Style & Skill Crush: ABCD

One of the fabulous women I got to meet last week was Amy of ABCD Design. I've been following her for ages so my crush is no surprise. I happened to mention to her how I was IN LOVE with the way she decorated her last apartment (she is on to bigger and better projects now) but couldn't find the photos. She graciously sent them on and just I had to share.

Amy is a woman of many talents but this place just blows me away. Those posters are making me swoon. I just love how she stacked them up the wall to really make the most of the high ceilings.


I love how her living room is accessorized enough to feel adorned but not so much it feels overwelmed with trinkets. I feel pretty confident about my own skills but I am seriously lacking when ti comes to finishing to a perfect polish as she has done.

Hello gorgeous, thy name is ABCD. Pop over her place to see all of her stylish musings.

More Brooklyn: Atlantic Antic

Anyone who lives in or around NYC knows that street fairs tend to be kind of a bust. I'm not sure why but 90% of them seem to be overrun by booths selling socks warehouse style or pushing shamwows. So when we decided to stop by the Atlantic Antic this weekend, my expectations were low. Much to my delight, this street fair was a winner. The food was varied and delish, loads of great booths selling interesting items, etc.

AtlanticAntic12
booth outside a vintage sign store - a big "S" came home with me
AtlanticAntic6AtlanticAntic18
S is for StreetFairAtlanticAntic10

Some great items for browsing and buying.
AtlanticAntic15AtlanticAntic3AtlanticAntic5AtlanticAntic21

Like these adorable robot organic tee's from Lunacy Design. I lusted after that antique embalming fluid bottle from a vendor selling glassware found in the ground but I was too cheap to spring for it. This pretty compact adorned with beautiful photography from Citybitz would make a great souvenir in my humble opinion. And these cool image transfer signs on wood - I wonder if there a simple way to DIY that?

Of course it wouldn't be a street fair without some stellar street food to feast on.
AtlanticAntic19AtlanticAntic14AtlanticAntic13AtlanticAntic7AtlanticAntic11

All in all, a winner. Big hand to whoever organizes this event. We'll be adding the Atlantic Antic one to our annual must do list.

Nate + Nest + Networking

If you want to read my thoughts on Nate Day and the wonderful Nest afterparty where I met so many other bloggers and one fabulous photographer, Trent Bailey, click here.

Trent Bailey Photography-The Nest 00007

Steal this Idea*: Punch Pop Art

Its Friday (yippee!) - time for another Steal this Idea* feature - a tiny little show of appreciation for a well executed tutorial. Today's know how comes from Londen of Sixty-Fifth Avenue.


I had somehow missed her beautiful blog in all my surfing. Thankfully she emailed me this simple, cheap but impactful decor idea that I think turned out just fabulous. The best part is - it requires almost no skill whatsoever - just a little bit of punching and glue and you're done.

Londen took a butterfly paper punch and some old magazines and made the most adorable wall art for her family. From this....

to this:

in just a few easy steps. Check out all the details at her blog.

What I really like about this project is that it can be reincarnated in a lot of different ways. This version is very cheery and kid friendly but with a different punch and some different ephmera, it could have a totally different vibe. It would also be a great way to reuse some sentimental scraps you've been keeping but don't need in their original form anymore like old cards or letters.

Has anyone done a similar project but with different results?

postscript:
*When I say steal, I really mean borrow nicely and give proper credit!
**If you have an idea/tutorial you would like me to consider for a feature, email me. I'd love to see!

Snap!

Remember when I mentioned I was participating in an A to Z photo challenge? Well it certainly has been a challenge to shoot a relevant image every day. I admit I've been a bit of a slacker in using my camera phone most of the time but at least Im still treading water. Not sure if I'll make it all the way to Z before being kicked out but Im trying.

In case you are curious...it 'P' day but I haven't taken that photo just yet. Here is 'A' to 'O'. Click on any of the images to see them larger.
SaltandPepper4B is for blue in unexpected placesC is for change you can believe in.D is for Diana, goddess of who knows what.E is for Empty (for now)F is for Fountains
G is for GruesomeH is for handsH is for Hurry HomeI is for ideaJ is for johnny pumpK is for Kansas
L is for LimesM is for MondayN is for NaughtyO is for Open Book
A is for Accident: B is for Blue; C is for Change You Can Believe in: D is for Diana Goddess of Who Knows What; E is for Empty (for now); F is for Fountains; G is for Gruesome; H is for Hands and Hurry Home; I is for Idea; J is for Johnny Pump; K is for Kansas; L is for Limes; M is for Monday Morning; N is for Naughty Chains & Leather; O is for Open

Now that I put these all up I realize I did H twice. Doh! You can probably also figure out which days I had more or less free time based on the quality of the photo. I'll let you be the judge. 11 more letters to go. Wish me luck!

Thanks to Miss B for creating and running Sovenir Foto School in the first place!

Shore files: Trunk Treat

So back to the shore for one final addition made this weekend. If you remember when I was asking for suggestions on how to make this room better, an anonymous commenter suggested getting an old trunk in here for character. Why didn't I think of that?

So I added 'vintage trunk' to my list of things I hope to find in my junking travels. Back home in Brooklyn I went to the Meeker Ave Flea to see if I could score one. They had a ton of them but they were all a couple of hundred bucks. So imagine my excitement when I saw this bad boy at one of my Red Bank, NJ haunts, Monmouth Antique Shoppes.

Trunk1

Not perfect - the handles are missing and it stinks like mothballs inside. But the size and price was right. Hello little mister - you are coming home with me!

Trunk4

Of course it needs to be styled a little bit better but it fits the space perfectly and will serve as some very handy storage space for extra beach things. I love its worn look.

BeachLivingRoomWindowsAfter3

Of course now that its there, I feel like the ladder style photo display thingy looks all wrong. Might have to move that elsewhere.

Ahoy Natey!

Along with a ton of other fabulous design bloggers, I'll be in the audience of the Nate Berkus Show. How excited am I? A lot.


Big thanks to the Moggit girls for getting us all invited, Camila for arranging an afterparty so I can actually talk to some of the people I've been stalking for the past 4 years and Chanee for putting together a photo guide so I can find them in the crowd. Awesome.

Check out my Nate love letter here.

Shore Files: Hang em High

So yea, summer is over. What better time to get a few of those projects crossed off down the shore? This weekend we took a trip down to spend time with friends, catch a few last rays before the cold gets here and hang curtains in the living room.

If you need a refresher, check out my full on cry for help for improving this room here.

ShoreLivingRoom2

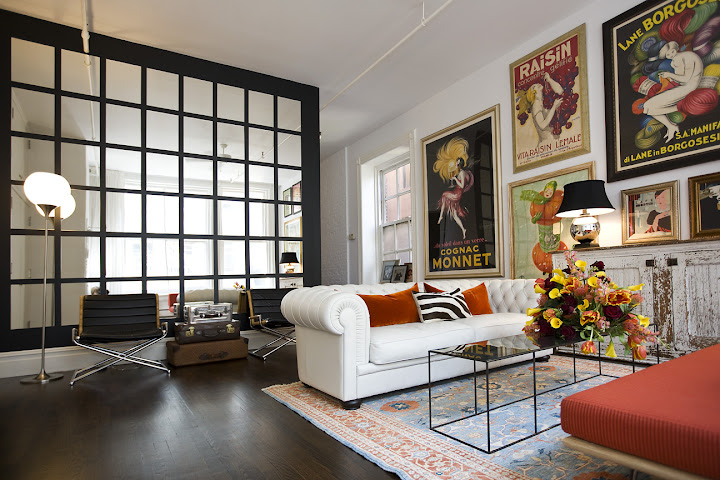
I was really torn about what to do with the windows. I was thinking of maybe sheers but I thought that might be a little bit too delicate for the look I had in mind. And then I found some grommet panels at Pottery Barn that I got fixated on. The problem is that it would have cost me about $500 for the drapes alone. Of course I wanted it to look right but I really didn't want to shell out a lot. So when I was pointed to some pretty similar looking grommet top sailcloth panels at a online store called Curtainworks, it was a done deal. I also ordered hanging rod from them as well.

BeachLivingRoomWindowsBefore
excuse the weird color - sun was setting and I just wanted to get a few quick snaps off while hanging

Out came the drill and a kitchen chair in place of a ladder. The rod was very simple to hang - a couple of screws for each bracket and it was in. (Of course I can't manage any project that requires holes in the wall without making a mistake - I eyeballed the width the first time and made it a bit too far out and the rod wasn't long enough to reach. Doh! I'll just have to fix that later with some spackle.)

BeachLivingRoomWindowsWithRod

After the rod was hung, I pulled out the panels. So glad I went with the grommet tops. They seem a bit more beachy than pole pockets or clip rings, don't you think?

BeachLivingRoomWindowsGrommetDetail

Honestly, it was one the quickest windows I've ever dressed - I don't know why I was putting it off so long. Its such a small thing but makes all the difference. (Even if its not really finished yet, its something, right?) Just having the drapes there balances the window side of the room with the couch side so much better.

BeachLivingRoomWindowsAfter1

Now for the specifics: The drapes are 95 inches long. I put up two panels on each side (a total of 4) to give it a little bit more of a full look. And of course I hung them high. If you are wondering about the quality of the drapes themselves - I'm pretty happy with them. They aren't lined so as you can see some light comes through which I expected. Because the description said it was made of "sailcloth" I sort of expected a much heavier weight material but other than that, everything is exactly as I expected. They are 100% cotton so they can be washed (although I hope I never need to). They came really quicky too. Overall, I'd definitely recommend them because of their prices and their options in the longer lengths (which seem impossible to find affordably)

I'm also thinking of adding a little embellishment to the drapes themselves. Maybe dying them gray (anyone know anything about dying panels??)? Or adding some ribbon like I did with the roman shade in my guest bedroom? Thoughts?

You'll notice I still have those nasty mini blinds up. That's because I haven't quite figured out what to do in the middle. Should I leave it bare and just close the curtains when I want privacy? Should I get some bamboo shades to add some more texture in here? Maybe I should get those transparent roller shade thingies? Or make my own roman shades in an interesting fabric? Still undecided. What do you think?

Steal this Idea*: Linen Pinboard

Its Friday (yippee!) - time for another Steal this Idea* feature - a tiny little show of appreciation for a well executed tutorial. Today's know how comes from Bethany of b*spoke.

You might remember her from her previous guest appearances here but I think this might be my fav.

Bethany started by recreating a pretty but pricey item from a store we all know and love - this linen pinboard. Not only did she she do that on the super cheap with minimal effort but she added her own little twist of personality to bring it to another level.

How can you not love that?? You can see the whole step by step on Bethany's blog here.

postscript:
*When I say steal, I really mean borrow nicely and give proper credit!
**If you have an idea/tutorial you would like me to consider for a feature, email me. I'd love to see!

Follow @ Instagram

© 2007-2020 Brooklyn Limestone. All Rights Reserved. Privacy Policy
Back to Top