Showing posts sorted by relevance for query master bathroom. Sort by date Show all posts

Master Bathroom Renovation: From Useless Space to Bathroom and Walk In Closets

When I was writing this 3-year recap of our home renovation, I realized I hadn't taken any photos of our master bathroom. Not that anything earth-shattering has happened in there since, but it just seemed wrong that it didn't have its own post. Particularly as it's one of my very favorite spots in the house.

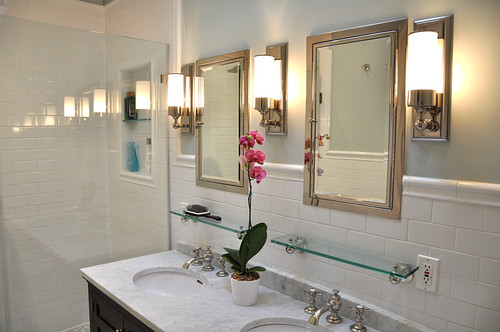
  View of Shower, vanity and mirrors after the Master bathroom Renovation - white subway tile up walls silver medicine cabinet mirrors with light sconces on each side and carrera marble countertops

Master Bathroom Before the Renovation

To refresh your memory, it didn't always look like this. It didn't even start out as a bathroom. We took this windowless room next to what became our master bedroom and turned it into a master bathroom and his & her closets.
  Room with no windows and closets before transformation into Master bathroom

Insert renovation montage music here.

  MasterbathroomMasterbedroomtoBackBedroom3DSC_0240DSC_0241DSC_0206DSC_0213 DSC_0161DSC_0208DSC_0315DSC_0021DSC_0020DSC_0022 DSC_0025DSC_0071Master BathroomMasterBathLeft2MasterBathLeftDSC_0013.JPG

Master Bathroom Renovation After

So why do I love it so much in here? First off the idea of having a master bathroom that only my husband and I use is pretty fabulous. It's our private sanctuary. (Neither of us had ever lived in a house with more than one bathroom before so this is the high life!) Another perk is having my very own medicine cabinet. All my lotions and potions just for moi.

Mirrored medicine cabinet above the sink with door open

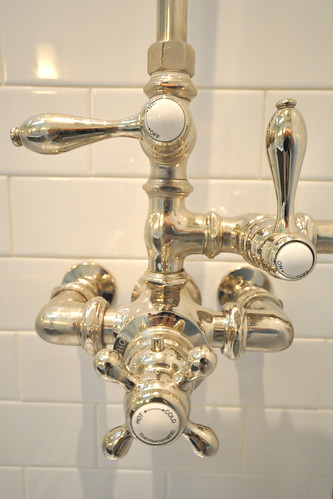
And if that weren't enough, I heart the thermostatic shower. No need to futz with the hot and cold until its just right. The temp is always perfect with just a quarter turn.

Thermostatic Shower hardware that has an updated antique look in Master Bathroom Renovation

Another detail I'm so happy we included in the master bathroom reno was adding a between the beams skylight right over the vanity. Its a little thing but it makes a big difference.

view from back of bathroom highlighting the sky lightView from doorway of bathroom highlighting the skylight

And finally, this little orchid we picked up at Ikea a few weeks ago. I have somehow managed to keep it alive thus far! No one is more amazed than me about that.

Pink Orchid from Ikea

Eventually, I'd like to add some art to the left-hand wall. But I haven't yet found something just right yet. Any ideas?

If you liked this master bathroom renovation be sure to check out my Black and White Bathroom Mini Makeover!

Welcome to the boudoir.

I don't generally swoon when I visit the beautiful sprawling suburban homes of our friends - I love living in Brooklyn, I love the character of older homes, suburban life is not for me. But when we were starting this and we were trying to put the best of modern life in the house, we couldn't help but think lustfully of those fabulous master suites with a huge bedroom area, giant walk in closets and en suite bathroom complete with giant soaking tub, separate shower, etc. We knew we couldn't do anything that grand - we simply didn't have the space. That didn't mean we couldn't do some scaled down version of the master suite.

We knew we wanted to take the largest bedroom as our own. The bedroom is hardly huge but by old house standards its pretty spacious. It also has the prettiest features on the top floor - the bay windows and a (non working) fireplace. While drawing up the plans, we had a choice about placement. We could take the larger middle, windowless room that was currently open to our bedroom (but could have been closed off to make a private room) or take the really tiny room next door. If we took the really tiny room next door, we could make better use of that space as a bathroom rather than a room so small its barely a bedroom. But if we did that, we would still have no closets in our room. Ultimately, we decided to sacrifice a normal sized middle room in exchange for both a master bathroom and two smallish but walk in closets.

Here is how the two rooms looke before the renovation got started.
MasterBedroomBefore copy

The bedroom room itself stayed mostly the same but needed a lot of clean-up. The ceilings were totally wrecked after years of water damage so that was one of the first things that had to go. After what was left of the ceiling came down, we used that opportunity to add some insulation. The area around the fireplace was in very bad shape and needed a lot of plaster repair. There was an extra door to the teeny tiny room next door. I never quite understood the point of that door but that had to go as well to make more wall space.

The once open space connecting the bedroom to the middle room became a short hallway with a closet on either side and the master bathroom at the end of the hall. Since space was tight in there, we used pocket doors.

For the bathroom, we opted for a shower stall rather than a tub. I originally specified a bench in there but ended up scraping it after feeling the contractors weren't able to do it without it looking somewhat different than I imagined. This left enough room for a double vanity which was much more of a practical luxury for us than a tub ever would be. Having my very own medicine cabinet and vanity to store all my junk seems absolutely like heaven.

This was a totally new bathroom of course so we could have went a lot of ways with the style. We ended up with a look thats a tad more contemporary than the other bathrooms in the house but also has some accents that recall the older style. Honed marble basket weave tile, an exposed shower fixture, inset medicine cabinets and the polished nickel finishes were all a modern twist on old. More in line with todays bath choices are the frameless shower doors (not pictured but in progress), vanity style, skylight and light fixtures.

Its hardly grand or spacious or perfect but its quite a luxury for us to have our very own bathroom. I love how its turned out.

Here are photos of the progress from when the work started in Sept to what it looked like at the end of the year.
MasterBedInProgress copy2

Not yet installed are the Elfa closet systems. I'm very excited about the prospect of a beautiful closet even though my wardrobe full of rags is hardly worthy. We were lucky that we ended needing to order them just as they had their 30% off sale. Even so, these aren't really cheap by any stretch of the imagination and they require some effort to get sorted but they are a lot cheaper than California Closets. Whether they are worth the price or they do the job or they look as good in place is yet to be seen. What I can say is that the people at the Container Store are quite helpful, they have quite a few nice options and their delivery fee to Brooklyn is only $35. More to come.

I'll post some semi-finished photos in the next paint color post. Its not quite finished but we're quite close in here. The whole space makes me feel a tiny bit more tranquil and there isn't even a bed in here yet. So I'd say it worked out pretty nicely.

Whadya wanna know? Renovation edition

So back to the Q&A. With the easy answers and travel related questions out of the way, the next big topic was about what else? The renovation. Or I should say the RENOVATION, b/c it was a big deal for us.
DSC_0117

Anonymous said... Now that you've been cleaning your bathrooms for about 2 years, which bathroom grout do you prefer? The master bath tinted green, the hex cararra grout or the grout in the bathroom with the black and white floor.
DSC_0024
Well I don't really have a preference really. Each bathroom got a different color to work with the tile and to suit its use so its hard to compare. I wouldn't put light grout in a bathroom on the first floor or one that gets used by kids because once it gets stained, its impossible to clean. The light green grout in our master bathroom doesn't see that much outside dirt b/c its off our master bedroom and we don't wear shoes in the house. So far, we've had no complaints about any of them.

Linda at Lime in the Coconut! said... Do you have a housekeeper...or do you beeswax and lavender your wood yourself?
Office Sanded
Ha! There is no beeswax or lavender in my house. Our floors are shiny thanks to the lung burning oil poly applied after the floors were sanded. The word housekeeper conjures up an image of a live-in domestic like Alice from the Brady Bunch. We do not have one of those. We do have someone who comes every 2 to 3 weeks for a few hours to scrub house. We do all the in between cleaning ourselves.

vanessa said... Don't your inlaws live in the basement, do you ever see them?

They live in the downstairs apartment. ( It is not the basement - its the first floor, completely above ground. ) And yes, we see them all the time.

PhillyLass said... How much experience with home maintenance did you have before buying the limestone? And how much have you done yourselves as opposed to delegated to contractors?Also, do you have any advice on how to choose contractors? And how to manage a major renovation?
DSC_0241
Before this house, we lived in our last house for about 10 years. We did some renovation there including a new kitchen, new floors, new walls, finishing a basement, etc. So we were fairly schooled in home maintenance and a little knowledgeable about renovation. For that house we did everything slowly over the ten year period with some DIY. For the limestone, the house was in much worse shape (no heat, running water, holes in the roof, missing windows, etc) so we didn't have the luxury of doing it slowly over time. It all had to get done at once to make it livable so we hired a team of people to do all the work. (We did a few projects ourselves while we were waiting to get the big project started but 99% of the work was done by pros) Just supervising them and doing all the other things involved in doing a renovation of this size was a job in of itself. As for how to choose contractors and how to manage a renovation - its far too much to really share here. I don't have any secret tips - all the things you've heard before really. I think the most important thing you can do is to learn about the various trades so you know the terminology and can speak intelligently to your contractors. Otherwise, they are much more likely to screw you. And there is a certain amount of luck involved as well. Sometimes you do everything right and it goes wrong anyway. Thankfully we did our research, put in a lot of time and and we got lucky too.

Eliza said... You obviously tried to restore original pieces of the house as you renovated. But you also made some significant changes to the floor plan, and moved pieces like the mirror, and got rid of a lovely looking built in. How did you decide what you wanted to save? Do you regret changing/removing certain pieces? Conversely, did you devote lots of resources to restoring specific areas without much to show for the added effort in the end?
PaintColorSelections
We bought an old house because we really appreciated the charms of it. That said, we knew right at the outset that we were not creating a museum. We had to live here and it if something was original but impractical, I didn't have much reservation about changing it. That's why we moved the mirror to the dining room, got rid of the built in in place of a door, etc. Anything else we liked, could practically save or restore or was original to the house and was cheaper to keep, we kept. Those decisions were very obvious and easy to us. We didn't devote a lot of resources to these things really - the bulk of the renovation costs went into things that had nothing to do with those kind of items. The little money we spent on keeping certain things or restoring them was usually offset by the savings of not having to buy new. No regrets at all about those changes - they just made sense.


Alicia said...Did you have challenges staying within budget in your renovation? How did you keep costs under control? Did you get everything done that you wanted to within budget? Do you have any big projects left? [Money is a rather taboo subject, but I resent all the shelter media that portray homeowners with limitless funds and no mention of the costs of such improvements.]
LadderCaution
There are always challenges around budget. In our case, we knew renovating our house was going to cost a lot and we did our best to prepare for it. I think the best thing anyone can do is to set a realistic budget from the outset. If you expect to do $100 worth of work for $5, you are setting yourself up for major failure. Right at the beginning we sat down and wrote out a fairly detailed budget and allocated it out to various things. We factored in some extra money just in case some other unexpected things popped up. We had some optional projects we could have cut if things got too pricey. It helped to be very prepared but also a little flexible. Having some experience renovating helped us there but so did consulting with a few contractors. If didn't have enough money to complete the project in a way we thought made sense, we wouldn't have bought the house in the first place. While there are ways to economize, some things just cost a certain amount of money and there isn't much way around it. Most of the work we did was not optional or cosmetic so we had to be fully committed to completing the job if it was going to work.

We don't have any big projects left. Certain things we cut from the list because we wanted to stay within the budget. Things like stripping more of the woodwork was just too expensive and not worth it in my opinion. My husband wanted to have speakers installed in some of the rooms but we cut that because it was too pricey. But now that we're done with the work, I don't think we'll ever bother going back to those projects because they weren't that important to begin with.

littlealexa said... What color are your window frames exterior and interior (black or brown)? Are they new? If so what material (wood or vinyl)?
DSC_0318
The windows themselves are dark brown (they look almost black) vinyl. I would have preferred pure black but they were way more expensive so not worth it. The frames are made of wood and original to the house. We could have replaced the frames with vinyl but I thought the wood looked nicer. It means we'll have to paint them every few years so who knows if I made the right decision but I like how it looks now.

Lovely Little Nest said... Why was your home in such bad shape when you bought it? Was it formerly a bad neighborhood?

Our neighborhood was never bad. It was always a safe, middle class kind of area - a wonderful place to live. As with everyplace in NYC, the prices have gone up a lot in my lifetime and there are lot more hipsters in the area then there were. But while we are very close to a very trendy area, we actually live in a tiny quiet off shoot that is much less posh but a very nice place to live. The house was in terrible shape because the guy that lived here before was obviously a little bit disturbed. He owned the house for decades and just let it fall apart over time. He left the house to the next door neighbor and we purchased it from her.


Megan said... I believe the top floor was being used as a rental, and the bottom two floors were used as the main house? So how do/did all those floors connect? Did the renter have to go through the main house to get upstairs? And do your in-laws have a way of getting upstairs without having to go outside?
DSC_0339
When we bough the house, no one was living here. The guy that owned the house for ages before didn't have any tenants. But yes, it was set up that way. The way it was set up had the parlor floor hallways as common space - the tenant would enter through the main door up the stairs and then walk up another flight to their apartment. The owners had the garden floor and the parlor floor. But yea, the set up is very weird if you ask me.

Yes, my in laws can come up my stairs anytime they want and vice versa. Their hallway is common area and we don't lock the doors between our apartments. But that is not an issue as they pretty much keep to themselves and only come up when invited.

Mrs. D said... Here's my question: Do you and Mr. Limestone ever bump heads over renovations or decor choices? What's the best design compromise you've made together?
DSC_0249
Did we ever? We did all the time. If I said red, he said black. We just have that kind of relationship where we often don't agree. Normally its fine but during the renovation when we were making so many decisions and we were stressed about money - it really took its toll on our relationship. I won't lie in that we had a rough time of it but we made it through in one piece.

We pretty much compromised on everything since he usually has a different idea than I do. I can't think of any one great thing. Maybe he wants to chime in on this one?


AlysonO said... Was there ever a point where you just felt like, "THAT'S IT, I GIVE UP!" and what happened/what did you do to keep on keepin' on??
Parlor Living Room sconce
Pretty much everyday. It just wasn't an option. We had sold our other house and had most of our money invested in this house. We couldn't just chuck it all without being homeless and poor. So no matter how bad it was, we knew we had to get through it. Not having an alternative certainly helped keep us focused.

Ok, I think those are all the house questions. If you have any others, feel free to give a shout.

The final renovation before & after?

Hmm..could it be that this is the final renovation update? Hard to believe. Have I missed anything you want to see? Of course, there is a lot more in the decor category but putting the renovation part behind me seems almost surreal.

Unfortuntely, I didn't leave a very exciting one for last. You've already seen this one in other posts (power of paint & flush me down) guest bath update And on top of that, there isn't that much of a change in here. But just for completion sake, I figured I'd do a post dedicated to the upstairs/guest/hallway bathroom. (We haven't really settled on what we call it yet)

This is the upstairs bathroom as we found it when we bought the house
Upstairs_Bathroom
The sink that got resprayed and reinstalled in its original location
Topfloor_HallBathSink
And the tub that got moved downstairs, resprayed and painted silver for the parlor bath
Upstairs_BathroomClawfoot2

If it were possible, we would have loved to keep most everything in here as is and just clean it up. But that wasn't really an option as we had to replace all the plumbing and electrical. We did save as many of the wall tiles as we could and reused them in our kitchen backsplash. We were also able to keep the sink here and repurpose the clawfoot downstairs. I think we did the best we could in terms of re-using what we had in a practical way.

This bathroom is the smallest and will likely be the most abused in terms of future guests and children. So as a trade off to some of the splurges we made in the other bathrooms, we went with a low-key (read: cheap) plan in here. The wall tiles are the same stock ceramic subway tiles & trim we used in our master bathroom. The floor tiles are an unglazed ceramic black & white hex that seemed vintage without being expensive. (I had originally wanted to do a pattern that included square and hex tiles in a custom pattern for the little floor but after seeing some of the early issues we had with our contractors, I decided to keep it simple and get the black and white hex.) The toilet is a Toto Promenade, the faucet are Kohler Pillar Taps and the tub is a Kohler run of the mill cast iron.

As you might see from the photos below, we had to give up the window in here in exchange for a place for other ducts, vents, and piping. Sad to see it go but it was worth it to not have soffits in my opinion.

The one thing we did in here that I would call a splurge was adding a skylight. Its a small thing really but it makes this very small room seem a lot more spacious when there is some natural light filtering in from above.

Some in progress photos
2ndfloorbathDSC_0016DSC_0015DSC_0014DSC_0238DSC_0287DSC_0202DSC_0157DSC_0160DSC_0024DSC_0092DSC_0093Second Floor Hallway BathroomDSC_0325.JPGHall Bathroom RepaintedDSC_0124.JPG

And without further ado, the offcial "after" photo
2nd floor Hall Bath

I don't think Ill add much more in here except for a little care package when we have the random overnight guest. Honestly, I still don't love the paint color but Im trying to make it work with the striped shower curtain from Target and keeping everything else pretty bare. Other than that, its a cute little bathroom that gives a nod to the vintage style I really love without being impractical.

Follow @ Instagram

© 2007-2020 Brooklyn Limestone. All Rights Reserved. Privacy Policy
Back to Top