Showing posts with label bathroom. Show all posts

DIY NETFLIX + CHILL BATH CADDY

DIY the bath caddy of your dreams using a piece of scrapwood using this easy tutorial. 


I know all you hopeless romantics out there are looking for the perfect handmade Valentine for your schmoopy.  Well move along!  This DIY homemade gift (which is perfectly acceptable to make for yourself!) is for all the lovebirds who just want a few minutes alone in the bathtub with their favorite tv show and beverage.  Is there a bah humbug for Valentine's Day?  This bath caddy is the embodiment of it.  This is 'Netflix & Chill' for grown-ups. Can I get an "Amen"?

This project is super simple and if you happen to have a router (or can borrow one for a few minutes) you are set.  Simply cut a board to the width of your tub, mark out the appropriate size divots for your smart device, votive candles and wine glass of choice.  The first step was to use a corner round bit to finish up the rough edge of the board. I used a straight bit to cut out the slot for the iphone, votives and wine glass. Voila!  I think it would look even better stained but I was too impatient so I took the easy route and got the bubbles going.


Happy Valentines Day lovers and loners alike!


Black and White Bathroom Mini Makeover Complete

A few months ago, I shared how much I didn't love my guest bathroom. It was in that weird decor limbo where it was good enough not to be totally offensive so I've lived with not liking it for 8 years but your comments gave me the impetus to just make a change. And oh boy do I love it!


I went bold with black paint - what I had wanted to do all those years ago but chickened out with an untested grey that ended up looking like poop brown. See, that is what I get for not following my own advice about testing before painting!!  To quickly cover up that mistake I used some blue green paint I had hanging around and closed the door to this room.

As you can see, this bathroom is small so it didn't take much to make a big impact.  First the paint - Glidden Diamond in Onyx Black - was exactly what this space needed.  It really makes the white tiles and fixtures pop and brings out the black in the vintage style hex flooring.  I also changed the light fixture, shelving and linens but that was about it.  It was an easy makeover with a big result.  Now I just love walking past it!


Black and white whimsy bathroom makeover

Black and white whimsy bathroom www.brooklynlimestone.com
sources: mr owl / squirrel cage fixture / ceramic jar / bathmat / floating shelf 


Remember the unloved bathroom? Well it's getting some attention in the form of a mini makeover. New paint and accessories to update this space. All of the fixtures will stay except for the shelf above the toilet and light fixture. I took your advice about not worrying about towel storage in here and decided on this fun Owl print. A little bit of whimsy without going all crazy in the kids bathroom department.

Thoughts?  I haven't actually purchased anything yet (painting first) so let the suggestions fly!

The unloved bathroom - makeover or move on?

Unless you have been reading for a long time, you probably have never seen this photo.  That's because this is the most unloved room in our house.  It's a guest bathroom - the one that got the least amount of money and attention during the gut renovation. I know we are incredibly lucky to have such a luxury as an extra bathroom but when we were at the tail end of the renovation that seemed endless and our pockets felt extra light, I just sort of gave up and did what was good enough at the time.


So while I don't love it, I know it could be a lot worse.  This was the before.  And yea, it looked much more disgusting in the flesh.  (Thanks to the former owners for leaving me that hot plate though!)

Check out a recap of this room's renovation here.

But I would love to give this space a refresh.  Specifically paint, new accessories and new lighting.  I just need some motivation to get me there because its easy to just sort of let this room languish since it's not offensively ugly - its just bleh.  I have guests coming in April - perhaps just the motivation I need?

What do you think?

Blue in the Bathroom

Over the holiday break, I did get one home related task accomplished. I've been meaning to add some little touches to the parlor bathroom for ages and I finally had a chance to get around to it.

If you want a refresher of what this room looked like before we renovated, check it out here. Last year I finally added some of my photos over the tub and I was really happy with that how looked but it still needed a little more oomph.

After finding this fun patterned rug at Target, I picked up some candles, a cheap tub caddy, and mini vases to complete the look.

ParlorBath1ParlorBath10ParlorBath2ParlorBath5ParlorBath6ParlorBath7

Nothing earth shattering but it looks a lot more finished to my eye now, not to mention the tub caddy being really useful when taking a bath. I really like how it looks a little more lived in now. What do you think?

Room Redos Recap

There are few things that thrill me more than a proper room redo (also known to me as house porn). Not the kind you see in glossy mags that are all impossibly perfect - filled with the highest end furniture, designed by a famous decorator and fueled by a vault full of cash - the kind that "real" people create in their own homes. The rooms that you can tell just by looking at it how much time and effort and care was put into every decision until it all comes together.

PaintColorSelections

So why am I bringing this up? Because next week I have a handful of room redo's brought to you by some wonderful guest bloggers. I can't help but be excited to share these but until then I thought its only fair I do a cliff notes version of my own room makeovers (apologies to the regular readers - I hope this isn't too boring for you). And while they are not perfect or even finished in some cases, I like to think they make some fairly dramatic before and afters. (mostly because the house was in such terrible shape to start out with but I'll take the credit anyway.)

Starting off with the main floor:

Easily the most startling before picture of all time, the parlor bathroom. Parlor Bathroom BeforeParlor Bathroom
Long story short: It was pink and gross and smudged with mysterious brown stains. We gutted it and made it slightly smaller. We moved the clawfoot tub from the upstairs bath down here. Design choices inspired by the marble used in new york city institutions, I hung some of my favorite photos of Brooklyn in here.

Cliched but true, the most used room the house, the kitchen.
Kitchen BeforeKitchenatAngle
Long story short: Used to be a tiny water damaged bedroom. Blew out the wall and stole a few feet from the pink bathroom next door. Didn't try too match the original floors in the dining room next door - used a horizontal skinny plank instead. Maximized the vertical space to make up for the lack of square footage. White and gray and blue all over. Mixing metals = old world mets new.

Considerably less dramatic and still very much in progress considering I still haven't figured out a solution to the table dilemna, the dining room.
Dining Room BeforeDiningRoom4
Long story short: Already a great room that just needed some tweaks. We moved the pier mirror from the living room in here for added drama. Found and refurbished vintage light fixtures, a repro ceiling medallion, refnished floors and shades of creamy white make a nice backdrop for whatever get together we are hosting.

And the much discussed 'i admit, i love tv' living room.
Living Room BeforeDSC_0390
Long story short: Yes, I love tv. So sue me. I watch tv every single day so hiding the set from myself didn't make sense (although I agree the room would be prettier with a painting, just inpractical). Soothing tones of gold and grey (and mixed metals). It still needs a few finishing touches but I'll call it finished for now.

I'll recap the upstairs tomorrow.

Do you have a room makeover you'd like to share? I'd love to see it!

Master Bathroom Renovation: From Useless Space to Bathroom and Walk In Closets

When I was writing this 3-year recap of our home renovation, I realized I hadn't taken any photos of our master bathroom. Not that anything earth-shattering has happened in there since, but it just seemed wrong that it didn't have its own post. Particularly as it's one of my very favorite spots in the house.

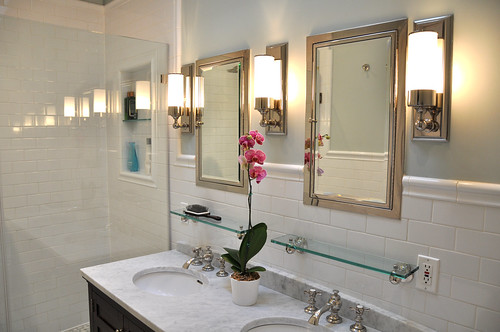
  View of Shower, vanity and mirrors after the Master bathroom Renovation - white subway tile up walls silver medicine cabinet mirrors with light sconces on each side and carrera marble countertops

Master Bathroom Before the Renovation

To refresh your memory, it didn't always look like this. It didn't even start out as a bathroom. We took this windowless room next to what became our master bedroom and turned it into a master bathroom and his & her closets.
  Room with no windows and closets before transformation into Master bathroom

Insert renovation montage music here.

  MasterbathroomMasterbedroomtoBackBedroom3DSC_0240DSC_0241DSC_0206DSC_0213 DSC_0161DSC_0208DSC_0315DSC_0021DSC_0020DSC_0022 DSC_0025DSC_0071Master BathroomMasterBathLeft2MasterBathLeftDSC_0013.JPG

Master Bathroom Renovation After

So why do I love it so much in here? First off the idea of having a master bathroom that only my husband and I use is pretty fabulous. It's our private sanctuary. (Neither of us had ever lived in a house with more than one bathroom before so this is the high life!) Another perk is having my very own medicine cabinet. All my lotions and potions just for moi.

Mirrored medicine cabinet above the sink with door open

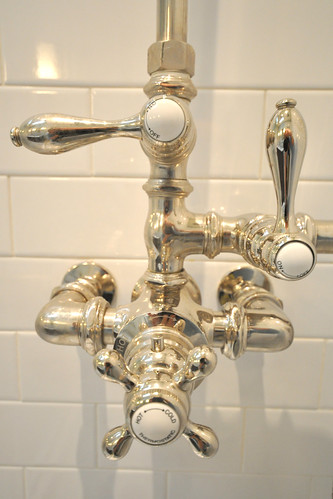
And if that weren't enough, I heart the thermostatic shower. No need to futz with the hot and cold until its just right. The temp is always perfect with just a quarter turn.

Thermostatic Shower hardware that has an updated antique look in Master Bathroom Renovation

Another detail I'm so happy we included in the master bathroom reno was adding a between the beams skylight right over the vanity. Its a little thing but it makes a big difference.

view from back of bathroom highlighting the sky lightView from doorway of bathroom highlighting the skylight

And finally, this little orchid we picked up at Ikea a few weeks ago. I have somehow managed to keep it alive thus far! No one is more amazed than me about that.

Pink Orchid from Ikea

Eventually, I'd like to add some art to the left-hand wall. But I haven't yet found something just right yet. Any ideas?

If you liked this master bathroom renovation be sure to check out my Black and White Bathroom Mini Makeover!

A little more Brooklyn.

Thanks so much for your comments on my photographs. I'm glad you enjoyed taking a walk 'round the nabe. On to a couple more photos if you don't mind.
ManhattanBridgeontheROcks
On Sunday we went a little bit farther out of our way to DUMBO (down under the manhattan bridge overpass). Its got a very unique vibe as part old industrialized area, part hipster mecca, part tourist trap. However you describe it, its a great spot for photography.
BattleofBrooklynSign
Unfortunetely for us, the weather didn't cooperate so I only got a very short stroll before it started to pour and the camera got put away. Even still, I think I got some photos that might work for the bathroom. Just not sure if its too much of the same. ManhattanBridgeThruTheViewfinder

ReflectioninPuddleManhattanBridge
(I really like this shot but its the wrong orientation for the frame. To use it I have to cut off a lot. )

BrooklynBridgeThruTheViewfinder2
BrooklynBridgeThruTheViewfinder
ManhattanBridgeDUMBO

What do you think? Frame these are keep trolling for better?
BathroomMockup2web

Follow @ Instagram

© 2007-2020 Brooklyn Limestone. All Rights Reserved. Privacy Policy
Back to Top