

I think you've had enough kitchens for now so its time to turn to the other wet room in the house, the bathroom. Jeannine (can you believe it, she doesn't have a blog? collective boos are heard around the blogsphere!) shared her bathroom remodel with me. Of course I love it but I'm sort of biased as she and I made some of the same choices.
Damn, I can certainly go on and on even when I'm not here! Take it away Jeannine...
My announcement was met with disingenuous enthusiasm. I was moving to Virginia and I was moving into new construction.
I, and all my friends, happened to live in pre-war buildings in Boston. New construction was for the suburbs; people who commuted to work on the Mass Pike. My new construction condo in Charlottesville, however, was smack in the middle of downtown, halfway between the University of Virginia and the pedestrian-only shopping district called the Downtown Mall.
I left my Boston apartment’s 14 food ceilings, picture frame moldings, and radiators for 900 square feet of beige. The only things in my new home that weren’t beige were the appliances (builder’s grade stainless steel) and the countertops (gray, solid surface). For the last two years, I’ve been trying to make my condo look less like the other 200+ in my complex.
I stumbled upon Mrs. Limestone’s blog when I was trying to find pictures of the paint I wanted to use in my bathroom, so that seems like a good room to share for a “before and after” post on her blog.
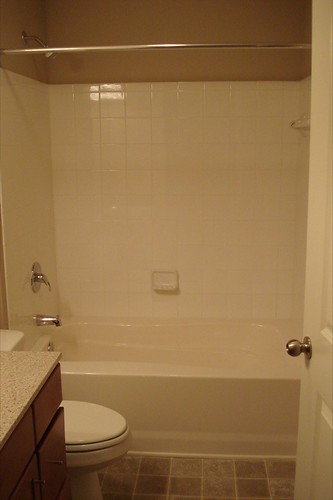
Here’s the dreary, sadly beige before:

Notice that the tile stops below the showerhead so the builder would save $4.72 on tile. In addition to that shortcut, the builder opted not to put anything waterproof behind those tiles. Had the grout or caulk failed, the plain drywall behind the tile would have been a mess! The flooring was linoleum sheeting and the fixtures were all builder grade.
Notice that the tile stops below the showerhead so the builder would save $4.72 on tile. In addition to that shortcut, the builder opted not to put anything waterproof behind those tiles. Had the grout or caulk failed, the plain drywall behind the tile would have been a mess! The flooring was linoleum sheeting and the fixtures were all builder grade.
I decided that I wanted a classic bathroom that was reminiscent of the old bathrooms I had back in New England, but also wanted some contemporary touches. Resale was a concern, as was over improvement. When I fell in love with some Thasos basket weave, I realized that using tile that cost $50 per square foot was the best use of my budget and was a bit over the top for a modest condo in a college town.
After seeing a kitchen with marble subway tile, I became fixated on having it. I wound up finding a great deal online and buying all the tile from a seller on ebay. I got carrera subway, basket weave, baseboard, and chair rail for the same cost that it would have cost me to get just the subway and basket weave from the local tile shop.
Being a self described lighting nerd, I was tempted to go over the top on a chandelier, but would up getting one that was appropriate for the small room on eBay. I splurged a little bit on the vanity light, which is from Bellacor. I conquered my fear of electrical work and installed both (okay, my boyfriend helped by holding them up).
Accessorizing this room began my love/hate relationship with Restoration Hardware. The mirror, towel ring, wastebasket, and countertop accessories are from RH’s Dillon line. Oddly, certain Dillon items are sold online only and other Dillon items are sold in stores only. So, the finishing touches had me going back and forth between the store and home to track everything down. Also, when I got the mirror hung, I realized that the finish was flaking off, so I called for a replacement. The operator told me that the entire line was discontinued and they had six mirrors left. Of course, the entire line is still in the catalog and on the website.
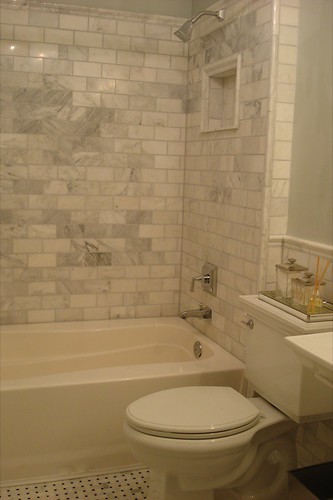
Behold the finished product:
Behold the finished product:

The finishing touches required a couple DIY projects. I had seen some beautiful candle sleeves online, but between their cost ($20+ per pair) and the fact that the local store that carried them was only open from 9-5 (who has such limited hours these days?).
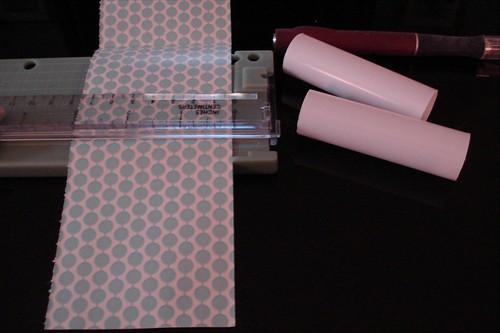 I bought some pretty paper at the Caspari boutique (for some reason, Charlottesville has the only one), then cut it down to strips that could wrap around the cheap, plastic candle sleeves that were already on the chandelier in the bathroom. A quick swab with a glue stick and the candle sleeves were done! In less than five minutes at my craft table (my coffee table with a magazine on top for protection), I think I did a pretty good job!
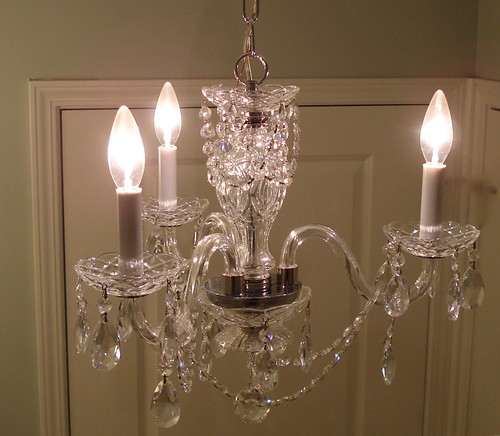

Wow. That is my dream bathroom. You did a fabulous job!
ReplyDeleteI am head over heels with the marble subway tile! And I love the light fixture! It came out wonderful, I love it.
ReplyDeleteThanks!
ReplyDeleteI have toyed with starting a personal decorating blog, but am worried that it would become too much of a chore because blogging is part of my job. For now, I post on a few message boards and blogs like this one.
Looks like the final chandelier picture didn't come through. You can see it on my Flickr account.
If you'd like to see the "play-by-play" of the entire process, I wrote about it a message board called The Design Board. You have to register to see the thread, but here is a link to it.
And here is the Flickr photo set that documents the entire process.
Wow, I am in love with everything in your bathroom! Thanks for sharing such a fantastic transformation.
ReplyDeleteGeez, I just read the whole entry and I have to laugh at my spelling and grammar errors. I'm so sorry for the errors...I'm burning the candle at both ends these days and dashed the entry off late, one Sunday night.
ReplyDeletePhenomenal! I'm freaking because this is almost exactly the bathroom I have designed for our remodel.
ReplyDeleteWould you mind telling me what vendor on Ebay you sourced the tile from? I've been looking for the exact same for a few months now.
Again, absolutely fantastic job.
The ebay vendor was called Marble Outlet and they were located in Canada, I believe. I think I dealt with a man named Jun. I emailed a few people who had won auctions for the same tile in the past and all replied with positive reviews.
ReplyDeleteI'm pretty sure the tile is Chinese, but so was the tile I was seeing at some of the tile shops, so I was okay with that. Putting more expensive tile in a small condo wouldn't have made too, too much sense to me.
One of the previous buyers told me that packaging would make me smile and it did...each box was wrapped in bubble wrap, then nestled in another box with newspaper and plastic wrap packed around it. My worries about the tiles being damaged en route to Virgina were unfounded and while there were a few chipped tiles here and there, nothing was truly broken.
I love, love, love the basketweave carrera floor.I wanted that for our bath but was talked out of it since we have two boys(who miss the toilet half of the time) and it stains easily. Beautiful bathroom!!
ReplyDeletePaper, I have to admit that I bought one of those hiddeous bath mats that "hugs" the toilet. The Thomas O'Brien line at Target has one that's not as 70s as most of them look (squared off, thick, loop pile instead of fuzzy).
ReplyDeleteIt comes up when I have guests over.
And...I am now officially obsessed with basket weave tile with marble subway tile.
ReplyDeleteGorgeous!
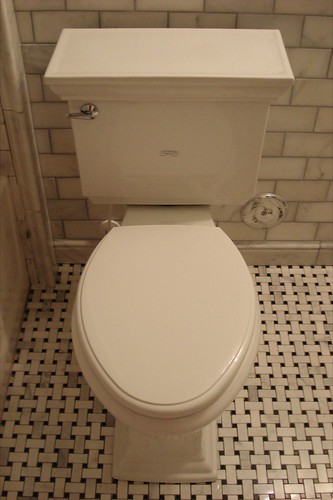
I just realized that the picture with the toilet in it was taken before the floor was grouted. Here's a picture that was taken with grout.
ReplyDeleteThe grout was Laticrete's Silver Shadown.
I love love love the remodel! We have a townhouse, this would look just right in our tiny little bath! I particularly fell in love with the marble subway tile! I think that it is the only subway tile I have ever liked!
ReplyDeleteMy only concern witht he sink is it does not have anys torage underneath. That might be a delabreaker for me, so I might have to hold on to our ugly builders standard vanity. I could paint the cabinet white to make it little bit less ugly I guess.
Do you mind sharing the total dollar amount you spent? Although our bathroom is also very tiny, we would still end up paying more than you because we are not DIYers.
Hi! Lovely job! I would like to know the paint color that you chose. We're getting ready to remodel the master bathroom in a similar fashion as yours!
ReplyDeleteRegarding the storage issue, the bathroom has a fairly large linen closet in it, which you can't see in the pictures. If you were standing at the sink, it would be behind you. I guess I'm a little anal and I like everything tucked away, out of sight, so everything is in the closet when not in use.
ReplyDeleteI'm guessing a little bit, but $3,000 on materials and $2,500 on labor sounds about right. My labor costs were low because my tile guy is a friend of my boyfriend's. We're also into the music scene here (tile guy and plumber are musicians, my boyfriend is a radio DJ, and I help produce his show) and I think we all like to take care of each other.
What's more, this is a small, southern city. I imagine my budget would have been at least twice as big if I did the same project back in Boston.
Rachel, the paint color is Benjamin Moore's Quiet Moments and I used Aura paint in an eggshell finish.
I am speechless. (!!!!!) Fantastic job, Jeannine!
ReplyDeleteDon't know what I love more: the marble tile, the chandelier or the basketweave tile.
We just got done w/ a bathroom remod ourselves. Now I wish I had seen yours beforehand (we have the exact same layout). WOW!!
Oh, one more question! Where did you happen to find the toilet tank lid? It would fit perfectly in my guest bath!
ReplyDeleteThanks, Freckles. Your blog has provided me with plenty of inspiration and I think your bathroom is just great! I have actually considered putting three towel hooks on the blank wall opposite the toilet. I'm not sure if having three towels hanging on the wall all the time is too casual for this space. Hm...
ReplyDeleteI'm also still trying to figure out what to do about a shower curtain. Currently, I have a white, diamond mattelasse curtain, but it's VERY white against the tub and tile. I've considered getting one that matches the walls (RH's Silver Sage is a pretty good match), but I'm not sure about using a curtain with color.
Rachel, the toilet itself is Kohler's Memoirs Stately toilet. The mirrored tray on top is from Restoration Hardware. It's one of the items that you can't fine online. The store only had one when I found it there.
Jeannine, your bathroom is fantastic! Love all of the details!
ReplyDeleteI love it! I love the tile on the walls and floor!
ReplyDeleteThanks so much for these nice comments! I still have a few things left to consider this done, so this is great encouragement for me to tend to those details.
ReplyDeleteThis is a very classy and classic bath. I have never seen tile quite like this, but you can bet I am going to start looking!
ReplyDeleteScribbler
I am in love! That bathroom is perfect, every detail is beautiful! I wish so bad I didnt live in a rental because i would go home from work today and start ripping down the tile so I can do something like this- I just LOVE IT!!
ReplyDeleteOh Linda, I know how you feel. When I lived in Boston (I went from Brighton to Newton to Coolidge Corner), owning a place in the city was just a dream for me (single, working in education). My condo down here in Charlottesville is the first piece of real estate I've owned.
ReplyDeleteSuch a stylish bathroom! And kudos on the diy skills! I'm looking for great before/after photos for a segment on a show I work for. The show is called Bathtastic! on DIY Network. We would send you a DVD of the show once it airs.
ReplyDeleteIf you are at all interested, send me an email.
Thanks, either way - great job!
bathcasting@edelmanmn.com
Gorgeous! The tile...I could go on and on, beautiful! I also love how you mixed the angular fixtures with the very feminine chandelier, creates a wonderful balance. Enjoy!
ReplyDeleteJanell
I will be dreaming about that floor tonight...
ReplyDeleteFABULOUS!
Every room needs a chandelier. It's like the period at the end of a sentence.
ReplyDeleteI LOVE the chandelier. Is it a special chandelier specifically for a bathroom and may I ask where you purchased it? What a beautiful job you did....absolutely beautiful...I am so envious!
ReplyDeleteI love it - absolutely gorgeous. God, builder's staging beige is so banal, I hate it!
ReplyDeleteI too lived in C-ville for 11 years and in the 'burbs of Boston before that. My brother has that same basketweave floor and I trip out over it every time I visit - it's so beautiful and has such a great, classic, vintage look.
I am picturing that your condo must be right by the Amtrack station? I haven't lived in Cville since 2001 and that Star Hill area development was all new to me. What a fantastic location - walking distance to the best margaritas in town at Continental Divide!
Jeep, the chandelier was just an ebay purchase...nothing special. I actually wish I had gone for the four light fixture. I had thought it would be too big.
ReplyDeleteBubb, how funny! You have the right complex in mind. We are Divide regulars, too! BTW, He-who-must-not-be-named has since sold the complex and even Starr Hill! He has added a bunch of Five Guys to his restaurant empire. :)
That tile is absolutely to die for-I am head over heels in love! Fabu chandelier too.
ReplyDeleteWonderful bathroom remodeling. It's remarquable how adding some drama in the bathroom makes such a change in our every day surroundings.
ReplyDeleteOMG, your bathroom takes my breath away. I'm looking to do my bathroom and had a question. On flickr you mentioned that you had trouble with marble tile with unwanted yellow tint, is this the same from the ebay buyer? I just want to know who to avoid and who to purchase from.
ReplyDeleteAlso, what finish is your tile you used on the floor and walls?