Showing posts with label guest blogger. Show all posts

Take It Outside with Linda Facci | Beautiful Blogger Backyard Series

Have you been inspired by all the outdoor goodness in beautiful backyard series?  I hope so!  I thought it would be perfect to wrap up with a space that just calls for the weekend!  This stone cottage from Facci Designs makes me want to drive up to the Catskills and take a long weekend right here.


Aside from that adorable stone path and water feature you can see in this photo, her backyard features a gazebo and a hammock.  This is summer!  Hop over to Facci Designs to see the full before and after.

Phew!  That's the lot of them.  I hope you've loved the series.  Thank you so much to everyone who shared their outdoor spaces.  In case you missed any, click over for a peek.

Eclectically Vintage crushed it with great upcycled projects to decorate
DIY Playbook knocked not one but two patios out of the park with style
That’s My Letter takes DIY to a whole new level in her gorgeous home
Life on Virginia Street has built a resort like backyard that demands a staycation
I shared my own backyard which is very much a work in progress

Primitive + Proper has a chicken coop. Need I say more?
Migonis Home brings simple classic style back in her inviting seating areas
House 214 Design has a green thumb to spare with her lush patio
Rambling Renovators relaxes on her stylish porch 


Take it Outside with Rambling Renovators | Beautiful Blogger Backyard Series

With just 2 more days to go in the #beautifulbloggerbackyard series, we are switching it up and moving to the front of the house with Rambling Renovators.  She is sharing 2 beautiful porches to inspire a little love for the front of our houses as well.  (Insert my porch envy here!)


Just look at this sneak peek - cane back chairs and a buffalo plaid rug?  This would be beautiful indoors or out.  Hop over to Rambling Renovators to see much more.

See you back tomorrow for the final post in this series!
SaveSave

Take It Outside with House 214 Design | Beautiful Blogger Backyard Series

Today's beautiful backyard comes from House 214 Design - I first discovered her beautiful home on instagram and then turned to her blog to see more.  She has amazing style so I wanted to know what her outdoor space looked like too!


As you can see, she has a green thumb (something this black thumb envies hard!) and has a great point on making the outdoors work with your indoors.
I love the time of year when the cooler days slowly turn into ones filled with open windows and dinners outside on the patio. The outside becomes another place to live and another place to feel home. We have a busy household with three children. The last thing I want to create in our home is unnecessary chaos. I choose design elements that are consistent both inside and outside our home to create a calming and predictable setting.  When I stay consistent with these elements, my home doesn’t feel disjointed when moving from room to room or inside to outside. It actually creates the opposite outcome and everything flows and connects.

Well isn't that smart?  I honestly never even think about my indoor style matching my outdoor style but it makes so much sense from a serenity point of view.  Thanks for the tip Melinda!  Want to see and hear much more? Head over to House 214 Design for the full tour.

Stop by tomorrow for some porch inspiration!

SaveSave

Take It Outside with Migonis Home | Beautiful Blogger Backyard Series

Today's beautiful backyard belongs to the lovely Jen of Migonis Home. Her outdoor space is a great illustration of how you can have an elegant but simple outdoor space with just a few elements.


Comfy seating? Check! Full landscaping? Check! Bar cart? Check! Who wouldn't want to sip lemonade out here with Jen? Here is what she had to say about it:
We moved into this home almost exactly a year ago today and it has been amazing to have such a gorgeous spot for a backyard. In our previous home we were surrounded on every side so we never felt like we had privacy and this space gives us exactly that. I love feeling like we can host our weekly summer dinner parties in a beautiful space that we have created to be an extension of our living area inside. It's comfortable and done in my favorite neutrals with a little bit of color with the hydrangeas we are slowly adding to the yard!


Want to see more?  Head over to Migonis Home for the full tour!

I'll see you back here tomorrow for more inspiring outdoor spaces.


Take it Outside with Primitive + Proper | Beautiful Blogger Backyard Series

Another week, another 5 inspiring outdoor spaces coming up.  Today we are swinging by Primitive + Proper country backyard complete with veggie gardens and chicken coop.  She has chickens, people!  Chickens!  Something this city girl is super enamored and frightened of at the same time.  I love it!


Here is what Cassie had to say about it:
When Stefanie invited me to participate in her Beautiful Backyard series, I was thrilled, but also a little nervous.  After all, our backyard is not like the rest of our outdoor spaces which display a bit more of our style.  In the front yard we have curb appeal and a flower garden and fire pit.  We have a wraparound porch that serves as our family hangout and place to relax and read, or sip coffee or wine.  But our backyard?  Well to be quite honest, it's not what I would call beautiful, unless your idea of beauty is in functionality.  Our backyard is all about serving our family needs, and making use of our land.  We were thrilled to move out to the country 5 years ago and gain much more land in that move.  We have almost 2 acres, and we are doing our best to make use while teaching our children important life skills.  Way back behind our garage and up on a hill was a grassy open area.  We've turned that into our vegetable garden and plan to extend it next year, and add rows of cutting flowers to attract more bees and fill our vases.  Directly behind our house we've fenced in a large area, initially for our old beagle who is no longer with us.  Our current 3 dogs would much rather be anywhere we are than out roaming, so while the fence isn't needed for them as much, it has recently come in handy as we've added a chicken coop; our hens are able to free range in our fenced in back yard.  With my father's help, my husband and I built the coop ourselves over several weekends.  We were so excited to finally put it to use and more recently gather our first eggs!  A friend suggested a shelter in the middle of the yard to protect the hens even more (we have several trees for protection) from hawks.  My kids had also been asking for a trampoline, so I thought I'd kill two birds (this pun seems oh so wrong here!) with one stone; our new trampoline has the kids jumping for joy, and the hens safely under shelter.  Our backyard is by no means a well designed or manicured space, but it is a reflection of our happy and beautiful life.

Anyone else craving a fresh egg omelette right about now?  Never mind that, head over to Primitive + Proper to see more of this free range loveliness.

And in case you missed it, here is a round up of the outdoor spaces shared last week.
Eclectically Vintage crushed it with great upcycled projects to decorate
DIY Playbook knocked not one but two patios out of the park with style
That’s My Letter takes DIY to a whole new level in her gorgeous home
Life on Virginia Street has built a resort like backyard that demands a staycation
I shared my own backyard which is very much a work in progress
SaveSaveSaveSaveSaveSaveSaveSave

Take It Outside with Life On Virginia Street | Beautiful Blogger Backyard Series

Today's Beautiful Blogger Backyard series feature is a little bit of a different scale than the others. Think personal hotel resort complete with water feature, pool and sun recliners and you'll have exactly what Sara of Life On Virginia Street just completed.


Even more impressive when you see the before state was literally just a grassy open area.  I can only imagine the fun she will have with her family this year and many years to come. Here is what she had to say about it:

My husband and I recently completed our dream backyard renovation. What started as a boring, grassy hill has quickly turned into our own little slice of paradise. I have documented the 20-week renovation process weekly on the blog and it fun to see how quickly the space was transformed. Our inspiration was California meets Cabo and it's the perfect little getaway for us in the dead-center of the Midwest!

Isn't it lovely?  Go right now to Life on Virginia Street to see lots more of this transformation.

Miss a post?  Check out days 1-3 in this series with Eclectically Vintage, DIY Playbook and That's My Letter to catch up.  And stay tuned tomorrow for more outdoor oasis inspiration tomorrow!

Have you been inspired to share your own backyard beauty?  Post a photo to instagram with the tag #beautifulbloggerbackyard to be featured!

Take It Outside with That's My Letter | Beautiful Blogger Backyard Series

Today's beautiful blogger backyard feature is all about charm.  If you can drag your eyes away from that amazing red shingled home, you'll find an inviting outdoor space with just the right mix of old world and modern convenience. And it's no surprise because this is where Jaime of That's My Letter lives.  She is already a DIY maven who shares her talents by sharing her build plans for just about everything - so it's no surprise she has built almost everything herself.  Love that!


Jaime described her space as follows:
Our backyard space triples the square footage of playable area for my kids run wild.  In the Spring when the snow melts we are gifted with an outdoor space that is open but still private and has almost everything a kid could ask for (minus the treehouse with zip line but I have to draw the line somewhere).  The pool and trampoline are their favorites but there is also a whole slew of DIY projects out there that I have completed over the last three summers: the dining table, adirondack chairs, see saw, hose hiding planter and swinging bench just to name a few.  And to be honest we spend most weekends at the beach so this backyard space serves as our summer weekday entertainment when the kids are not at sporadic camps.  It’s a great entertaining space complete with the original well to our 1740 antique home.  The well sits centered prominently in the middle of the backyard as a constant reminder of days long gone by and the daily hardships those farmers must have endured.  We often think about how lucky we are to be able to enjoy and relax in this beautiful space while hundreds of years ago there was probably no relaxing going on at Samuel Brown’s farm.  Please enjoy this space as we do and if you’re ever in Westchester County, NY feel free to stop by!
I love how she has created discreet zones for relaxing, entertaining and playing.  But don't take my word for it - pop over to That's My Letter for a more complete tour of this charming outdoor oasis.

Have your own beautiful outdoor space to share?  Tag your insta snaps with #beautifulbloggerbackyard to be featured.  Stay tuned for another beauty tomorrow!


Take It Outside with DIY Playbook | Beautiful Blogger Backyard Series

It's Day 2 of the Beautiful Blogger Backyard series (Didn't you just love Eclectically Vintage's outdoor space?) and I have double the inspiration today thanks to Bridget and Casey of DIY Playbook.


Casey's patio is the perfect illustration of how you can be short on space and long on style. I love everything about this fabulous outdoor space but especially the mix of black and white and green (a personal outdoor color scheme fav). She maximized the space beautifully adding in every element you would see in a larger outdoor seating area without it feeling overwhelming.  Bravo!  Who wouldn't want to party out here?  Here is what she had to say about it:
My husband and I live in downtown Chicago where outdoor space is a hot commodity. Even though we have a small, strangely-shaped back balcony, we've made the most of the space this summer. We added lots of flowers, a lounging area, and garden stools for even more seating.  We love spending time out here grilling, playing games, and sipping on cocktails in the evening. It just goes to show that you don't need to have a large backyard to enjoy the outdoors! 


Bridget's patio is another great example of using what you have to your advantage. Check out that striking brick wall she used as the backdrop of her relaxing and feminine outdoor space.  She added touches of whimsy (hello little gnome!) and brass and pastels in such a lovely way.  If only summer could last forever!
My husband and I live in a suburb just outside of Chicago and are fortunate to have a patio and a backyard to call our own. We added a big 'ole grill and lots of comfortable seating to this space so we can entertain family and friends as much as possible. My husband and I are both teachers and are both off for the summer so we are really trying hard to get out and enjoy this colorful and relaxing space as much as possible... even if it means the to-do list isn't completely done for the day. Before we know it, the summer will be over and we'll be hauling furniture back inside before Chicago's winter so making the most of this relaxing space NOW is top on our priority list.

Want to see more?  Pop over to DIY Playbook to see more photos and details of both of these wonderful exteriors.

More outdoor inspiration on tap for tomorrow - see you then!


Take it Outside with Eclectically Vintage | Beautiful Blogger Backyard Series

The dog days of summer are on us so it's the perfect time to kick off a new series: Beautiful Blogger Backyards!

I tend to carefully stalk follow stalk my favorite bloggers so I practically know the interiors of their homes by heart but outdoor spaces are sometimes a mystery.  What can I say? I'm nosy curious! There is so much inspiration for not only backyards but interior projects in these outdoor spaces, I can't wait to share.


First up is Kelly of Eclectically Vintage.  Her patriotic backyard is just the right mix of bold colors, greenery and soft seating.  Aside from that fabulous flag she made with fencing, she also used an old dresser as a planter, used an vintage cooler as a side table and a giant shell as centerpiece.  You know how much I love a good upcycle.  A woman after my own heart. Makes me want to run over there and share a pitcher of sangria with her! Here is a little peek but hop over to Eclectically Vintage to see so much more!

Ready for more?  Every day for the next 2 weeks I'll be sharing the outdoor goodness.  Stop by tomorrow for a two-fer!


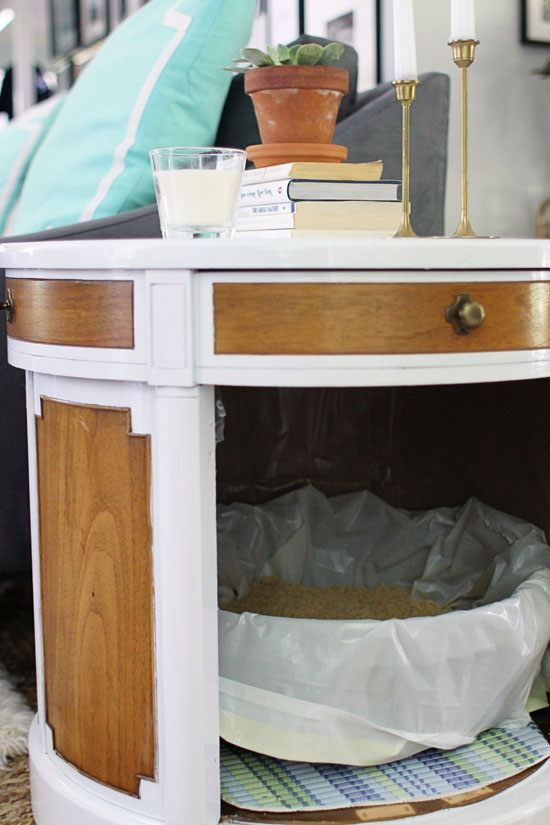
Hidden Kitty Litter Side Table {Guest Contributor}

hidden kitty litter side table created by Two Delighted | www.brooklynlimestone.com
This post was written by Megan of Two Delighted, contributor for Brooklyn Limestone.ContributorBannerTwoDelighted

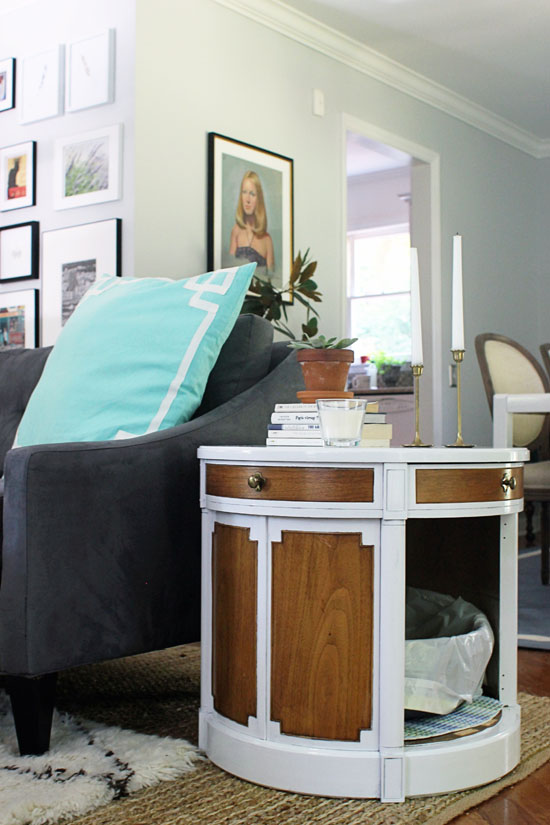
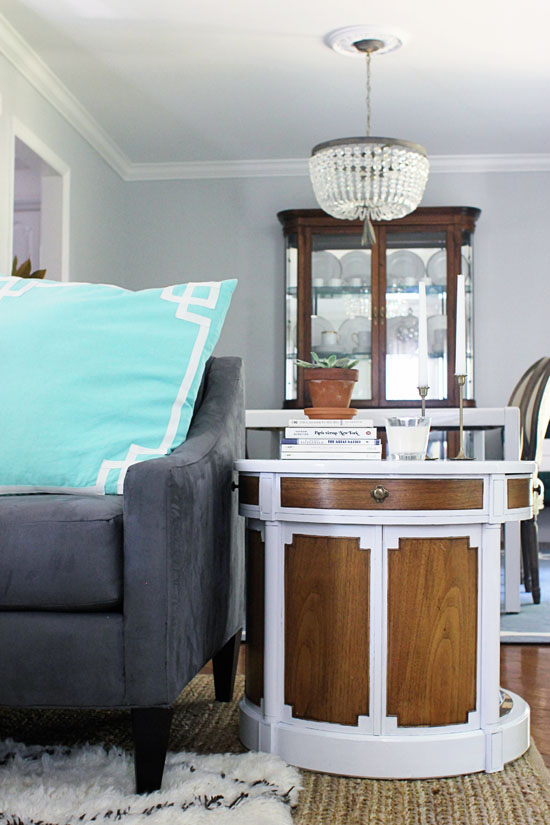
Hello friends! It’s Colleen again and I’m here with a DIY for the cat lovers. We adopted the sweetest kitten this winter and we love everything about him, except the fact that our litter box quota has increased exponentially from one (for our older cat) to four (to make sure the kitten doesn’t urinate all over the house). Litter boxes are unattractive and smelly. It is just a fact. The one we have downstairs has been offending my eyeballs for months and I finally decided that I would make an attractive litter box holder to remedy the problem. I was originally going to buy a cheap furniture item from Ikea but then my husband and I stumbled upon the perfect open table/cabinet thing at Restore and I felt like I won the lottery. With some paint and a couple of cat necessities, it has now become a lovely side table as well as a place to hide the litter box.


What You’ll Need:
  • Cabinet or chest that you don’t mind messing up. If you can’t find anything used, Ikea has some cabinets that would work.
  • Paint - I used white oil based paint to make the white portion of the furniture nice and glossy but you can use whatever you want. 
  • Litter box that will fit inside of your cabinet - make sure the kitties have enough room for their little heads.
  • Plastic litter box mat
  • Plastic drop cloth
hidden kitty litter side table created by Two Delighted | www.brooklynlimestone.com

What You’ll Do:
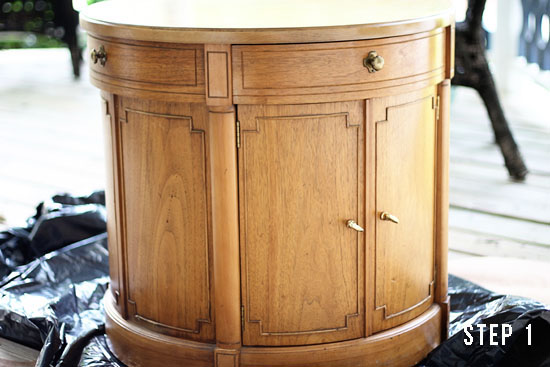
  1. Paint the table with whichever paint you choose. Or don’t paint it. Completely up to you.
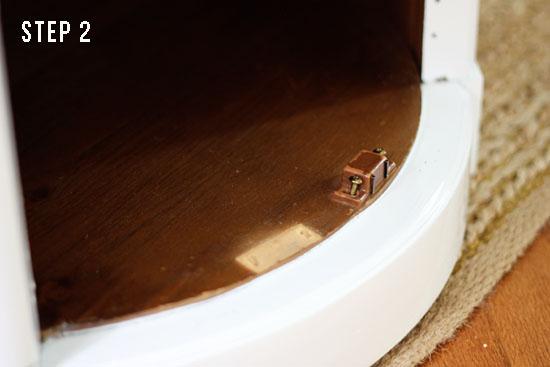
  2. Remove any hardware that will be getting in the way on the inside of the cabinet. I was lucky and was able to just take off the doors to have a hole for the cats to enter, but you might need to cut and sand a hole if your furniture doesn’t have doors. Place the mat at the bottom of the cabinet and line the inside of the cabinet with plastic drop cloth (securing either with staples or nails at the very top) so it is soft for their paws. Once we put the litter box in, it took the cats a little while to start using it. After a couple of days, I’m happy to report that both cats have seemed to like their new litter box. Yay for small victories. 
hidden kitty litter side table created by Two Delighted | www.brooklynlimestone.com


Halloween Love: Mad Scientist Dining Room

Want more Halloween fabulousness?  Meet Evita of The Happy Heathen.

TheHappyHeathenHalloweenviaBrooklynLimestone

table5vampireBlood4
TheHappyHeathenHalloweenPartyonBrooklynLimestonebloodBrandy

I somehow missed her amazing mad scientist thread when she first shared it a few Hallow's Eves ago but when I finally stumbled upon it, I was smitten.  As if it wasn't already inviting in the most twisted way possible, Evita added even more creative details to round out the display.

TheHappyHeathenHalloweenPartyonBrooklynLimestonetable2
TheHappyHeathenHalloweenPartyonBrooklynLimestoneTheHappyHeathenHalloweenviaBrooklynLimestone

See what I mean?  So fabulous!  Be sure to check out The Happy Heathen for all the details (including an aged label DIY tutorial, source info and more) from the hauntress herself!

Halloween Love: Prime Human Cuts Invitation

Few things give me more joy than to find someone else who shares my love of Halloween. While I consider myself no slouch in this department, I have to bow down to the supreme skills of today's featured guest for her amazing talents in the Halloween invitation department. Rachel of Salts Press throws a Halloween dinner party every year but this one is going to be KILLER if the invitation is any indication.

humancutsinvitesaltspress4

Lucky for me, she shared her work for us uninvited revelers and was even kind enough to send me my very own!  Lucky for her, I live a few thousand miles away or I would be shamelessly crashing this party.

humancutsinvitesaltspress3humancutsinvitesaltspress5

See what I mean?  Amazing!  The mini cutting board, the tissue paper, the paper number tag.  It's all perfect together!

humancutsinvitesaltspress2humancutsinvitesaltspress6

The concept is wonderful but the execution is even better.  All of those little details really pay off to let guests know this is something not to be missed!

Ok, Rachel, please take a bow now (if you aren't otherwise occupied in some other creative endevor.) Now when do we get to see those party decorations?

Have you dabbled in the dark arts of Halloween Love and want to be featured?  Email me!


Favorite Entertaining Trick: Sewing Pattern Favor Wrapping

With the end of summer near, I can't help but start to think of putting my party hat on and get back to entertaining.  So while I get my own plans in order, I thought I'd ask some of my favorite blogger hosts to share their favorite entertaining tips/projects with us.

This is the final guest poster in Entertaining Tricks series (I'll be sharing my own personal favorite tomorrow!) is from Emily of Go Haus Go. I've had the pleasure of her contributing here before so you already know I'm a fan but I happen to think Emily has one of the best eyes for color so of course I had to ask her to chime in.

* * * * * * * * * *
Emily May

Emily says:
"For throwing parties or showers, I'm always focused on the guest favor. And, in my opinion, guest favors are hard! There are very few things that everyone loves that are inexpensive enough to hand out in bulk. Wrapping of the favor also goes along way... I typically buy the favor and DIY the packaging.

One of my go-to's are little seed cup packets (from the dollar spot at Target) wrapped in old sewing patterns. Patterns are easy enough to find... lots (10+ in a single listing) are available on eBay or Etsy for a few bucks. The fonts on old patterns are always neat and when wrapped around something small, there's an interesting graphic effect.

Once wrapped, I stamp a couple of tags (from Office Depot or Staples) with a "Thank You", add a ribbon and call it a day. Cute, easy and nearly everyone likes the idea of future flowers (even if they never get around to being planted.)

I've used these favors for bridal showers, baby showers, you name it. The vintage patterns change depending on the theme, too. Bib patterns, wedding dress patterns, etc. To really amp up the cheese factor, growing seeds work so well with a message about growing babies, growing love, growing in age, etc.!"

* * * * * * * * * *

Thanks Emily.  I had no idea sewing patterns were so easy to find.  I will definitely be using this idea in the future.

Do you have a great entertaining tip you want to share via a feature?  Email me!

Favorite Entertaining Trick: Thoughtful Guest Room Goodies

With the end of summer near, I can't help but start to think of putting my party hat on and get back to entertaining.  So while I get my own plans in order, I thought I'd ask some of my favorite blogger hosts to share their favorite entertaining tips/projects with us.

Today's entertaining trick comes from one of my all time favorite bloggers Ez of Creature Comforts.  It is a go to source for all of the tiny little details that make life sweet.  Her entertaining trick comes courtesy of one of her friends  - someone I am now convinced must be the world's most thoughtful host.


* * * * * * * * * *

Ez says:
"I must confess that anything I know about hosting overnight guests has been gleaned through the example of my dear friend Marichelle. I've had the great fortune of being a guest in her home many times, and without fail an overnight stay with her as host leaves me feeling spoiled in the best of ways.


On a recent visit, my daughter and I were welcomed into our room with a beautiful basket of bath goods, a dresser top stocked with tasty gluten-free snacks and water (my daughter can't have gluten), a tray arranged with a vase of roses and few essential toiletry items, and on the nightstand...a framed photo of our two beloved pups (they had to stay at home and Marichelle knew we'd be missing them). The thoughtful generosity of these unexpected touches instantly helped us to feel welcomed and at home, and this then set the tone for the rest of the fun and relaxing trip!

These days I now keep two baskets on my linen shelf that are stocked with essentials for guests who might come to stay over in our home. I also make sure to run to the market before a guests' arrival to pick up a few special treats (keeping any special dietary needs in mind) to help make their stay even sweeter. Through my friend's example over the years, I've learned that it only takes a little bit of effort to show your guests just how glad you are to have them in your home. And a warm welcome such a the ones she is so good at giving, will not be easily forgotten."


* * * * * * * * * *

Thanks Ez!  Including a framed photo in a guest basket might just be the sweetest thing I've never heard of!  Can I come visit?

Do you have a great entertaining tip you want to share via a feature?  Email me!

Favorite Entertaining Trick: Fabric Flags

With the end of summer near, I can't help but start to think of putting my party hat on and get back to entertaining.  So while I get my own plans in order, I thought I'd ask some of my favorite blogger hosts to share their favorite entertaining tips/projects with us.

After last week's guest bloggers, I have a few more to share with you.  Morgan of Pepper Design Blog is stopping in with not one but two entertaining tips today. Her blog is a great resource for fun decorating and entertaining ideas so of course she has a couple of good ideas to share today.


* * * * * * * * * *

Morgan says:
"I Have two favorite entertaining tricks that I'd love to share, one has to do with a now permanent decor piece in our 'outdoor dining room' and the other is a nifty little tool that I use again and again.

I made fabric flags for a friend's shower back in January of last year and have used them for so many outdoor parties that they are now a permanent fixture hanging above our large wooden outdoor dining table. Makes for such a lovely treat whether we are having an impromptu Sunday brunch or hosting a little ice cream social for Liv's friends! You can see the outdoor dining space from our kitchen and the brightly colored triangles of fabric always make me smile.

My nifty trick to share has to do with building tiered dessert towers from adhesive putty. Whether it's connecting plates to vases, bowls to candlesticks or blocks of wood to platters, putty makes a great and secure adhesive solution that can be easily removed when the parties over, no damage done. "


* * * * * * * * * *

Thanks Morgan!  I use that same blue putty for pretty much everything here - I'm always running out.

Do you have a great entertaining tip you want to share via a feature?  Email me!

Follow @ Instagram

© 2007-2020 Brooklyn Limestone. All Rights Reserved. Privacy Policy
Back to Top