Showing posts with label wood stripping. Show all posts

The Found Door, part 1

One morning, Mr. Limestone spotted this discarded door sitting on the curb waiting for the garbage man. I'm not sure which neighbor decided to trash it but their loss is our gain. We carried it in the house, leaned it against the hallway wall and waited for inspiration.
FoundDoor1
I batted around a few ideas until I came to the conclusion that turning it into a work table would be a good second life for this. Its long and lean and would make a lovely space to roll out fabric, make invitations or any number of crafty endeavors. And since I have a perfectly unused box room, I had just the place for it.
FoundDoor2
It was dirty and lumpy with paint drips so while I could have just slapped a new coat of paint over it, I decided it needed to be stripped down before anything other decisions were made about it.

Enter Peel Away. If you've been a really long time reader of this blog, you'll remember my experience with striping. So I went back to this goopy green magic potion to get rid of the paint.
FoundDoor5

First I removed the hardware.
FoundDoor3

Then loaded the door up with the stuff - think frosting a cake.
FoundDoor4

Covered with parchment paper (Peel Away sells their own papers but I find wax paper to be a lot cheaper and work just as well.) and let sit for 24 hours.
FoundDoor6

The next morning I went out there with scraper in hand. The term "Peel Away" is a little misleading. Sure, some of it peels. But most of it has to be forcefully evicted with a sharp edge.
FoundDoor7

Scrape. Scrape. Scrape.
FoundDoor8
Scrape. Scrape. Scrape.
FoundDoor9
Scrape. Scrape. Scrape.
FoundDoor 10

Two hours and two blisters later, this is the result. Close but no cigar.
FoundDoor 12

I had hoped to finish the stripping this weekend but the upcyling gods did not smile upon me. Another coat is working its magic now. I'll have to clean it off in the dark tonight.
FoundDoor 13
(Ran out of wax paper, turned to cling wrap to finish the job.)

Wish me luck.

I say po-ta-to, You say po-tat-o

A little sneak peak at our scary man of the stairs. Despite his age and what he has been through these past few months, he is looking quite handsome to me.
NewelPostStained
The latest decision to be made is what to paint the stair risers. For those obsessed with staining everything in site: yes,they need to be painted. I want to paint them black - its a little bit unusual but the black will work nicely with the pale grey and dark stain of the stair treads. It will also hide ugly scuff marks better. And its not any sort of strange choice like orange or teal. So whats the problem? Mr. Limestone didn't have an opinion on this until our contractor and architect chimed in that the cream would be nicer. Now Mr. Limestone is literally insisting that they be painted cream.

Why is it that when I needed help picking paint colors, no one has an opinion but when I'm 100% sure then everyone has to chime in?

I used to believe that whenever I would say white, Mr. Limestone would say black just to drive me completely up a wall. But I was wrong. In fact, when I say black, he says cream! A world of difference.

Whatever the shade, its quite close to being done. We're both in total agreement that a good thing.

Admitting defeat.

I am one of those people who feels nothing is ever done right if not done myself. So when it came to stripping the scary old man winter face newel post on our parlor floor, I figured this was the kind of job that I should do myself. I didn't want the carving to get destroyed by rough scraping that didn't care about the finished product as much as I did.

DSC_0173

So after my great experience
peeling the banister with Peel Away, I figured this project shouldn't be too difficult.

DSC_0194

I set my stool down in front of this thing and got to work. As I came to learn, Peel Away works wonderfully on smooth surfaces but anything with this sort of detail was a totally different story. Instead of being able to wipe the paint off, it had to be picked away at piece by piece. I did multiple coats of stripper and countless hours in a respirator over several precious weekends. And after all that, I got this:

DSC_0215

More coats, hours with tiny plastic picks and a box of rubber gloves later, I was still left with this

DSC_0275

Really disappointing. After spending so much time on it and not getting the results I hoped for, I just couldn't stand working on it anymore. I admitted defeat and moved on from the hope to get this thing clean.

Fast forward to working with our contractor, we asked him to see if he could strip the post for us. I wasn't sure what to expect but I kept fingers crossed that it would survive.

DSC_0326

And it did! Turns out that my weekends were all for nothing because our contractor got this thing done in just a couple of days! Im sure it was a lot of elbow grease for the guy working on it but chalk this one up to being better left to the pros. Lesson learned.

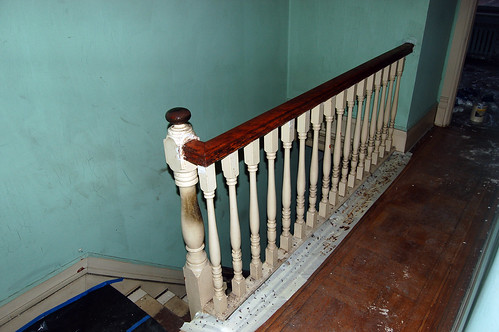
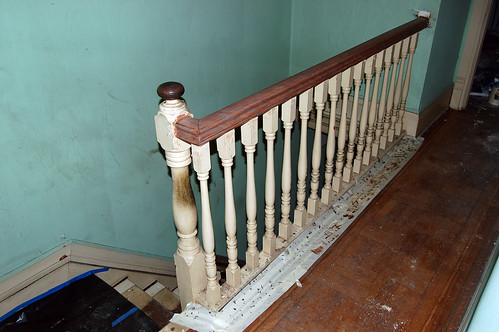
The banister stripped bare.
{19 jan 2007}

After the good results with peel away 6 on the door jamb, I moved on to a more weighty project: the 2nd floor banister. It has some moderate curves on it and quite a few of these tiny little ridged details that would be a challenge. Sorry, I forgot to take a true "before" photo that shows it untouched. You can get a good idea by looking at the newel post that I didn't strip yet in the after photos but take my word for it, there were quite a few layers of paint on her. All the colors of the rainbow in fact as well as a coat or two of stain underneath.


So I set it and forget it. What I mean by that is I spread the stuff all over the banister railing and left it overnight. Even though my results with the door jamb were pretty good, I wasn't so confident about this experiment. I had visions of scrapping off some pasty by product with the paint still intact.


Anyway, arrived the next day and raced up the stairs to see the progress. Scraped right off! Scrape, scrape, scrape. Scrub, scrub , scrub. A few hours later and I had progress.


Unfortunately for me, the paint wasn't entire gone. The first 5 or so layers had been removed nicely but there was still patches where a brown icky mix of stain and paint hung on for dear life. Mostly these were the spots I hadn't applied quite so liberal of a coat. So I went in for another round.


This time, I really layered the stuff on. Almost like the frosting on an expensive hipster cupcake. This time I covered in plastic wrap as I was concerned it might dry out. Left for about 15 hours. The saran wrap did a good job of keeping it moist but working with it wet was a way bigger pain than working when dry. So I think I'll skip the wrap next time. Anyhow, a lot more scraping, scrubbing and rubbing and magic (well, sort of), she is completely stripped bare.


Quite happy with myself as the wood looks really great. We aren't sure what kind of wood it is - red oak maybe? Anyone a wood expert who can shed some light on the species?

Next up: I bow down to the mighty Martha again.

Its a STRIP off!
{14 jan 2007}

Get your minds out of the gutter people. This is a renovation blog.
Im talking about paint strippers of course.

In the right corner, weighing 32 ounces is Kleanstrip's KS3 stripper. As per the packagings propaganda, its "America's #1 Stripper". I don't know when that survey was distributed but I never got my copy. Anywho, Mr. Limestone anticipated my desire to start a messy project of my own (as he was ripping the precious tiles from the walls down the hall) and picked this product up for me. Guess what convinced him to buy this one over the other options? I'll give you one guess. Marketing at its finest.

In the left corner, also weighing in at a quart but seemingly much heavier when you pick up (Mr. Limestone will have to explain that one to me at a later date) is Peel Away 6. Don't ask me how I remember this but this product was mentioned to me a year or more ago and stuck in my head for just such an occassion. Another trip to local diy home improvement store and we had all the makings for a stripper rumble.


I applied to short sides of two doors in the same room. Figure that was as good as a test case as any and they would have the same # of paint layers.


Peel Away comes right out and say is takes much longer (anywhere from 2 hours to 48 hours depending upon the # of paint layers) so that was a bit of a bummer to the instant gratification desire in me. Kleanstrip indicates it needs about 15 minutes to work. Kleanstrip: 1 pt, Peel Away 0.

The consistency of Kleanstrip is a bit like clear snot. Not as sticky as would be ideal for a vertical surface and its colorlessness makes it a bit difficult to see where you have applied vs where you have missed. Peel Away is more like a loose frosting. Very easy to see and nice and thick. Peel Away: 1 pt; Kleanstrip: 1 pt.

As soon as I managed to pry open the child safe top of Kleanstrip, the smell was THERE in full force. To be expected with anything that can burn thru a hundred years of paint, no? So no surprise. But Peel Away is odorless (or as odorless as something that I wont actually put my nose in to smell is). No child proof cap either which is nice for a klutz like me but probably a negative if you have a child who might eat some of this odorless frosting looking substance that can burn a whole in your stomach. Anyway, no smell is a point for Peel Away from me. Peel Away: 2pts, KleanStrip: 1 pt.


And here is the money shot. I wait 15 minutes, both surfaces seem to be bubbling the multiple coats of paint under there. So far, both on equal footing. I wait 15 minutes and try to scrape the Kleanstrip off. Not so good. It sort of comes off but I have really scrape. Its only a few square inches and Im already exhausted. Not a good sign. I reapply and leave it on for about an hour figuring if it took 100 years to get this many layers, I can wait an hour, right? An hour later..still sucks. About this time I figure I'll give the Peel Away a try. Slides right off. So long Kleanstrip, Peel Away's in town. Bing, bing, bing - Peel Away wins by knockout.
So we have a winner....not much of a fight really.

On to a real test...

Follow @ Instagram

© 2007-2020 Brooklyn Limestone. All Rights Reserved. Privacy Policy
Back to Top