Showing posts sorted by relevance for query "to have and to hold". Sort by date Show all posts

Guest post: Bethany's Jars

Today is the last of our guests from the lovely Bethany of bspokeblog and emmylu. Unlike Kara, Claire and Alycia, Bethany isn't new to guest blogging here. She's been so kind to do it before a few times! So a big welcome back to her. Today she is here to share a bit about how she uses and reuses a practical item in a beautiful way.

**********************************************************************

First of all, thanks to Mrs. Limestone for having me again as a guest blogger! I so enjoy her blog, and it's a treat to write for you, her readers. Today I want to share with you a few ideas on how to use glass jars in your home and in your decorating. I live in a small cottage in Minnesota, and tend to decorate using a subtle, natural style. Jars are one thing that I use all over my home to hold everything from dog bones to candles! Read on for ideas on how to use this thrifty and fun item all over your own home.


Pictured above, a couple jars sit on display on a shelf in my living room holding clothes pins. Multiples of the same thing have a dynamic, but calming effect. There is a look of consistency, but the trio (third jar not seen in this picture) creates visual interest.


My husband and I have a fun tradition of collecting multiples of one item from every vacation we take. We put these little collections in jars and display them on a shelf. Here you can see driftwood from a trip to Door County, Wisconsin and smooth pink and gray stones from a trip to the North Shore of Lake Superior.


In my studio, I have jars to hold rubber bands, large clips and paperclips. Since they look so lovely on my desk, I can keep these necessities close at hand for maximum convenience.


In my bathroom, I have two jars perched atop the toilet (since we have literally zero counter space) holding q-tips and cotton balls.


My kitchen counter is host to this trio of jars that hold loose change, dog bones, and clothes pins (for sealing up bags of opened bags of chips, etc). I also toss wine corks in the clothespin jar to keep things interesting.


Back in the studio, I have this small jar holding sticks of chalk that I use on a small chalkboard frame (see tutorial on how to make your own here).


In the summer, we spend many evenings on the patio, enjoying the long hours of daylight and warm temperatures. I often have a few jars scattered around with small votives burning. It sets a lovely mood, and when it gets dark...


...nothing compares to the beauty of all those candles burning brightly in the many glass jars!


The very best part about decorating with jars is that they are extremely cheap and easy to find. Most of mine were found at garage sales for pennies a piece. Often people who are into canning will sell a whole box of old jars for only a couple bucks. I scoop them up whenever I find them, and always put them to good use!

Other ideas for using jars around your home include ::

- use them to hold lemonade or a signature beverage at your summer party

- put some fresh cut flowers in them on the table for a casual and pretty centerpiece

- fill them with candy, cover the top with fabric and tie off with a ribbon, then give as a gift

- fill with dirt and place herbs in the jar... how lovely some basil or parsley would look growing out of a jar!

- use a small jar on your nightstand to hold keys, watches or anything that comes out of your pocket


I hope you have enjoyed this little collection of ideas for using jars around your home. If you have any other ideas that I did not mention, feel free to chime in and leave them in the comments. I have many jars and am always looking for creative, new ways to put them to use!
************************************************************************
A huge thanks to Kara, Claire, Alycia and Bethany for taking over for a few days. I hope you enjoyed a break from hearing me blabber on about me, myself and I.

Trash to Treasure: Burlap Sack Headboard

Another installment of the trash to treasure series today from Patricia & David Warrington who are co=owners/designers of Karma Flowers (who also run a fun event design blog), a floral and event company. In other words, they live and breathe the design trends in their work so I was excited to see what they would do with a trash to treasure challenge.


******
It seems these days, burlap is turning up everywhere. From bags to shoes to wedding and event decor, and even interior design. We have embraced the trend because it is natural and neutral, durable and relatively inexpensive. Recently, we have designed burlap table runners and bunting for some very special occasions and have also taken to using it in our own home improvement designs. However, we don't always use burlap in it's most common form, which is simply on a fabric roll. Instead, we have sought out companies that use burlap sacks, or cocoa sacks, in their daily business and have purchased them in an effort to up-cycle. Why? Well, for one, it's environmentally a good choice to reuse and re-purpose, but stylistically it creates options. Burlap sacks typically have bold type or even graphics on them. While most are stamped with black ink, we have found others that infuse greens and reds, and even more vibrant oranges and blues. Against the earth toned sack, the colors really pop.

One of our favorite burlap sack projects was our very own headboard. Our young son often sleeps with us and moves and rolls all over the bed, so we knew we wanted something soft above our heads. Additionally, we wanted to maintain a relatively neutral color palette to fix with the muted and tranquil feel of the rest of the room. Rather that just buying a roll of burlap and creating a rather standard piece we turned, instead, to sacks we had recently purchased at a flea market for around $10.

The first thing you should know about true cocoa sacks is that they stink! Two ways to remedy this is to simply leave them outdoors in covered space for a day or so and let the fresh air to it's magic. The smell may not entirely lift, but it will with time. If you are a bit more adamant about removing the smell, you can soak the sacks in warm water. We suggest leaving them in the water for a couple of hours and then again, letting them air dry, While some burlap is machine washable, this is not recommended for burlap sacks that are not as tightly woven and might significantly fray.

While your burlap sacks are getting a bath, you can begin on the headboard structure. We used a 4' x 8' sheet of 3/4" plywood. A standard size king mattress is 76" wide. We decided to make our headboard 80" wide, in order to allow for a 2" overhang on each side. This accounts for a plush mattress cover or bedspreads. The height is strictly an aesthetic decision. Ours is 40" tall to give you an firm measurement.

You will also need upholstery foam (enough to cover the width and height of the plywood but you can piece several together to achieve this) and spray adhesive. When you are ready to affix the foam, spray a generous amount of spray adhesive onto the plywood. Carefully, place the foam on the plywood with roughly a half inch overhang of foam over the wood.

The next step is to lay batting, at least a foot longer and wider than the foam, out on a flat surface. Flip the plywood and foam over so the foam is lying on the batting. Take one size and fold it up and over onto the plywood, stapling from one end to the other. Repeat the process for the opposite side of the structure than the one you started with. Then repeat for the remaining two sides, being sure to pull extra tight and tuck neatly in the corners.

Once you have selected the sacks you wish to work with and they are clean cut the backs of the sacks off, but do not discard. Keeping in mind type and pattern, lay out the sacks with the graphics in the pattern you desire.

Now you must "sew" them together in order to create a piece of fabric large enough to cover the surface of your wood and foam headboard. Here's a secret. Neither one of us can sew using a sewing machine {learning is on my to-do list} so we elected to hand stitch the bags together using twine.


The twine kept with the natural feel of the burlap and was thick enough to let allow us to do less stitches on each sack. We chose to sew the backs of the sacks together first and use them as the first layer of fabric cover on the wood and foam. This allowed us to stretch the graphic sacks tight around the edges, without worrying that the batting would show through the burlap. Staple the burlap just like you did the batting.

And Voila! You now have a custom upholstered burlap sack headboard. We recommend using french cleats to hang it as they hold weight rather well.


Now sleep tight.


Organizing Products You Need in Your Life Right Now

I know I'm not the only one purging and organizing my house every January so this one will be no different.  Thanks to being at home the last 9 months, I've actually be organizing my heart out all year. So when would be a better time to share my absolute favorite organizational find than now?

In no particular order, these are my favorite products to get your life in order this year or every other.  (If you don't want to read my little story that comes with each item, feel free to just look at the list directly on my Amazon shop here.)


Pretty pre-made food labels:  I've said it before and I'll say it again, consistently labeling will make anything look bespoke.  Take a bunch of recycled jars or boxes and throw some pretty labels on them and watch the magic happen. I made these for myself a while back using my Cricut but it took forever to design and print and weed.  If I had known pre-made ones had existed, I would be all over it!  If you don't love this font choice, there are loads more to choose from - just search around.

Stackable acrylic drawers: These were my hero storage find last year. I used them to organize the chaos that was breeding in my under sink storage areas.  They are amazing!  Not only does it look so much better having these pretty bins staring back at me, it also makes it a snap to find everything. Now when I need a bandage or a nail polish or a hair tie, I know exactly what drawer they live in.  They also help so much in not purchasing more of something you already have but can't find. They can be a bit of an investment but they are worth it! They come in a few different sizes so be sure to measure careful around any existing plumbing to make the most of your space.

Toiletry Bag: While we haven't actually gone anywhere exciting last year, we did spend a good amount of time at our place at the Jersey shore.  Having a good sized toiletry bag already stocked that can hold full sized products as well as all the other little things I carry was perfection! The clear bag makes it easy to find. The little pocket is great for earrings or hair pins. I also tend to leave it right on my sink sometimes - its easy to tuck away when Im cleaning up. (Someone recommended this bag to me last year but I can't remember who! If it's you, thank you!)  For $7 its hard to beat this little workhorse.

Water Bottle Organizer: Before I got this, I can't tell you how many times I've had a stray water bottle fly off the shelf and try to kill me.  Between the kids' school cups, coffee thermos and big water bottles for long park days, we seem to have so many and there isn't a good way to cut down on the number. These organizers hold them all a little cubby so they can stay with their cap and not come flying out or get lost. 


Reusable Ziploc Bags: Are we the only ones who go through an insane amount of those plastic throw away bags?  They are so handy for just about everything but also super wasteful.  These can help with that.  While they won't completely replace my need for disposable ones, at least this will cut down on them somewhat. 


Baskets Baskets Baskets: This is the answer to one of the most common questions I get.  How do I keep my house tidy even though I have young kids with tons of toys.  The answer is simply: baskets.  Everything and anything looks better contained. And when it comes to toys, something pretty and texture like these rope baskets are just lovely to look at in any setting. They also make post play clean up a breeze.  Kids can easily throw everything into a basket without much assistance. If you don't have kids, they also work really well for blankets, storing throw pillows, laundry, towels and pretty much anything that looks sloppy sitting on the floor.


Skincare Organizer: This little 5 compartment storage bin is my personal solution to makeup/skincare products I like to have on my bathroom sink counter without looking like a pile of junk.  It holds a surprising amount of stuff but doesn't take up too much room and is easy to clean.  When it starts to overflow, I know its time to purge.


Old School Label Maker: I know I've mentioned this before but its the best 10 bucks I've ever spent on anything organization related. I use it A LOT and I don't really know how I went this far in my life not having one.  No need to charge it or download it or find batteries - it at the ready whenever you need it.  And each little role of tape lasts a shockingly long time.  Great as housewarming gifts too! Everyone needs one.


Silicone Toilet Brush: Okay so maybe this isn't strictly organizational so I'm cheating here but I have to profess my love for a toilet brush somewhere and this seemed like the most logical list for it.  First off, it's footprint is TINY - much smaller that the typical toilet brush you probably already own.  Second it works just as well if not better. Third its made of silicone so "nothing" sticks to it if you catch my drift.  This is the better mousetrap.  Get it.


Refrigerator Organizing Bins:  Ok this one is definitely in the "nice to have", not "must have" list but if you have been following organizing tik tok or the Kardashians you know that perfectly organized fridges are the hot things to have in 2021.  I admit I haven't quite gotten to a point where I would share the content of my fridge with the world but these little containers (they come in lots of different shapes and sizes to suit just about anything you eat so make sure you figure out what you need before ordering) make eating and cooking a visual treat!


So there you have it!  Do you have any organizational favorites you want to share with me? I'd love to hear all about them!


DIY Octogonal Mirror {Contributor Column}

The following was written by Colleen of Two Delighted, contributor for Brooklyn Limestone
ContributorBannerTwoDelighted

Hello friends! My name is Colleen and my sister Megan and I have a blog called Two Delighted, which we started in order to document all of the DIY, entertaining, and home decor shenanigans that we get ourselves into pretty regularly. We are thrilled to be guest contributors for Brooklyn Limestone, which has been one of our favorite blogs for forever.
diymirror21

Today’s DIY is a bit of a doozy, so I’m going to get right down to it. I’ve loved this mirror from Ballard Designs for a while, and have almost purchased it on several occasions, but I could never justify the cost. Attractive mirrors in general are just crazy expensive. I decided to see if I could make a version of it myself to save some cash and I feel I was actually quite successful, even if things did get dicey a couple of times along the way.

Materials

  • an old mirror (rectangular or octagonal)
  • moulding from the hardware store
  • a saw (a miter saw if you can get your hands on one)
  • one of those long cheapy mirrors that we all took to college with us like so 
  • mirror cutter (tip: it is easier to cut away from you than toward you)
  • wood glue (I used Monkey Wood Glue)
  • Mirror mastic 


Instructions
  1. You want to start out with a clean mirror, free of any frames or heavy backing. I found an octagonal one from Restore for cheap and took off the frame. My warning to you is that using an octagonal shape makes things about 50 times more complicated, so I would maybe start with a rectangle shape. Go to Home Depot or Lowes and find moulding in the wood section with a lip on it to go over the mirror. Estimate how much you will need by figuring out the circumference of the mirror and then multiplying by 3 since there will be two layers of frame and you will inevitably mess up several pieces. Measure each side of the outside edge of the mirror, and mark the inside of the moulding with the length. You will need to cut each piece with angles on each side. For an octagonal mirror, use 22.5 degree cuts and for a rectangular mirror, use 45 degree cuts. After you’ve cut all the pieces, lay them over the mirror to make sure that they fit. We had to make a couple of adjustments by cutting pieces a little shorter. 1b
  2. Next is cutting the strips of mirror for around the edge of the moulding. Cutting a mirror is pretty daunting, but it actually turned out to be much simpler than we thought it would be. Have someone with a steady hand (a lovely and helpful husband, perhaps) do this part. Lay a towel underneath the long mirror to have something to catch any fallen glass. I used a long piece of moulding as a straight edge, and drew three straight lines with a washable marker equidistant across the length of the mirror to make four equal strips of mirror. To start cutting, dip the glass cutter in a little bit of oil (vegetable will work fine although there are fancy glass oils) and wheel the glass cutter over one of the marked lines with firm pressure. You will hear a kind of squealing noise if you are doing it right. Once you have gone over the entire line, place the mirror over a broom or long dowel, with the mark lined up with the broom. Then press down gently on both sides of the mirror to cut. Once you have the strips of mirror, you can start cutting them into shapes to line up with the existing pieces of moulding. For each piece of moulding, use the outer edge to mark the inner edge of the corresponding piece of mirror. To cut 22.5 degree or 45 degree angles depending on your shape, place a straight edge along the angle of the moulding and over top of the mirror to help draw the line. Look at the picture collage if you have no clue what I’m talking about because I just said a lot of things and it is kind of confusing. 2b
  3. Now you have the inside moulding and the pieces of mirror, so you just need the outside pieces of moulding. You will want the lip of the moulding to go a little bit over the mirror to cover up any scraggly edges, so figure out how you want it to line up and then mark the inside edges for the new pieces of moulding. Then cut the angles again, just like you did in the first step. Lay down all the pieces to make sure they will fit together. Again, we had to re-do a couple of cuts so don’t feel bad if you cut a wobbly piece and need to re-cut. I don’t have a picture of this part, but you will probably want to stain or paint your wood pieces. I used a combination of grey stain and white wash stain, but you can use whatever you want. 3
  4. Measure the outside of the mirror both horizontally and vertically and go back to Home Depot to grab the cheapest particle board you can find and get the nice people to cut it for you. If you decided to do an octagonal mirror, you will need to lay all the pieces over the board and mark around the edges so you can cut off the angles. Also mark around the center mirror so you glue it back in the right place. Spread a good amount of the mirror mastic within the marked area and press down the mirror. To make things a little more sturdy, I screwed in tiny screws around the edge, being careful to not put too much pressure on the mirror.4
  5. Use wood glue to glue down the moulding one piece at a time, holding it firm until you feel like it has been properly set. 5
  6. After the first set of moulding has been glued down, use mirror mastic to place the pieces of mirror around the edge, one at a time. Use very fancy clamping tools like old canned goods to hold the pieces of mirror in place. Once the mirror has set, use wood glue to place the second set of moulding. Go get yourself a cookie and take a nap because you will probably need one.
diymirror23
But isn’t it lovely?

Photography MrsLimestone style

Thanks to Michael aka Captain Obvious for the following questions:

"Where did you learn your photography skills? Do I photoshop them? Can I convince you to do photography and photoshop lessons via your blog ala Pioneer Woman?"

First off, I had no idea who Pioneer Woman was until this mention. What a cool site! How have I not seen this one before?? Thanks.

Second, my photography skills are just meh. I'm just tricky enough to post mostly my better photos. Trust me, I have a lot of clunkers. But I'm happy to share my tips with you if you would like to give them a try.

I'll put your fears to rest now that I won't be giving any technical photo mumbo jumbo. I've read a lot of photography books and they all seem to explain the bits and bobins that go into great photos but I dont remember 99% of it. And while I'm sure if I ever could remember these things, my photos would drastically improve, I seem to have a mental block about it. If you are into all of that, I highly recommend reading Understanding Exposure as it quite useful.

Ok, on to the tips. Do you have your pencils sharpened? Note pads ready? Sitting on the edge of your seat??

If my sarcasm isn't already obvious, I'm joking. None of my tips are earth shattering or even something you haven't heard before. But these are the things I think about when camera in hand. Hope you find them helpful.

1. Look with a critical eye
You are standing in front of something that you want to capture. Now take a look at it. A really critical look. Is this REALLY a good photo? Sure there might be the most beautiful thing in front of you but is there also a dirty vagrant, a hot dog cart and another ugly building in the shot? Imagine the printed photo of what you see in front of you. Is that really the best way to portray your subject? (For illustration purposes, I'm going to use some poor saps photo I found on the internet. No disrespect dude...I hope you never see this)

This isn't a terrible photo per se but it could be so much better. All you have to do to make it better is to see what is ruining the shot and take it out of your photo. So you may not be able to make the vagrant step aside or the hot dog business to close up shop but you can can make them disappear in other ways like shooting the building closer up.

2. Think of the light!
Without going into the specifics (that I really don't understand), the difference between good and bad photos is most often the differences in light. You want enough light so that the image is clear but not so much that its all blown out. Keep in mind a camera needs more light to make something look clear than your eye does. So that fruit bowl in your kitchen may look totally fine to your eye but comes out like complete crap in your photo. Generally speaking, you always need more light when you are shooting inside. So open the shades all the way, bring your subject to a sunny window, turn on all the lights. Do whatever you need to do to get some light up in here. Which brings me to my next tip...

3. Flush the Flash
This may seem counter intuitive after I just told you to add light. But you want to have natural light falling on your subject...not a harsh bright light washing out all the details in your photos. PLEASE, for the love of all that is holy - just permanently shut down your flash. There really is never a good time to use it unless you are documenting a crime scene or some other need where pretty photos aren't really a priority. If you like the look of my photos, you can just forget about ever using it because I don't. Really, never. Well, maybe by accident but that's it!

4. Use your camera's settings
I don't care what kind of camera you have. Chances are, you have more than one setting or doo-hicky knob to turn. Try it out. What could you lose? Those settings are there for a reason. A proper photographer would tell you to shut all those pre-settings off and play with the manual settings. Sure, I've done that. Its not all its cracked up to be. I'm sure the manual settings are the way to go if you really know what you are doing. But if you are like me and only have a few seconds to capture something that is happening, you don't have the time to remember all the science. So I use my pre-settings all the time (after I turn off the flash, of course). I also play around with the manual settings occasionally too but only when the pressure is off.

5. Take lots of photos
Again, this probably seems counter intuitive to #1. I just told you to really pay attention and not to take a bunch of photos that aren't worth their digital card space. Well, that still hold true. What I'm saying is once you have done steps 1-4 above, then take 2 or 3 or 10 of the photo you want to capture. Take it with different settings and in different angles. Take one standing up and one laying on the ground. One close up and one far away. If you have the time, snap away. After a while, all of these photos of the same thing will teach you a few things. One it will teach you what sort of photos you prefer so you'll naturally progress in your skills. It will also teach you a little bit about how to get the best shots in various circumstances and you'll use that info again later.

That's pretty much it. Nothing too exciting as you can tell. Sorry, I didn't have much in the way of illustrative shots. Pretty ironic to have a photography post with fewer photos than a post about a nightstand but hey, I'm not a very good teacher.

As for photoshop. Yes, I do use it to tweak certain things when I don't do the best job with the camera. I find the best photos don't need photoshopping. Or if they do, they need something really minor like a tiny crop or level adjustment. I don't really have any lessons or tips for that. Generally if I have to use photoshop, its probably not a great photo to begin with.

Hope that helps. If you have any other questions, just ask.

Guest Post: Home in the Country Bathroom Redo

Another day, another wonderful guest post. Today's installment comes from the lovely Jen of Home in the Country and its all about her bathroom renovation.
Vintage inspired but with an updated twist, this is a renovation after my own heart. Judge for yourselves after you read what Jen has to say about it.

In May, my husband, Jason, and I moved into a 1960s center-entrance colonial in rural Michigan. It was a far cry from the beautiful, detailed Minneapolis home that we moved from - built in 1920, our previous home had gorgeous wood floors, amazing built-ins, and nice, thick woodwork. Still, we fell in love with the land that our Michigan home was on. We're surrounded by rolling hills, and our house is situated in the middle of the woods. It's serene and peaceful outside our home... but inside? Not so much.

The first project that we tackled was our bathroom. At roughly 5' x 8', our bathroom is not big. Yet the previous owners had installed large cabinetry, opaque shower doors, and an oblong dusty pink toilet. Furthermore, a plastic shower surround was installed over old tile, the upper portions of the wall were covered in faded and dated floral wallpaper, and a dusty pink carpet was glued to the walls. YES. CARPET on the WALLS. Weird, right? Not to mention, it's a design choice that doesn't necessarily scream hygienic or stylish.


So we gutted it. In just a few hours, Jason and I had everything removed from the bathroom. We salvaged what we could and donated it to our local Habitat for Humanity ReStore.


Next, we called in back up. We found a carpenter that would work for us on an hourly basis. I knew the types of tile and bathroom fixtures that I wanted to install, and Jason and I wanted to be able to cut costs and satisfy our DIY urges by completing a lot of the work ourselves. Yet, we had a tight timeline and no knowledge of how to install bathroom fixtures or tile. In the end, I was able to watch and learn from the carpenter, and now I should be able to tackle other tiling projects in our house.
We chose a standard white cast-iron tub, and were surprised to find that we could buy it at the Home Depot and have it delivered the following day (the local plumbing store house told us it would be 3-4 weeks). Our carpenter, assisted by a plumber and two high school football players carried the 300-lb tub up the stairs. It was an event that I was happy to miss out on.

Our plumber also raised the height of the shower head (it originally came out of the wall at a height of 5'5"). We also had to hire an electrician to raise the height of the electrical box that supported the vanity lights (it also was located only about 5'5" height) and to install a new fan, a light switch for the vanity lights (they were previously turned on/off by a pull cord), and a few electrical outlets (am still trying to figure out how previous owners dried their hair without electrical outlets in the bathroom).


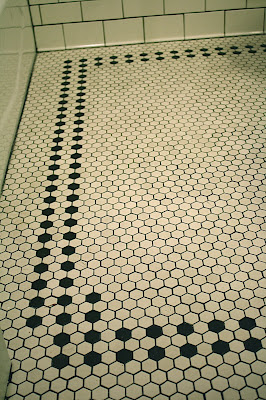
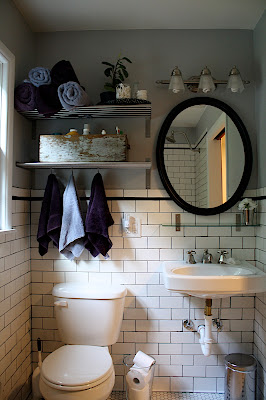
We chose to use black and white hexagonal tiles on the floor, and white subway tiles with black trim on the walls. We absolutely love the classic look of hex + subway tiles, and using white on the floor and walls makes the bathroom feel much bigger. We opted for dark grey grout to make the tiles really pop.

We chose a wall-mounted sink, standard toilet, light gray paint, and open shelves to finish out the room. The room is more open now and feels much bigger!


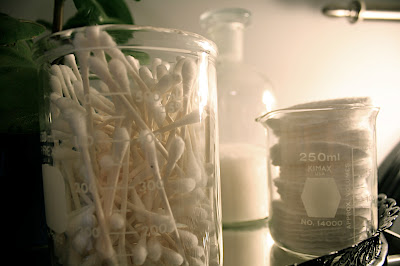
An antique toolbox to hold/hide our toiletries. Three hooks attach to the bottom shelf and our hand towels hang from them. Our bath towels are rolled and stacked on the top shelf, as well as a plant and three glass laboratory jars holding cotton swabs, cotton pads, and bath salts. Toilet paper is stacked inside an oversized glass vase.


We chose a rain shower head and it's amazing. Our shower fixtures came from the plumbing store house, but I was thrilled to find matching sink fixtures on ebay for 1/3 retail. Thank you, ebay!


We're so happy with the final product! No more crazy carpet on the walls and the dusty pink has vanished!

My only regrets about the project are:

1. We did not seal the white unglazed ceramic hex tiles before using the dark grout. This resulted in a slight discoloration of some of the tiles. It doesn't look bad - but the tiles are not as white as they originally were. They have a slight gray haze to them, but at least it's relatively uniform across all of the tiles.

2. We should have purchased a silver/chrome pipes for under the sink. I naively assumed that the plumber would install silver/chrome pipes, but when he was finished and I went to check it out, there was the not-so-attractive plastic piping seen in the pictures above. Don't get me wrong - it's MUCH better than our pink before. But it could be prettier.

We still need to buy a shower curtain... I'd like to find something with a lot of texture in a light color. Like maybe some sort of light gray burlap curtain? I've also spied some white shower curtains with ruffles that I love, but the hubby was not as impressed with them (too girly?). If any of you have suggestions, I'd love to hear them! And feel free to stop by my blog {
homeinthecountry} to check out all of the other updates we're making to our new home in the country.

Thanks Jen. Love this space and I think I might just have to steal that beaker storage idea. Very clever and chic. If you want to read more of what Jen has to say, hop over to Home in the Country.
The party is drawing to a close and I just have a couple more guests to introduce to you before I wrap it up. Grab a cocktail and stay a while.

Unfinished projects whine

A lot of work has happened in the house over the past few months. The team of tireless workers has made that happen so I don't want to sound ungrateful but sometimes its very frustrating when smaller projects drag on.

I've been very lucky that most of the really frustrating projects have been pretty unimportant in the scheme of things. That doesn't make it much less irritating.

Here is a sneak peek at two projects that take two steps forward and one step back on a regular basis.

The first is the built in unit in the little room that sits between my living and dining rooms. I'm told its a "music room", useful for the Victorians but who knows if that is true. Since its too small to put it to any specific purpose, we decided to make it a bit of a pass through library. I wanted to make use of the leaded glass doors that were elsewhere in the house (and couldn't be used in their old spot)
Leaded Doors used for Built-ins
As part of the bid for the contractor, I drew this out sketch so the contractor could see exactly what I had in mind.
Built-in : Millworkdrawing
Ok, so maybe its not the worlds most beautiful drawing but I think the general look is pretty clear. I made notes in the margins about how it was to be constructed as well as providing photos of other cabinets that looked similar.

I had discussed exactly what I wanted with the contractor multiple times after the drawing was given to make sure it was on track. I was told it was being custom made at the woodworker and would be installed toward the end of the job. We'll, "it" was installed
Built-In WTF?
I'm not sure what drawing they were looking at but it was not what I had specified and it was definitely not custom made. Not entirely apparent from this photo but this is a bunch of crappy stock cabinetry screwed together. I was not a happy camper.

I seriously considered having them remove the whole thing and scrap the project because after seeing this, I was so frustrated and I didn't want to deal with it. But then I remembered they had removed some of the inlay detail floors under this to repair the missing pieces in the living room. Arrghh.

In the interest of maintaing good relations and my own sanity, I focused on the two main issues: the cabinet doors were tiny (to give you a sense of scale, they were about as wide as a shoebox) . I wanted 4 doors, not 8! I also pointed out that there was a lot of molding that needed to get added to make this look finished. I let go the other issues of it not being made of quality wood; the lower part not having the inset style as specified, it having a toe kick area despite specifiying a furniture like base, it not being custom fit for the space; it not going all the way to the ceiling; as well as a few other problems. He agreed to make the change and it looked a lot better.
Built In: Better but still argh!
But it still wasn't right. For one, they had broken our glass doors while installing them. Did they think I was not going to notice that? Secondly, the doors and drawers didn't work properly. And lastly the molding was added but in a weird way - like the crown was not sitting at the edge but rather it was pushed back a few inches. And there were other issues too (I won't bother boring you with those).

This built-in continues to be a source of annoyance. Every time something gets fixed, something else is either broken or done improperly. I have nightmares about this monstrosity. Hopefully it will get done "well enough" and I'll replace it with what I really want some years down the road when my memories of this renovation has faded.

The other nagging project is our closet systems. This has nothing to do with the contractor. My annoyance is aimed directly at the Container Store. Dear Container Store: You lured me in with your pretty advertisements and promises of an organized wardrobe in easy to follow steps. You cruel vixen, you evil temptress, I trusted you and you have left me unfashionably bereft.

Elfa Walnut and Platinum
We selected the Container Store's elfa closet system because it was a) easy to get b) could be configured to make the best use of the space c) cheaper than similar alternatives d) looked pretty cute in the store and e) promised it was easy to install.

My Closet
My closet all ready to receive its due.

We went to the Container Store during their 30% off sale with measurements in hand. The salespeople were very helpful and designed our closets for us. They even delivered right to our door! It seemed pretty straightforward. We left with the plans and waited for the parts to get there.

When the boxes did arrive our hopes for a straight forward assembly vanished! There were so many parts without much in the way of labeling. We had ordered systems for all of the clothing closets in the house so it took us a lot of carrying these heavy things all over the house to get them to the right room.

The main rails that the system hangs on got installed but other things were going on so I decided I'd take a crack at putting it together myself. Just unpacking the boxes took forever b/c every part is wrapped within an inch of its life. And then to be extra annoying, every single piece (and there were many) had one of these sku # stickers on them. Is this really necessary? Its time consuming enough to put this together, peeling each of these off one by one only adds to the frustration level.
My Elfa Closet in Progress - Those Damn Stickers on EVERY PIECE
The shelves have a locking mechanism to keep them in place. It took me about 20 minutes to figure out how to press down in the right place and the right amount of brute force (while precariously balanced on a ladder) before I picked up the technique. So far, so good.

The drawers were a lot less cooperative. I spent at least an hour unpacking, unpeeling, setting up on the rails followed by trying to lock them into place, hearing the telltale "clicking into place" sound only to have the drawers fall to the ground if I put some minor pressure on them. I kept reading the directions, trying again and I'd still get a heap of drawers at my feet. Arrgggghhhh!
My Elfa Closet in Progress

In walks contractor who tells me he tried to install this all earlier and the drawers don't lock into place properly. File that under things I would have liked to know before. :)

Anyone else have these drawers and like to share with me the secret to getting these things not to fall out into a heap of metal and wood veneer?

Contractor's solution is to put a screw in the sides of the drawer rail to hold in place. Seems like a good idea. Of course, its not done yet and so my closet sits idlely mocking me while I continue to fish my clothing out of cardboard boxes.

Ok, end of bitch session. Im hoping both of these projects will be done by next week and I'll be able to share the happy outcome. Anyone want to take the under/over?

Flea Market Finds: Made in the Shade

Im so happy to welcome back the always impressive Matthew Mead for another smart project. This time he is sharing a how-to of turning some found treasures into a custom lamp in a few easy steps. If you like his simply beautifully classic style, be sure to check out his new book-a-zine, Flea Market Finds.

****


Lamps are special to me; they are a three-dimensional focal point in a room. They draw the eye up and have a stylish presence in both shape and texture. Lamps are a standout in a room and in design, and something that is so personal to me. I often like to create a lamp out of a found object. The flea market recently yielded two mercury glass bottles (which I think were thermal liners for something). I am always drawn to mercury glass because of its beauty and reflective quality and I thought the bottle shape would be perfect for a desktop lamp.

I purchased the mercury bottle for $9, which is an amazing steal. At the same market, I found a base for my lamp (a wooden platform often used to show off a ginger jar) and painted it black:

I like to make sure my lamps are attractive and “finished” looking, and this base was just the perfect final touch. I then looked for a graphic floral pattern to make a shade and for some appropriate gift wrap at a card store. Wall paper or even fabric would work just as well.

TO ELECTRIFY YOU WILL NEED: SOCKET, CORD SET, RUBBER STOPPER, WASHERS, VASE CAP

You can find these at a lamp supply store or puchase them online here.


For this project, I required a threaded rod, socket set, cord set rubber stopper and vase cap to adapt the top of the bottle to a stationary setting for the finished socket. The cord comes off the socket itself, so there was no need to drill a hole in the bottle.

Several washers screw onto the threaded rod after the stopper to hold the entire apparatus in place.

Once together as a unit, the rubber stopper socket set fits snugly into the bottle hole and the vase cap hides the unattractive stopper.


Next I used liquid nails (epoxy would work, too) to attach the base to the bottom of the lamp. Let dry according to the manufacturer's directions.

The base is a sturdy and stunning looking lamp base.


Next I turned my attention to the shade. I measured my lamp to decide on a size and style of shade and drew an arc on craft paper to create a template.

I traced the template onto my paper and cut out the shade. It is really a very easy process.


Next, I used a product called a pressure-sensitive styrene, which is basically a vellum-like material with a sticky surface on one side. I peeled the paper from the styrene, laid my gift wrapping paper arc on it, and then cut out the arc once again. The styrene provides body to the gift wrap and creates a durable lampshade.

FOR LAMP SHADE YOU WILL NEED: PENCIL, SCISSORS, QUIK GLUE, ARC, WIRE RINGS (TOP AND BOTTOM, GIFT WRAP, BULL DOG CLIPS

To create the finished shade, I simply attached the arc to the lamp shade rings (which were provided with my arc and style shade). Clip the arc to the rings using bull dog clips.

Attach clips to both top and bottom so that you have a complete looking shade. With a pencil, mark the seam of the shade along the vertical line of where the paper meets.


Remove the bull dog clips and place glue along the underside of the pencil mark.

Place seam end of paper just at pencil line, and smooth to adhere the seam.


Let dry 10 minutes. You are now ready to glue in the top and bottom rings. Place glue on the ring and place just inside of shade.


Wipe excess glue away if necessary and hold rings in place with several bull dog clips. Glue both top and bottom rings and let dry for 30 minutes or more.

To trim the shade you may use paper tape, ribbon, seam binding or vintage trim. I chose to make trim from the same gift wrap paper we used for the shade itself.

Cut long strips of paper about 2 ¾ inches wide to make a paper tape. Use glue to adhere tape to top and bottom of shade. Place paper tape on the edge of the shade in a manner where half the tape will horizontally trim the shade and the other portion with be glued and folded over under the edge of the shade.


Let dry thoroughly and attach to light bulb via a bulb adapter.

The final lamp is a crisp and updated lamp and shade that works well with colorful desk accessories, and will look as equally charming lit at night as it does in the daytime.


***

Thanks again to Matthew for sharing. For lots more check out Matthews blog and his great new book-a-zine, Flea Market Finds.

Follow @ Instagram

© 2007-2020 Brooklyn Limestone. All Rights Reserved. Privacy Policy
Back to Top