Showing posts with label organizing. Show all posts

Organizing Products You Need in Your Life Right Now

I know I'm not the only one purging and organizing my house every January so this one will be no different.  Thanks to being at home the last 9 months, I've actually be organizing my heart out all year. So when would be a better time to share my absolute favorite organizational find than now?

In no particular order, these are my favorite products to get your life in order this year or every other.  (If you don't want to read my little story that comes with each item, feel free to just look at the list directly on my Amazon shop here.)


Pretty pre-made food labels:  I've said it before and I'll say it again, consistently labeling will make anything look bespoke.  Take a bunch of recycled jars or boxes and throw some pretty labels on them and watch the magic happen. I made these for myself a while back using my Cricut but it took forever to design and print and weed.  If I had known pre-made ones had existed, I would be all over it!  If you don't love this font choice, there are loads more to choose from - just search around.

Stackable acrylic drawers: These were my hero storage find last year. I used them to organize the chaos that was breeding in my under sink storage areas.  They are amazing!  Not only does it look so much better having these pretty bins staring back at me, it also makes it a snap to find everything. Now when I need a bandage or a nail polish or a hair tie, I know exactly what drawer they live in.  They also help so much in not purchasing more of something you already have but can't find. They can be a bit of an investment but they are worth it! They come in a few different sizes so be sure to measure careful around any existing plumbing to make the most of your space.

Toiletry Bag: While we haven't actually gone anywhere exciting last year, we did spend a good amount of time at our place at the Jersey shore.  Having a good sized toiletry bag already stocked that can hold full sized products as well as all the other little things I carry was perfection! The clear bag makes it easy to find. The little pocket is great for earrings or hair pins. I also tend to leave it right on my sink sometimes - its easy to tuck away when Im cleaning up. (Someone recommended this bag to me last year but I can't remember who! If it's you, thank you!)  For $7 its hard to beat this little workhorse.

Water Bottle Organizer: Before I got this, I can't tell you how many times I've had a stray water bottle fly off the shelf and try to kill me.  Between the kids' school cups, coffee thermos and big water bottles for long park days, we seem to have so many and there isn't a good way to cut down on the number. These organizers hold them all a little cubby so they can stay with their cap and not come flying out or get lost. 


Reusable Ziploc Bags: Are we the only ones who go through an insane amount of those plastic throw away bags?  They are so handy for just about everything but also super wasteful.  These can help with that.  While they won't completely replace my need for disposable ones, at least this will cut down on them somewhat. 


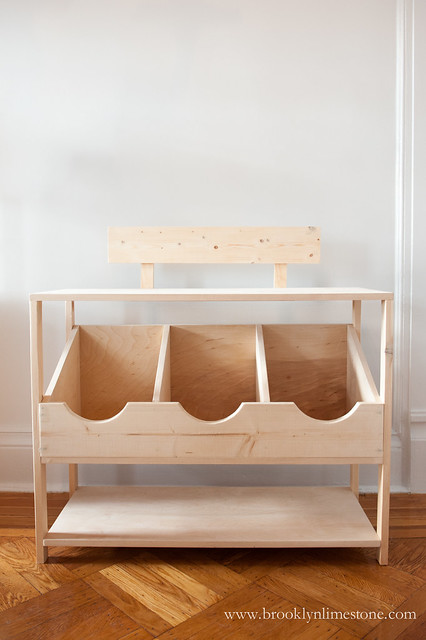
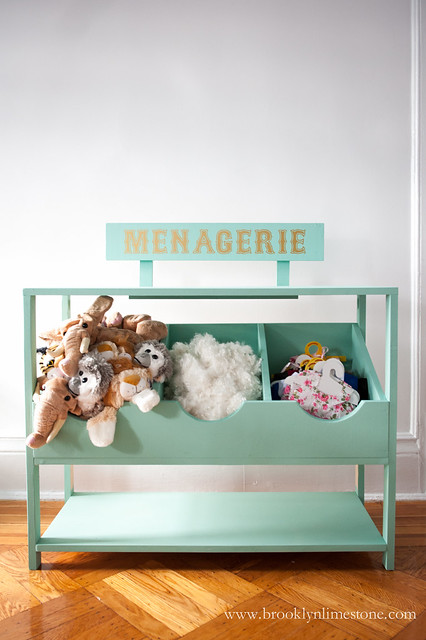
Baskets Baskets Baskets: This is the answer to one of the most common questions I get.  How do I keep my house tidy even though I have young kids with tons of toys.  The answer is simply: baskets.  Everything and anything looks better contained. And when it comes to toys, something pretty and texture like these rope baskets are just lovely to look at in any setting. They also make post play clean up a breeze.  Kids can easily throw everything into a basket without much assistance. If you don't have kids, they also work really well for blankets, storing throw pillows, laundry, towels and pretty much anything that looks sloppy sitting on the floor.


Skincare Organizer: This little 5 compartment storage bin is my personal solution to makeup/skincare products I like to have on my bathroom sink counter without looking like a pile of junk.  It holds a surprising amount of stuff but doesn't take up too much room and is easy to clean.  When it starts to overflow, I know its time to purge.


Old School Label Maker: I know I've mentioned this before but its the best 10 bucks I've ever spent on anything organization related. I use it A LOT and I don't really know how I went this far in my life not having one.  No need to charge it or download it or find batteries - it at the ready whenever you need it.  And each little role of tape lasts a shockingly long time.  Great as housewarming gifts too! Everyone needs one.


Silicone Toilet Brush: Okay so maybe this isn't strictly organizational so I'm cheating here but I have to profess my love for a toilet brush somewhere and this seemed like the most logical list for it.  First off, it's footprint is TINY - much smaller that the typical toilet brush you probably already own.  Second it works just as well if not better. Third its made of silicone so "nothing" sticks to it if you catch my drift.  This is the better mousetrap.  Get it.


Refrigerator Organizing Bins:  Ok this one is definitely in the "nice to have", not "must have" list but if you have been following organizing tik tok or the Kardashians you know that perfectly organized fridges are the hot things to have in 2021.  I admit I haven't quite gotten to a point where I would share the content of my fridge with the world but these little containers (they come in lots of different shapes and sizes to suit just about anything you eat so make sure you figure out what you need before ordering) make eating and cooking a visual treat!


So there you have it!  Do you have any organizational favorites you want to share with me? I'd love to hear all about them!


Nightstand turned into a Mini Dining Room Sideboard

Anyone else living in an old home knows it's a constant battle to find storage for all of the things we need for modern living that our Victorian friends seemed to manage without. Especially now with little kids, the storage space we built during our renovation just never seems enough.  So when said goodbye to our high chair, that spot seemed like the perfect spot for a small sideboard to hold all those little odds and ends that you need for diner parties.


The only problem was that spot on the wall was quite narrow so something ready made just did not exist. So instead of a traditional sideboard, I had to get creative with what would fit in that spot.


Off I went to Lowe's, my go to source for all things DIY.  Not surprisingly, they are also a great source of storage and organizational products (I could spend all day just in that aisle alone). They have everything from bins to pegboards to hooks to closet systems so I knew they would have a solution.


Turns out a small chest or in this case, this beautiful Chevron nightstand was the perfect fit. (I was really hoping this beautiful curved pine chest would fit but alas my wall was too narrow.) Aside from being the exact width I needed and visually lovely, it also has two built-in USB ports on the back which was a total surprise.  I can create a nice charging station right here down the road.


My first step in turning this nightstand into a dining room storage piece was lining each drawer with shelf paper.  I used Duck shelf liner in their 'Grey Gate' pattern - one roll was more than enough. Aside from just looking a little cuter, the plastic lining helps things stay in place when opening and closing the drawers.  Once that was in place I turned to my new obsession; bamboo drawer organizers. Specifically I used these three sizes: 15x6 , 9x3 and 9x6. They turned this open drawer into a custom space for every little small item I use for dinner parties including fancy cutlery, cheese markers, votives, napkin rings, appetizer knives and a corkscrew.  The stackable nature of these trays makes the most of every inch.  It also makes finding these items and putting them away a breeze.  The only problem with them is once you get a few, you will want to fill every drawer in your house with them. It's completely addictive.


The second drawer I used for my linens and placemats as well as some of my favorite wood slice trays. Amazing what can fit into a tiny space when well organized. I thought I might need some of these drawer dividers (which I'm also obsessed with) but everything fit perfectly without me lifting a finger so score!


And finally I saved the third drawer for appetizer plates and serving dishes.  Things I didn't use everyday but wanted to have easy reach to.  I could have stuffed this drawer with a lot more but by purging a bit, I was able to store my favorites safely and with plenty of space.  The shelf paper really helps here keeping each little dish in their place without any extra effort.


Even though this chest is relatively small, it has made setting up for guests so much easier and has freed up some precious room in my cabinets that help me stay organized day to day.


Disclosure: This post was sponsored by Lowes but all opinions expressed are my own.  Thanks to wonderful sponsors like these for supporting my projects.


Saving Memories with Legacybox

Call this digital nesting or just plain being smart.  Some of my most prized possessions - old photographs - are finally off the shelf and safely backed up.  After years of wanting to get this task accomplished, I can finally cross it off my list! I had been researching the various companies for years but Legacybox seemed to be at the forefront both for ease of use and great reviews.


The process could not be easier.  Legacybox sends you a kit which is essentially a box you can load your various outdated formats into  - VHS, Super8film, slides, photos, whatever. You return the box and LegacyBox turns those bits of ephemera into digital form and send the whole thing back to you in a few weeks.  The only hard part is going through all those old photos without spending a week reminiscing and calling up old friends to laugh about the good ol' days.


I had expected the task of culling down to just 250 photos was going to be difficult but I was wrong. Back in the days when dinosaurs roamed the earth (pre-digital cameras), there were a lot more bad photos thanks to not having that handy preview feature so even in the many rolls I had taken over the years, it was easy to find the ones worth treasuring.  Most importantly we are able to preserve in time some beautiful old photos that were well on their way to being damaged by sitting in shoeboxes! Like some of these beautiful black and white portraits that were practically falling apart...


Or just some generally adorable images of me being cute.


Excuse my sap but having some of these treasured photographs secured in a way that not only I can appreciate but my kids will be able to share gives me the warm and fuzzies. It also makes me feel like I really accomplished something with very little effort on my part. Double score!


Want to preserve your own digital memories?  The first 25 readers will get a 40% off coupon with the code "LIMESTONE".  Click here to grab the deal. 


disclosure: This post was sponsored by Legacybox but all opinions expressed are my own. 


DIY 3 Bin Stand

You've seen the patisserie and the dress up boutique.  Closing out the series is simple but functional 3 bin storage unit that That's My Letter built to house the make your own stuffed animal activity.   This piece worked perfectly for its purpose but will make a great piece of toy storage going forward.  Want to build your own?  Pop over to That's My Letter for free plans and details.


PretendPlayParisStands_BrooklynLimestone (3 of 7)PretendPlayParisStands_BrooklynLimestone (7 of 7)

That's a wrap for the DIY party stands.  I hope you've enjoyed seeing more of the details that went into each. I'll be eternally grateful to Jaime for sharing her talents with me and making this party such a success.


Oh Great Crates!

Pretty crates are pretty much magic. Take a pile of toys (or anything else for that matter) and make it seem like an artful collection.  Oh crates, I love you most of all!


Materials used: Crate, casters, vinyl letters + paint.  Step by step on how I made this rolling storage crate at Snapguide.

Clutter Control Play Space | Die Ugly Toys Die

This week's installment of Die Ugly Toys Die is a little bit different. Instead of a DIY toy, Besotted Blog is sharing a simple clutter solution for a toddler play space that has adult sophistication.  Added bonus?  No tools required! (ok, so maybe one of those ikea wrenches but those don't really count as tools, do they?)


Gorgeous light? All white? Room to play?  This is a toddler play solution any mother could love! Pop over to Besotted Blog to see more.


Want more inspiration?  Check back every Thursday for a new installment or check out the past weeks' features below.


I have lots of other great #dieuglytoysdie projects to share with you for this summer series - I hope you love them as much as I do.  Want your project to be featured?  Drop me a line.

Real Life in the Living Room


We truly live in our living room.  This is where we hang, where we entertain, where we play.  So the challenge of incorporating the things that come with having a baby and now toddler into this space was a bit of a challenge.  Before I had her, I did not realize that toys were more for the parents than the child. I suppose that is an obvious point but it had just never occurred to me.

LivingRoom-2
for the renovation obsessed, here is the scary before

After a bit of struggle, I think I've finally struck a good balance between function and form.  While it's not magazine perfect by any means, it still feels open and organized while having lots of entertaining options to keep Aggie busy. Sure it feels like a Toys R Us threw up in here sometimes but at least it only takes a few moments to put things away.

The sideboard behind the couch is stuffed with baby accessories and pajamas since dragging her up and down the stairs to change is less than ideal.  Maybe this will change as she gets older and can dress herself but for now it works for us and no one is the wiser.

Repurposed Play Table | www.brooklynlimestone.comPlay Kitchen Renovation | www.brooklynlimestone.com

You already know about the play table and play kitchen.  She uses that every single day so having it where she can get the most use of it just makes sense.

Finally the toy chest - the biggest concession by far - was definitely a good decision that took me far too long to make.  This book and toy storage piece holds so much stuff, is the perfect height for "self serve" and clean up, is not terrible on the eyes and is a steal at less than $100.  Before I broke down and got this piece we were using these 3 Sprouts storage bins which are also great for just toys but I wanted her to be able to grab books as well.

What do you think?  For those of you with one living space and kids, what are your solutions for a happier life?


Annual Photobook Complete

Checking off a personal to-do, our 2014 year in review photo book is here. It's one of those things I push myself to get done by February because I know if I wait, I'll be tempted by good weather and it will fall the wayside. Starting with travel books in 2009, 2010 and 2011, it then morphed into more of a  year in review in 2012. Last year's book was supplanted by an baby's first year book since that made the most sense. Now back to a year in review style. I love having the years most important photos in physical form.


Once again I used Blurb to make my annual book - mostly because I've used them so many years now and I want the book to be the same size. Up until now I've been really pleased with the company but this year was a little bit disappointing. The book is still a good quality piece at a reasonable price but they made two changes this year I wasn't crazy about. First they changed the software which made it much more annoying to line up photos correctly. Since I use a lot of collage layouts that was a lot of spot checking and editing to get it right. Second, they changed the size slightly so now its a tiny bit longer which means the books don't line up perfectly anymore. A small annoyance but I might just look for another supplier next year. Any suggestions?

DIY Hidden Jewelry Organizer

A few weeks back I shared my master bedroom update that included this artwork hidden jewelry organizer I had built out of a few pieces of wood and hardware.  It's working really well for me so I thought it would be a perfect time to share how to build your own.

Hide your accessories behind your favorite photo with this easy to make DIY Hidden Jewelry Organizer

The measurements for your jewelry organizer will vary depending upon the type of artwork you choose to face it but its very versatile.  I would suggest pulling out the jewelry you would like to hold so you can size the shelving for what you are going to store.  The technique can be used to hide other things as well like a collection of ties, a television, a circuit box or a thermostat.

Materials needed to make a Hidden Jewelry Organizer: 


  • Artwork
  • Wood boards (as long and deep as you would like to make the box) 
  • A piece of plywood large enough to serve as the back of the box
  • Cup hooks
  • Wooden cabinet knobs
  • A piano hinge,
  • L brackets
  • Wooden dowel and screws.

How to make a Hidden Jewelry Organizer


1. Determine where on the back of the artwork you can attach your piano hinge. Using this as a guide, choose your measurements for the box that will be hidden by your artwork. If possible, make the box 1 inch smaller than your artwork to better hide it.
2. Cut 2 boards each for the width and length of the box. Screw the resulting 4 wooden boards together to form the frame of the box.  Use L brackets inside the corners for additional support (optional).
3. Cut and attach the plywood back with screws.
4. Measure the inside width of your box and cut wood boards to form shelves. Add as many or as few shelves as you would like depending upon your collection. To create shelves for earrings, drill pilot holes approximately a half an inch apart all along the boards.  If you have larger earrings, you can adjust this measurement as needed.
5. Using screws or shelf pins, attach the shelf inside the box as you would like.
6. Add cup hooks, cabinet handles and dowels as needed.


Hide your accessories behind your favorite photo with this easy to make DIY Hidden Jewelry Organizer

That's all there is to it.  The deeper the box, the more you can store!

I'll definitely be making another one for Aggie's big girl room to hold all her hair bows and other little doodads.  It's a great way to have those little items accessible without adding to the visual clutter.

For more Great DIY Organizational Ideas check out this DIY Mail Center!


DIY Mounted Kraft Paper Roll

Chalk this project to something I would have done a long time ago if I had realized how easy it would have been.  It took no more than 10 minutes and cost less than $10.  What could be better?

DIYKraftPaperRoll_www.brooklynlimestone.com

Materials
  • 2 eye hooks
  • 1 wooden dowel that fits through the eye hooks
  • 12 inch roll of kraft paper (or is it craft?)
  • 2 metal washers - optional
  • 2 small screws - optional
Instructions
  1. Hand screwed the the eye hooks into any wooden surface (I used the back of a door but you could easily modify this for wall mounting by using a wooden board)
  2. Measure the space between the eye hooks and cut the dowel to slightly larger length
  3. Optional: Add the washer and screw to one end of the dowel
  4. Thread the dowel into the eye hook and hang the paper roll from it
  5. Optional: Screw in the other washer + screw 

It's great for everything from lists to love notes.  Hung in a more prominent place it would make a great menu board or office to do list as well. You can easily make this smaller or larger depending upon the paper roll you are using by using larger eye hooks and a thicker dowel.

Easy right?


Agatha's First Year Baby Book

For the last few years, I've been putting all of our favorite photos in an annual book.  It started out just with trip photos (20092010, 2011), morphed into more of a whole life recap including pregnancy shots, parties, etc. (2012).  While I haven't quite gotten around to putting together a 2013 version, I did finish Agatha's first year baby book which is a pretty good recap of our year too.


I won't bore you with a look at every page (its 100 pages long) but it's made up of lots of photos, a letter to her about how excited we were to finally meet her, a highlight page per month and a "stats" page for her first year.

Maybe because I was so fanatical about keeping up with it all year or I realized it's way harder to put together than I imagined but I'm so happy to have this done. It makes me feel very organized even though I'm so far from it!

I haven't been keep up with as many photos or notes for her second year of life so we will be back to a consolidated photobook for all of us in 2014.

You can see the whole book here:


Mentioned: Family Circle Magazine

Thanks so much to Family Circle for including a couple of my organizational tips in their January issue. So many other great bloggers contributed making it especially lovely to be in such good company.

BrooklynLimestoneinFamilyCircleJan2014

Ironically enough, the mag hit newsstands just as was sharing my scary mess of a craft closet so maybe not the best timing to reveal my dirty secrets.  While I'm not an especially organized person, I like to think I sometimes have some good ideas to share.  So to redeem myself, please enjoy some of my past organizational triumphs.

DIY Door Gift Wrap Organizer 
Vertical Mail Center
Organize your paint stash with free labels
Junk Drawer Overhaul


Help! I'm trapped in the closet...

Ok, so when I say trapped I mean it figuratively but I still am feeling a little overwhelmed with cluttered storage spaces lately.  I'm pretty good with keeping open spaces tidy but I'm definitely an "out of sight, out of mind" type of person - once its in the closet, I let it all loose.


You can really see the ghosts of posts past in here: back of door gift wrap organizer, balloons from Agatha's Christening party (that are still semi filled with helium 7 months later!), left over molding from the nursery, vintage camera display boxes that I made and can't bear to part with etc. 

It's gotten so bad that I don't even like opening my beloved craft closet anymore!  Dastardly!  I don't want to throw most of this stuff away because I do/will use a lot of it.  At the same time, if I can't find what I need, its kind of pointless having it in the first place, right?

I know so many of you have gorgeous, perfectly organized closets so I'd love to hear your best organizational tips.  In other words, please share and inspire me to be less of a behind closed doors slob.


My favorite organizing tip.

The always fabulous Centsational Girl asked I share an organizing tip for the new year but thanks to a bit of poor planning on my part (aka complete denial that I would go into labor on my due date), I didn't get her the info in time. So I figured I'd share it with you in case you are in the organizing mood.

OrganizationalTipBrooklynLimestone

Ok so perhaps this isn't an earth shattering organizing secret but I happen to love a repurposed item that doubles as storage, don't you?

Want more organizing goodness? Take a look at last years junk drawer overhaul series.

What is your favorite organizing trick?

Away we went.

One of my (many!) shortcomings I'm trying to work on this year is being more organized. So it comes as no surprise to me that I never shared the finished photo book for 2010 that showed up months ago. (In some twisted corner of my mind, I was feeling quite accomplished for having completed the book just 9 months into the year!) Anyway, it arrived and I can now call my annual travel photo book a tradition as I stack it neatly on top of the 2009 edition.


I guess its time to work on the 2011 edition, huh?

Curious whats inside the pages? Flip through the 2010 version, 2009 version or read what I thought about the book's quality here.

Follow @ Instagram

© 2007-2020 Brooklyn Limestone. All Rights Reserved. Privacy Policy
Back to Top