Thanks to Michael aka
Captain Obvious for the following questions:
"Where did you learn your photography skills? Do I photoshop them? Can I convince you to do photography and photoshop lessons via your blog ala Pioneer Woman?"First off, I had no idea who
Pioneer Woman was until this mention. What a cool site! How have I not seen this one before?? Thanks.
Second, my photography skills are just
meh. I'm just tricky enough to post mostly my better photos. Trust me, I have a lot of clunkers. But I'm happy to share my tips with you if you would like to give them a try.
I'll put your fears to rest now that I won't be giving any technical photo
mumbo jumbo. I've read a lot of photography books and they all seem to explain the bits and
bobins that go into great photos but I
dont remember 99% of it. And while I'm sure if I ever could remember these things, my photos would drastically improve, I seem to have a mental block about it. If you are into all of that, I highly recommend reading
Understanding Exposure as it quite useful.
Ok, on to the tips. Do you have your pencils sharpened? Note pads ready? Sitting on the edge of your seat??
If my sarcasm isn't already obvious, I'm joking. None of my tips are earth shattering or even something you haven't heard before. But these are the things I think about when camera in hand. Hope you find them helpful.
1. Look with a critical eyeYou are standing in front of something that you want to capture. Now take a look at it. A really critical look. Is this REALLY a good photo? Sure there might be the most beautiful thing in front of you but is there also a dirty vagrant, a hot dog cart and another ugly building in the shot? Imagine the printed photo of what you see in front of you. Is that really the best way to portray your subject? (For illustration purposes, I'm going to use some poor saps photo I found on the
internet. No disrespect dude...I hope you never see this)
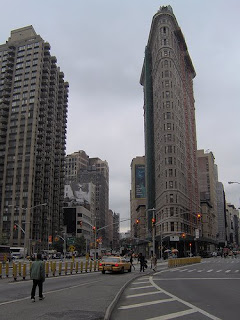
This isn't a terrible photo per
se but it could be so much better. All you have to do to make it better is to see what is ruining the shot and take it out of your photo. So you may not be able to make the vagrant step aside or the hot dog business to close up shop but you can can make them disappear in other ways like shooting the building closer up.
2. Think of the light!Without going into the specifics (that I really don't understand), the difference between good and bad photos is most often the differences in light. You want enough light so that the image is clear but not so much that its all blown out. Keep in mind a camera needs more light to make something look clear than your eye does. So that fruit bowl in your kitchen may look totally fine to your eye but comes out like complete crap in your photo. Generally speaking, you always need more light when you are shooting inside. So open the shades all the way, bring your subject to a sunny window, turn on all the lights. Do whatever you need to do to get some light up in here. Which brings me to my next tip...
3. Flush the FlashThis may seem
counter intuitive after I just told you to add light. But you want to have natural light falling on your subject...not a harsh bright light washing out all the details in your photos. PLEASE, for the love of all that is holy - just permanently shut down your flash. There really is never a good time to use it unless you are documenting a crime scene or some other need where pretty photos aren't really a priority. If you like the look of my photos, you can just forget about ever using it because I don't. Really, never. Well, maybe by accident but
that's it!
4. Use your camera's settings
I don't care what kind of camera you have. Chances are, you have more than one setting or
doo-
hicky knob to turn. Try it out. What could you lose? Those settings are there for a reason. A proper photographer would tell you to shut all those
pre-settings off and play with the manual settings. Sure, I've done that. Its not all its cracked up to be. I'm sure the manual settings are the way to go if you really know what you are doing. But if you are like me and only have a few seconds to capture something that is happening, you don't have the time to remember all the science. So I use my
pre-settings all the time (after I turn off the flash, of course). I also play around with the manual settings
occasionally too but only when the pressure is off.
5. Take lots of photos
Again, this probably seems
counter intuitive to #1. I just told you to really pay attention and not to take a bunch of photos that aren't worth their digital card space. Well, that still hold true. What I'm saying is once you have done steps 1-4 above, then take 2 or 3 or 10 of the photo you want to capture. Take it with different settings and in different angles. Take one standing up and one laying on the ground. One close up and one far away. If you have the time, snap away. After a while, all of these photos of the same thing will teach you a few things. One it will teach you what sort of photos you prefer so you'll naturally progress in your skills. It will also teach you a little bit about how to get the best shots in various circumstances and you'll use that info again later.
That's pretty much it. Nothing too exciting as you can tell. Sorry, I didn't have much in the way of illustrative shots. Pretty ironic to have a photography post with fewer photos than a post about a nightstand but hey, I'm not a very good teacher.
As for
photoshop. Yes, I do use it to tweak certain things when I don't do the best job with the camera. I find the best photos don't need
photoshopping. Or if they do, they need something really minor like a tiny crop or level adjustment. I don't really have any lessons or tips for that. Generally if I have to use
photoshop, its probably not a great photo to begin with.
Hope that helps. If you have any other questions, just ask.


