Continuation of
this post.
Sorry this is such a disjointed couple of posts but I was jumping from the box room (finishing the nightstand) to my office (finishing the painting) so its a little bit of a chaotic timeline.
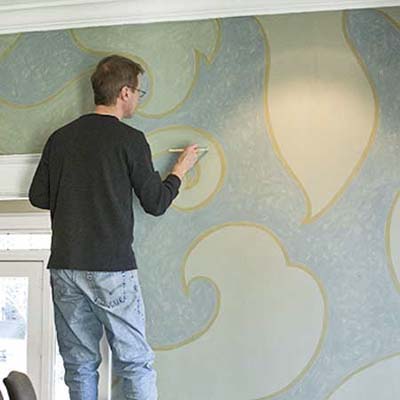
As I was saying, I decided I would try my hand at a little painting with some supplies I had laying around. My original idea was of a woman's legs from the knees down, hanging off a pretty bench. (She would be wearing fabulous shoes of course!) But I needed a photo to work off of and despite some serious internet searching, I never found just the thing I was looking for.

But while I was searching I found this photo of an incredibly chic woman jumping over a sidewalk curb. So off I went putting a grid down on the canvas.
After finally locating a pencil (how is it possible I only have 1 pencil in my entire house??), I sketched it all out.

As you might be able to see, I made a big mistake when I was sketching it on the grid by starting one row down. I realized it too late which required me to redraw the lower half a little bit more squished than the original photo. I'm pretty sure this model was 6 feet tall or more based on the proportions in the photo - so I don't think it was a fatal flaw.

I thought about using colors instead of keeping with the black and white...but lets face it, this was already way beyond my pay grade. So I just stuck with black and white and shades of gray.
At this point, it was late so I called it a night on both the painting and the nighstand. Sunday was a new day.
On Sunday morning I got back to work on both the nightstand and the painting. Pointing my attention back at the nightstand, I got back to work in the box room. I had already decided to mimic the look of the mirror by painting it black, now I wanted to go the extra mile by applying a silver leaf effect to the top. Using
this kit I had picked up at Dick Blick on Friday night, I started by reading the instructions 3 times.
 I think the gold antiquing kit is pictured above. The version I bought was just the plain old silver leaf that came with the silver, the sealer, the size and two brushes. Don't know what those other two bottles would hold but I guess thats the antiquing stuff.
Have to be honest here, the kit sort of stunk. The instructions were too vague but more importantly the included brushes were just aweful. I made the mistake of using them against my better judgement and it made for a messier than necessary job. Next time, I'll make my own kit than you very much.
Anyway, I applied the sealer to the dry black paint. (not pictured, there isn't anything to see as the sealer is clear). As per the box, I had to wait two hours for that to dry. So guess where I went next? To my office to finish the painting.

And before long, it was all done. I initialed and dated the corner, wraped the edges in black gaffers tape and set to dry.

Pretty sure the Met won't be calling anytime soon as it has some very distinct flaws in perspective and shading but I was pleased with it. I think it will make a nice addition to the gallery wall I'm planning. I just might try to another painting if I can find a photo that strikes me again.
After the two hours are up, I go back to the box room and the sealer is still really wet. I leave it for another hour until my impatience gets the best of me and I pull out my hair dryer. It was finally dry but when I ran my hand across it, it was bumpy. I suspect this was the fault of those aweful brushes. So I did a quick sand down. I think I made the right call on that but who knows.
Finally, its ready for a coat of adhesive "size" (aka glue)

See how terribly that brush distributes the glue? Ugh. Here is where it gets tricky. The glue goes on white and dries clear. As per the box, the wet to dry time is 60 minutes. But they don't explain at which point you should apply the silver paper. You just sort of have to wing it to determine when it is tacky but not wet. Easier said than done. I ended up waiting almost the entire 60 minutes and it was still wet to the touch but getting much more clear. I'm still not sure I picked the right point but it was a guess just the same.

So I covered the top in overlapping sheets of silver leaf. Not fun to work with really. Its extremely thin and fragile and never landed exactly where I wanted it to. Sorry, no in progress shots as my hands were covered in glue and silver leaf mid install. I let the leaves sit there for a few before using a proper brush to wipe away the excess. Im so glad I didnt use those aweful included brushes because they are so stiff, they would have certainly ruined all my hard work. After the first pass, I had a few larger broken areas which I "patched" with extra pieces.

Let me tell you - what a mess!!! That silver paper flies everywhere.

There are still small imperfections in the finish where the black shows through but I'm okay with those. I'm less happy with how the very edges aren't even. I could go back with some more size and silver and see if I can even it up. Or I could just leave it and let the imperfection read as old world charm. I couldn't decide so I opted to think a little more about it before I covere the whole thing in an acrylic sealer and attach new hardware.
So while I was thinking it over, I repainted the gray chair I plan on using in the guest bedroom. Looks so much better black, don't you think?


I still haven't decided what to do about the nightstand in a weeks time, I'll be posting the as-good-as-its-going-to-get completion of the guest room.
Until then, here are
the silver leaf photos and
sidewalk jumping lady photos in case you couldn't take my long winded explanation of it.
Sheesh, I certainly do ramble on and on.