


Disclosure: This project was done in partnership with Lowes but all opinions expressed are my own.
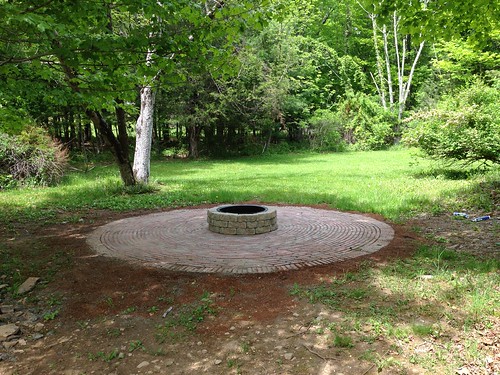
Woo-hoo! The country cottage's circular firepit patio is finally complete! It was a bit of a battle as we had some obstacles in the form of bedrock at the patio site and an extra cold spring and rainy weekends but it got completed in July and I'm so happy to share it. Let's start at the beginning.
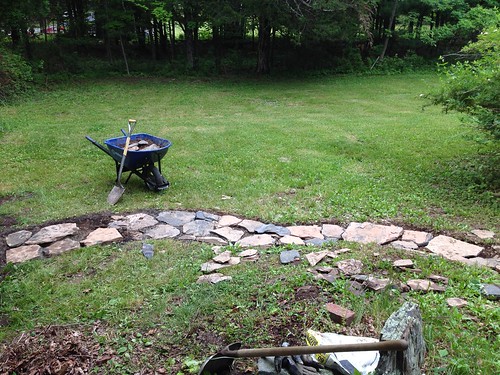
This is the before we installed the Firepit Patio:

After the spot was excavated, there was a fair bit of jackhammering and rock moving required to get that round hole dug deep enough to start laying the base for the firepit patio. Once the prep was done, the rest went a bit easier and you could really see the outdoor area take shape. (I can take no credit for any of that backbreaking work as I was very much pregnant and fully okay with using that an excuse to just shout design suggestions from the sidelines.) We used a layer of landscaping fabric to prevent weeds followed by pea gravel, sand, the stones and then polymetric jointing sand to hold the whole thing together.


Thanks to some super wet weather, we had to let that dry for several days before it felt stable enough to proceed but it did harden eventually. Finally it was time for the firepit - the center of the action at any outdoor gathering with us! My brother and sister in law smartly used some of the rock broken up from the excavation to lay a windy stone path from the house to the patio. Waste not, want not!
Once the hard work was behind us, the fun part of outfitting the firepit patio with just the right pieces to make the most of this backyard space was ready to start. In went Adirondack chairs - painted black to give it a more updated look.
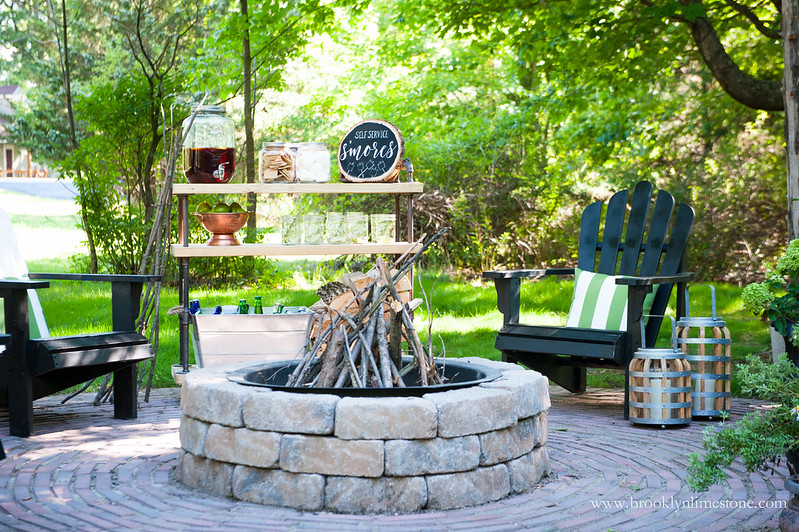
After deciding we wanted to be able to move the lighting for different types of events, these allen + roth string lights were strung from cedar poles anchored into cement bases.

Lumber and pipes were used to make this s'mores fixings cart which I'm kind of obsessed with. Once again, on wheels to make the most of it's function as BBQ cart, firewood caddy or outdoor bar cart as needed.


Finally off to the side we created another zone with a picnic table and a hammock for extra mingling and relaxing spots.


I just love this space so much! Maybe it's city life but the raging fire is the ultimate entertainment for all ages. I wish it were in my own backyard but I'll just have to plan to stop over a little more often.
Firepit Patio Resources
Red Charcoal Holland Concrete Patio StonePaver Base Sand
Polymeric Jointing Sand
Landscape Fabric
Flagstone Firepit Project Kit
Adirondack Chairs
Picnic Table
Striped Pillows
5 gallon buckets
Quickcrete
Bulb String Lights
Love DIY? Check out all of my DIY projects!

this space is so dreamy! looks like the perfect hangout!
ReplyDeleteYour firepit is gorgeous!
ReplyDeletesummerdaisycottage.blogspot.com
This space looks amazing!! So beautiful!! Great job!! xox
ReplyDeleteVesna - Home Chic Club
Oh my! It's absolutely beautiful! I love how you designed the circular space and laid the bricks.
ReplyDeleteLOVE LOVE LOVE!!! Worth every bit of that back-breaking work, and I adore the S'mores station!
ReplyDeleteHope Miss Aggie and her new baby bro' are both well.
This looks incredible! What a special space! I just love the stones!
ReplyDeleteCan you tell me the diameter of the sitting area? Looks great!
ReplyDeleteIt's about 15.5 feet. Hope that helps.
DeleteI would love to know what you used for the actual pit and where i can find that. What is the container that holds your wood? Thank you!
ReplyDeleteThe fire pit stones and metal pan came as a kit - there is a link to the specific item we used above.
DeleteThe container that is holding the wood is a galvanized box my sister in law already had. I'm afraid I don't know where she got it.
This is amazing. I was wondering about the cost of the total project, not including the chairs and furniture/ accessories. I'd love to do this in my backyard, but have no idea where to start in relation to the quantity of material to buy. Could you let me know the size of the patio and the amount of bricks and bags of sand were needed for that size project, that would be wonderful. hbmarcig@gmail.com.
ReplyDeleteI don't have the breakdown handy but including everything including furniture, a grill, the table, etc. was total was about $3K. The only thing Im not including in that number is the cost of having some heavy machinery move the bedrock stones and items we purchased at other times like the plants.
DeleteSo, there is a list of the products used for this project, but nothing that shows how many brick and rock it took. It would be nice to have product amounts in order to reproduce this.
ReplyDeleteHi, can you let us know approx how many red patio stones this took? Tara.marie.hart@gmail.com
ReplyDeleteI couldn't give you the precise number because I refuse to count but we ordered 1300 bricks and didn't use them all. Ill ask my brother if he remembers how many we have left?
DeleteThis is a wonderful space and very similar to what I have in mind for our home. How did you get power to the space?
ReplyDeleteJust an outdoor extension cord run to one of the poles from the house.
DeleteSo do the lights just plug into each other so that you only need one electrical source?
DeleteYes that's right - we daisy chained them and used one outlet to power.
DeleteJust came across the fire pit post. Your "s'mores fixings cart", do you have any plans made for this? Also your wheels choice, do you have any problems driving this over the yard to the fire pit? Looks like those wheels are more for solid flat surfaces.
ReplyDeleteNo I don’t have plans but if you search for pipe shelves, you will find tons of tutorials.
DeleteThe wheels are just for positioning. We didn’t have bigger wheels laying around so these were used but you could definitely put larger ones if you wanted to wheel it around more.
Hello, this is gorgeous! I live in a remote sandy (no grass whatsoever & do not ant any) watershed between creeks in the CO high country. Is there any reason I couldn’t lay the pavers flat on their wider side? To save $ ? Thank you for your response & guidance. Love your work.
ReplyDeleteDo you have directions on how you made the fixings cart from lumber and pipes. Also, what kind of a liner did you put inside the firepit.....it looks like black plastic, which I know can't be correct, but wondered what it was and where you got it.
ReplyDeleteWow, that is really amazing looking... makes we want to get outside and do the same myself... can just imagine sitting around that on a summers evening, or even in the winter, roasting marshmallows, making smores... thank you for that article!!
ReplyDelete