Master Bedroom Update with Shutterfly

If you recall from a few months back, I had the pleasure of meeting Martha Stewart and being inspired by some of the more creative uses of Shutterfly products in décor at the home of Kevin Sharkey.  As part of the project, I received an assignment to update a bedroom with my favorite items. Inspired by our recent trip to Paris, I thought it would be a great opportunity to incorporate some new elements into our master bedroom.  I wanted these items to be uniquely personal so it was the perfect opportunity to make the most of the custom capabilities Shutterfly offers.

Master Bedroom Makeover with Shutterfly | www.brooklynlimestone.com

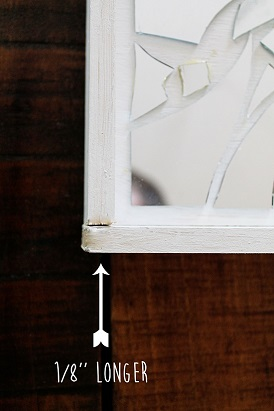
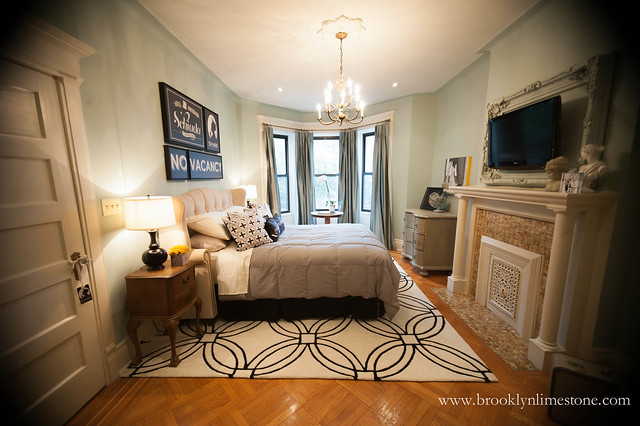
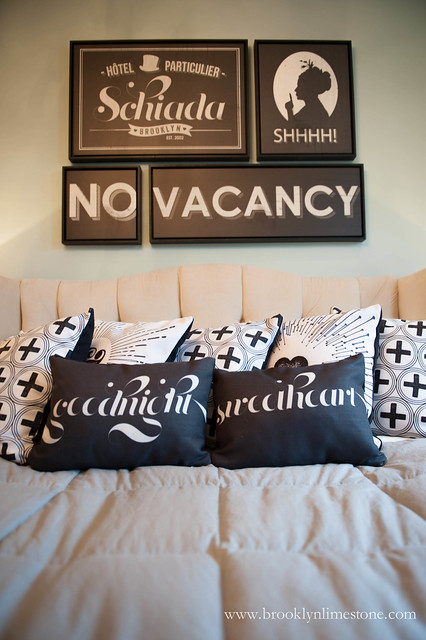
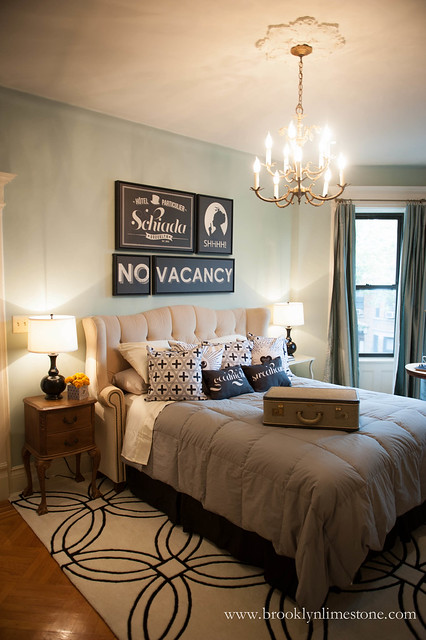
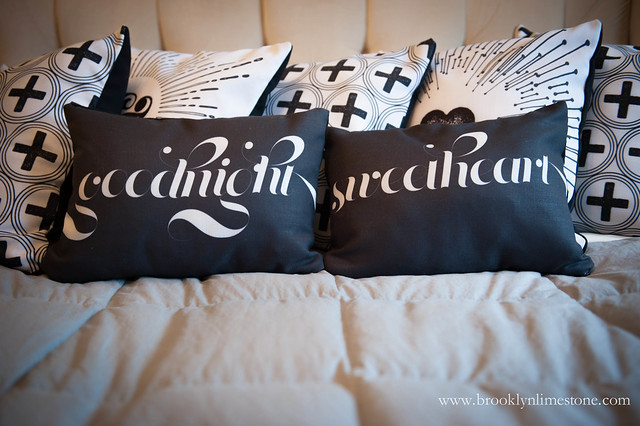
I started where all bedrooms should start – the bed.  First, I hung stretched canvases– including one designed with our last name along with coordinating pieces inspired by old hotel signage.  Then I added a little collection of pillows in black and cream shades – a Swiss cross pattern, and a starburst ampersand and heart design. I finished off the pillows with two petite versions that read “goodnight sweetheart.”  Just the right amount of softness for me without being too over the top.

Master Bedroom Makeover with Shutterfly | www.brooklynlimestone.comMaster Bedroom Makeover with Shutterfly | www.brooklynlimestone.com
Master Bedroom Makeover with Shutterfly | www.brooklynlimestone.com

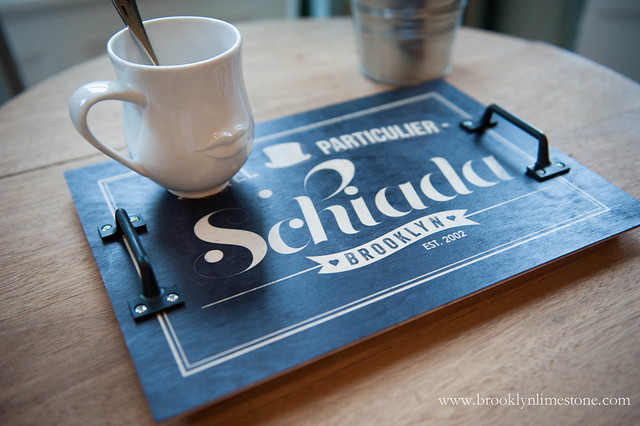
Then using the wood wall art and window hardware, I used the same artwork over the bed to create a small tray perfect for delivering a steaming cup of coffee.

Master Bedroom Makeover with Shutterfly | www.brooklynlimestone.com

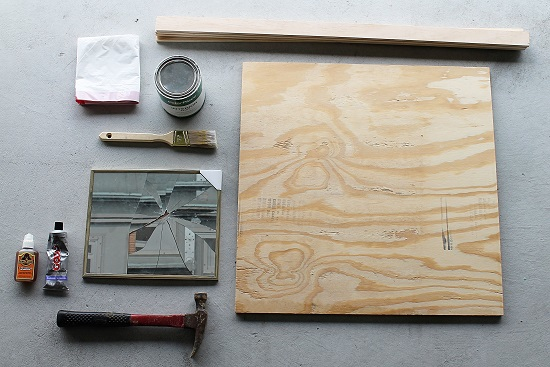
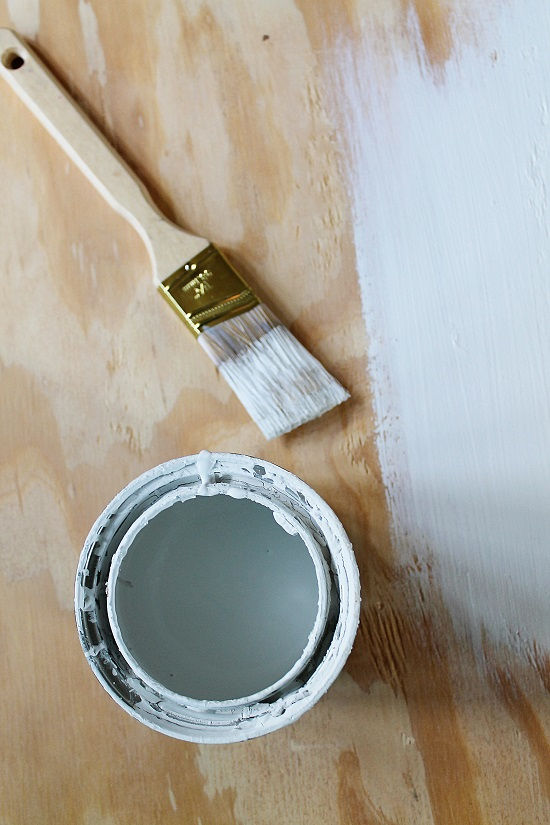
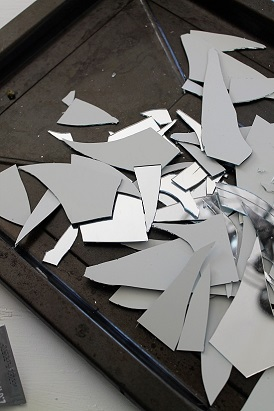
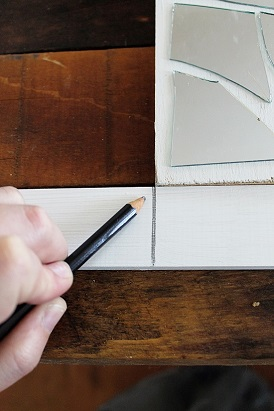
Naturally I can’t complete any project without breaking out the power tools so I had to make something functional.  Using a larger wood wall print, wood boards, hardware and a piano hinge, I constructed a jewelry armoire that serves as art when closed and an organizer when open.


Master Bedroom Makeover with Shutterfly | www.brooklynlimestone.com


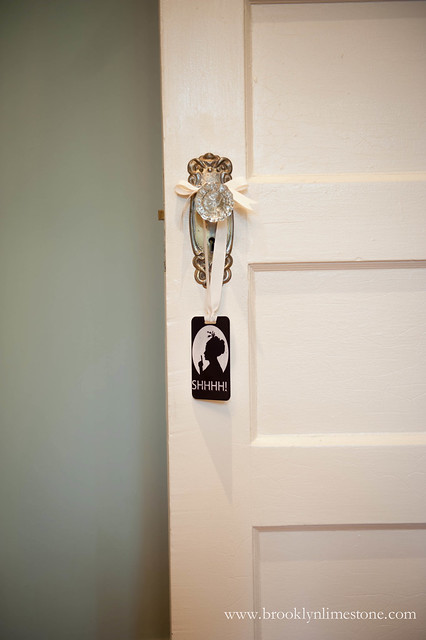
Not to be forgotten were a few finishing touches to complete the look.  A woven blanket featuring the same Swiss cross design used on the pillows is at the ready for cold nights.  Added to that, a luggage tag and length of ribbon became an easy-to-recreate do not disturb door hanger.  A photo cube designed upside down with the same patterns used in the pillows is repurposed into a vase. Finally my favorite photo from the trip in an acrylic block for the mantle.

Master Bedroom Makeover with Shutterfly | www.brooklynlimestone.comMaster Bedroom Makeover with Shutterfly | www.brooklynlimestone.com

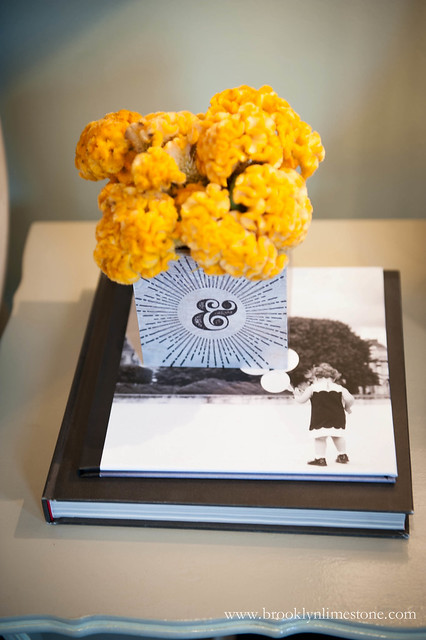
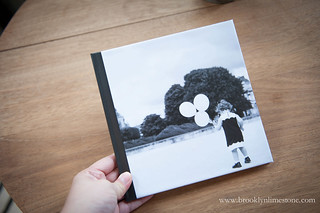
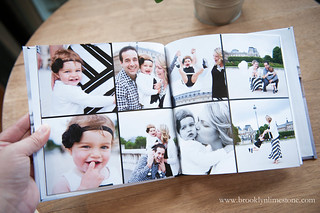
And the perfect finishing touch: I compiled my favorite snapshots from our Paris trip in an 8x8 hard cover book. This was super simple to make because of the ready-made styles offered (more than 250 to choose from!) as well as the functionality to easily pull photos from just about anywhere into the book. I love keeping this photo book, full of happy memories of that amazing trip, next to my bed. Having this keepsake of special moments is so wonderful, and I can’t wait to reflect on our amazing trip with our little girl when she’s older.

When I unwind in the evening now, in my Parisian-inspired bedroom flipping through this photo book and admiring our new decor, I am instantly transported back to The City of Lights!

I had so much fun designing these custom pieces but now that I’m done, I can’t stop thinking of new ideas!  This could be very dangerous.

Disclosure: This post was sponsored by Shutterfly and Martha Stewart Living Omnimedia but all of the opinions expressed are my own.

DIY Mounted Kraft Paper Roll

Chalk this project to something I would have done a long time ago if I had realized how easy it would have been.  It took no more than 10 minutes and cost less than $10.  What could be better?

DIYKraftPaperRoll_www.brooklynlimestone.com

Materials
  • 2 eye hooks
  • 1 wooden dowel that fits through the eye hooks
  • 12 inch roll of kraft paper (or is it craft?)
  • 2 metal washers - optional
  • 2 small screws - optional
Instructions
  1. Hand screwed the the eye hooks into any wooden surface (I used the back of a door but you could easily modify this for wall mounting by using a wooden board)
  2. Measure the space between the eye hooks and cut the dowel to slightly larger length
  3. Optional: Add the washer and screw to one end of the dowel
  4. Thread the dowel into the eye hook and hang the paper roll from it
  5. Optional: Screw in the other washer + screw 

It's great for everything from lists to love notes.  Hung in a more prominent place it would make a great menu board or office to do list as well. You can easily make this smaller or larger depending upon the paper roll you are using by using larger eye hooks and a thicker dowel.

Easy right?


Steal this Idea: Outdoor Mirrors

Its Friday (yippee!) - time for another Steal this Idea* feature - a tiny show of appreciation for a well executed tutorial.


Today's installment comes from Brambleberry Cottage who shares such a simple smart idea, it's close to genius.  This might be the best idea I've seen for reusing old windows and adding visual interest to an outdoor space at the same time.

By adding mirrors to old windows and pointing them toward something pretty, she added a feeling of space and light to her backyard.  If I ever have a bigger backyard with real trees, I'll be stealing this idea big time. She hung these on a barn but they would be really fabulous on a fence in an urban backyard as well.

postscript: *When I say steal, I really mean borrow nicely and give proper credit!


**If you have an idea/tutorial you would like me to consider for a feature, email me. I'd love to see!

Must Have: Kraft Paper 3 Ways

As part of the Lowes Style Saturday event, I thought it would be the perfect time to share one of my absolute favorite items sold there - kraft paper.

Cheap and endlessly useful, its the kind of thing you can never have enough. There are just so many ways to use it in crafting, entertaining, organizing and decor but here are 3 of my favorites.

KraftPaperDoorMountedGroceryListWM|www.brooklynlimestone.com
A 12 inch roll + a wooden dowel + a few pieces of hardware make the ultimate door mounted kraft paper roll that is perfect for everything from grocery lists to love notes.  Total cost is less than $5 bucks and it takes only a few minutes to install.

KraftPaperWineTastingBuffetWM|www.brooklynlimestone.comKraftPaperWreathWM|www.brooklynlimestone.com
A larger roll can be drawn on directly to let your guests know just what they are being served AND makes clean up a breeze. Or use that very same paper to make giant flower wreath for a few cents. Once again, both of these projects are super quick ways to inject a little extra style in your home for almost no cost.

Any other kraft paper hoarders out there?  What is your favorite way to use it?

StyleSat_Invite_BrooklynLimestone

Hope to see you this Saturday!  If you haven't already reserved your spot for a free design consultation, do it now - space is limited!

Disclosure: This post was sponsored by Lowes but all opinions expressed are my own.

You're invited: Style Saturday @ Lowes

If you are in the area this Saturday, I'll hope you'll join me at Lowes where I'll be sharing an easy DIY project and giving out free design consultations for all of those who sign up!  It's part of their Style Saturday series and I'm very excited to be a part of it.

StyleSat_Invite_BrooklynLimestone

Got a design problem that you'd like some free help with?  Want to learn a few favorite tips?  Feel the urge to roll up your sleeves for a quick + easy DIY project to take home with you?  Or maybe you just want to come say hi?  It's all happening this Saturday at the King Plaza Lowes.

I'll be there from 10am to 2pm so I hope to see you there.  Feel free to bring photos of your space and your toughest design queries - I'm ready!

Space is limited so email PublicRelations@Lowes.com right now to reserve your spot!

Curbside Find Coated

Remember this curbside find?  You can all breathe a sigh of relief that the inside was completely empty.  No jimmy hoffa, no pirates gold, nothing.

But a few weeks in the elements wasn't doing it any favors. So I pulled off all the warped pieces, filled in with wood putty, sanded it all down and gave it throughout coating with oil exterior paint in a cream color called Linen Canvas.

CurbsideFindChestPainted (1 of 2)CurbsideFindChestPainted (2 of 2)CurbsideFindChestPainted

The paint needs to fully cure before I do anything else to it but I'm kind of digging the cream. Naturally I can't leave it this bare but I'm scratching the plan of ripping it all apart. It's a fun piece just as it is and will be a great spot to store tools and outdoor cushions as well as serve for extra seating when we have guests outside. It just needs a little decorative love.  My favorite kind! More to come...

Obsessed: Garden String Lights

I think I've had putting these bulb lights up in my backyard on my to-do list for ages but I still haven't gotten around to it. Mostly because I don't really want to deal with the hassle that I know it will be to get the wires and poles run up properly to hang them.

Add this to next years summer to-do list.  Until then, I'll just keep pretending to be productive by pinning them on my urban oasis | city backyard board.


I know a lot of you have these lights in your backyard.  Any suggestions for the best brands to buy? The best way to hide the ugly plugs?  The best way to string them high and evenly?  How often do you actually turn them on and enjoy them vs. maintaining? Would love to hear your thoughts!

Won't you be my neighbor?

Being the real estate stalker that I am, I can't help but fall a little in love with this renovated revival home that is done entirely in blacks and whites. There is something peaceful just looking at it.

more details can be found at the corcoran listing 

Granted, it wouldn't be quite so peaceful once I added my own mess but I have to give a slow clap to the designers here. Makes me want to break out the brush and repaint my whole house white!

What do you think?  Could you live in an all white house?

5 Easy Tips for Better Toddler Photos with any camera

This is one of the topics I get asked about a lot! There is no more challenging photo subject than a fast moving toddler with their own ideas of what they want to do -which are usually the exact opposite of what you want them to do! So unlike other types of photography that allow you time to set up properly and then retake a photo several times until you get it right, there is no such grace in toddler photography. Much like my other inexpert guides, I am still very much a student in this subject but it seemed worthwhile to share my tips just the same.

5 easy tips for Better Toddler Photos | www.brooklynlimestone.com /></a></div><br />
These tips are specifically for the photographer who is alone with her children, is not in a perfect photoshoot setting and has limited time. So in other words, most parents every single day.  When I am using one hand for keeping my child from falling down the steps and the other to keep her from eating the brown thing she found on the floor, it doesn't leave much in the way for artful styling and steady camera holds.  That doesn't mean I don't want to capture some of those these moments as best as I can. So here are my best tips at doing so beautifully.  Added bonus they apply to every kind of camera – dslr, point & shoot or iphone included.<br />
<br />
<div style=

1. Focus on the Eyes. 
 So maybe you are thinking, ‘No duh! Of course I’m focusing on the face.’ But I often find that when Agatha is moving at what feels like the speed of light, I can’t quite get her whole face in focus. If I can just get sharp focus on her eyes, the photo is still good. Of course there are compositions when you don’t want to focus on the eyes but just remembering this little tip has saved many a photo from the electronic trash bin for me. Iphone shooters – don’t rely on the auto focus – tap on the screen to get the right spot.

2. Get in close. 
 Especially useful when the house is a mess, the baby’s hair isn’t combed and she is wearing something less than photogenic, getting in tight will crop out lots of the distractions that can ruin an otherwise good photo.

3. Get near the light. 
 Unless you are outside, there is never enough light when a toddler is in full roadrunner mode. Without going into the mechanics of how a camera works, I’ll simply say that the more light you have, the faster any camera will be able to capture the shot. So that means you need light – generally more than you think you’ll need. The easiest option is to move your child near a sunny window. Short of that, turn on the lights, open the drapes, open the front door and do whatever you have to do to add more ambient light into the frame.

4. Be ready. 
 If anything is for certain, it’s that you will have half of a microsecond to get that shot of your toddler doing {insert cute thing of the day here}. Simply put: Don’t put your camera away! As much as possible, leave it within arm’s reach so you are ready when the magic happens.

5. Go low, look up. 
 I’ve seen the tip to get down low often so this one is a no brainer but there is a second important part of this tip and that’s to make sure your toddler is looking either straight into the lens or up. I find that when I do get down low to take a shot, my daughter naturally tends to look down which doesn’t make for the best photos. So be sure to do what you need to do – jangle keys, tape a favorite toy to the top of your camera – to get those peepers looking at you and not at your feet.


That’s it. I hope you find these tips helpful in improving your own little munchkin snapshots. Have any other tips you’d like to add? Please share.

Fractured Mirror Art {Contributors Column}

The following was written by Victoria Major, repurposing contributor for Brooklyn Limestone.


Image 8-6-14 at 7.24 PM (9)

Thank god I’m not the superstitious type, because my next Upcycle project includes breaking mirrors. The first mirror actually broke entirely by accident-- and then it spawned into a whole project where I needed to break more mirrors to finish what I started. It’s probably the kid in me, but there is something totally satisfying in the crunch of that glass breaking. While a stress ball would be cheaper, it’s just not as fun.

Image 8-6-14 at 7.24 PM (2)Image 8-6-14 at 7.24 PM (6)

I've had this rather large empty wall in my dining room that for months now has been nagging me for something to be hung on it. It wasn't until I finished this project that I realized it was made this wall, not only does it bring a little modern edge to the room but it brings in beautiful broken light in the morning and evenings. If disco ball light doesn't make you happy, I don't know what will.

It’s a fairly cheap (about $19 dollars) and easy project, but it requires patience and safety since it requires working with broken glass. Here’s what you will be needing:

Image 8-6-14 at 7.24 PM (4)

Materials:
  • Piece of plywood
  • Framing sticks 
  • Thrift store mirrors, the cheaper the better!
  • White Paint
  • Paint brush
  • Industrial Glue
  • Hammer
  • Thick garbage bag
  • Rubber gloves
  • Baking sheet
  • Brown craft paper
  • Finishing nails
  • Wall hanging kit
  • Jig saw*
Image 8-6-14 at 7.24 PM (10)

Begin by painting your plywood and framing sticks. I chose to do mine in white but you can choose which ever color you like best. 


While it's drying prep your work space by covering it with craft paper. This will insure easy and safe clean up later. Remove your mirrors from the frame and place them into your garbage bag, close it tightly. For my first breaks I stood on a ladder and dropped my mirrors on to the cement floor of the garage, from there I used the hammer to create any smaller pieces I needed. 

Using your gloves dump your glass pieces into a metal baking sheet and jiggle it back a forth a little bit. This will move the smaller shards to the bottom of the pan. Start assembling and gluing your shards into the pattern you want on your plywood. Allow for proper cure time before moving on. 


Image 8-6-14 at 7.24 PMImage 8-6-14 at 7.24 PM (5)

For my frame I cut two of my framing sticks the same length of the top and bottom. For the second two sticks I cut them an 1/8" longer on each side. Nail them in place with some finishing nails and touch them up with some remaining paint. 

Image 8-6-14 at 7.24 PM (3)Image 8-6-14 at 7.24 PM (11)

Install your wall hanger on the back of your plywood and hang for the world to see. 
Image 8-6-14 at 7.24 PM (1)

Summer Snaps

This is it people, the last few weeks of summer.  Make the most of it.  Here is what I've been up to...

foolproofcolorsforawhitekitchenMaking the final edits to my updated one day guide to Brooklyn.  Feel free your favorite Bklyn thing to do/see/eat/buy that I might have forgotten.
attentionallhalloweenloversI'm not sure who is having more fun with all this @habausa play food - me or Aggie?
Thinking about Halloween |   Having far too much fun with Aggie's HABA play food
Yesterday might be the first day of summer but it's officially here now. #babytackleswatermelon #summer #extremebabyledweaningBrooklyn Limestone's version of the NY Public Library Lions. #bigcatstillreigns
Enjoying too much watermelon |  Confirming I still have a cat

I'm also working on a few other projects I can't share yet but I hope you'll love them. You know how much I love fall but if summer would slow down just a tiny bit, that would be great!  I'm not done with it yet.

Enjoy the snaps?  Make my day and follow me on Instagram.

Good Idea: Keep your Outdoor Tablecloth from Blowing Away

I keep a Pinterest board of good ideas for all the random tidbits I find along the way but occasionally I find something extra simple + clever that is worth a share.  Spotted in the July/August issue of Martha Stewart was this little tip about adding a few window cleats + elastic cord to your picnic table to keep your tablecloth from blowing around.


Um, why didn't I think of that?  This photo is using a paper roll instead of a tablecloth but it could be easily tweaked to accommodate. Added bonus: napkins can be tucked under the elastic cord to keep those from becoming airborne as well.  Genius!

Got a good idea to share?  Don't be shy - drop me a line.


Follow @ Instagram

© 2007-2020 Brooklyn Limestone. All Rights Reserved. Privacy Policy
Back to Top