You have already seen most of the work in prior posts which you can access at the end of this post, but it was time to do a complete post with sources.


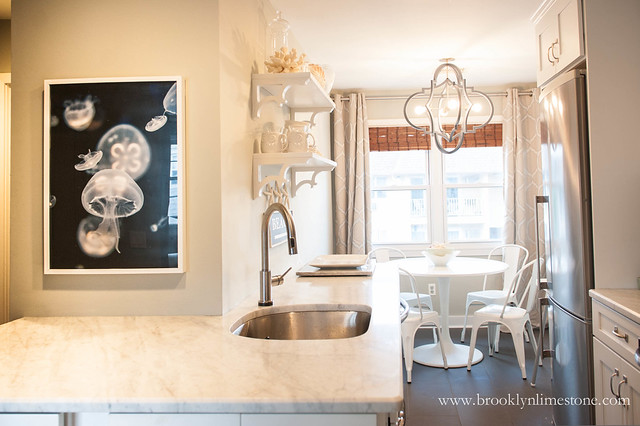
 As you might remember, we wanted to keep the renovation tab down so we decided to keep all the plumbing exactly as is. The only real structural change to the room was tearing down half the closet and opening up the space on the left. Essentially we made a galley kitchen into a L-shape – giving us more counter space, a more open feel to the room and allowing the light from the kitchen window to spill into the rest of the apartment. After that it was just finishing work. We went with stock cabinetry and affordable tile flooring to offset the splurge of the marble countertop. The room is so much more open and clean looking now – I really love how it all turned out.

 It does need a few more accessories (perhaps a bigger shell or wood bowl under the jellyfish print?) and some artwork in the seating area (maybe a new whale chalkboard or some old window art?). I haven't found just the right thing but I'll stumble upon something eventually.
  All the details are below (or at least as much as I could remember) but if I missed anything or you just have random question, do not hesitate to ask.
Coastal Kitchen Source List
Cabinetry: Ice White Shaker via Forevermark. We ordered through a local dealer but they are widely available and can be purchased online. Base cabinetsCountertops: Carrara Marble
Cabinet hardware: Window Sash Lifts in Satin Nickel
Backsplash: Mother of Pearl Hex Tiles
Kitchen Faucet: Delta Faucet Trinsic Touch2O in Arctic Stainless
Open Shelving: Corbels
Wall Color: Glidden Jade Frost
Table: Ikea Docksta
Light Fixture: Custom designed and built by Pickett Furniture (read about it here)
Chairs: Tolix Knockoffs Tolix knockoffs
Fridge: Summit Counter-depth Bottom Freezer
Drapes: JC Penney Turning Point in Lead
Runner: Target Striped Runner
Artwork: Jellyfish photo print by moi
To see more of the Coastal Kitchen Makeover check out:
Coastal Kitchen CountertopsCoastal Kitchen Cabinets
Coastal Kitchen Paint Colors
Coastal Kitchen Flooring