Showing posts with label trash to treasure. Show all posts

Country Cottage: Simple Rustic Dining Room

You've already seen the country cottage living room makeover (which definitely qualifies as one of my favorite rooms evah!) so it's time to see the other side of this room which is the dining space. With budget a serious constraint, the decision was the keep this room simple and more cabin like. That way it served as a counterpoint to the living room as well as a calm, open entryway to the whole house.


Renovation was essentially a clean up job. Pulling up carpet, sanding and staining the rustic existing floor boards and the whole space getting a fresh coat of white paint. The dining table and chairs are hand me downs from my sister in law's parents so absolutely free. The indoor herb garden was put together with a few scraps and some hardware and make a great live addition to the room.  The one splurge was this antler chandelier which gives the whole space a fun element while still being clean and modern.


When budget allows, I think these copper chairs along with some drapery and a sisal rug will finish off this room beautifully. I'm trying to convince them a shiplap wall would be pretty rad too but it's a bit of splurge and I think they are all DIY'd out lately.  But plenty of time to work on that in future years - until then, this is a lovely spot to entertain (and my sister in law is an amaaaazing cook and baker so I always look forward to meals here)


Must Make: Painted Brick Books

This idea is so simple and fun but I somehow never discovered it before.  Painted bricks all lined up to look like a book collection.  Love it!

You can buy them ready made ...

...or DIY your own collection.  Get some tips from the video tutorial from how to eugene  or a pictorial one from KU Alum.

Wouldn't these make a fun outdoor accessory?

The Lazy Man's Vertical Pallet Garden

Gasp!  I'm in violation of the code.  The code that states that every home blogger must have at least one pallet project in the archive.  Evidently after 8 years, I had to be stopped or suffer the consequences. I argued with the authorities that I really had tried.  [See exhibit A: The Problem with Pallets]  After that experience I learned I don't much like pulling apart pallets (and they don't seem to like it much either).  I argued "free" wood isn't really free if you have to spend the better part of the day and risk life and limb for it.  But alas, they won out and I've been sentenced.


Ok, I'm kidding but it's time I joined the pro-pallet side for just a minute. Why? Because I stumbled upon the fastest, easiest, no tools required way to turn a discarded pallet into a vertical garden.


Seriously, I really don't like working with pallets but when I ran across this curbside a few months back, it called out to me.  My husband dutifully carried it back for me (Isn't he handsome?).  How could I use it without having to wrestle it apart?  Ding ding ding!


I bought these uber cheap hanging pots and hooked them right onto the boards.  No tools.  No mess. No time at all.  And it holds a heck of a lot of plants.  More than I imagined.

The plants will need a little time to fill out and I will eventually paint the wood so it looks like one cohesive piece but I just had to share.  I know I'm going to love having this wall garden in our backyard. So anyone who has an extra pallet laying around or just wants to make the most of their limited outdoor space - this project is for you! 

DIY Halloween "Boofet" Sign

This week is crunch time as we do all the last minute prep for our party in those spare after work hours we call free time.  This little project (using the same technique I used for my vintage trunk) took only a few minutes to make and I think it will be a fun add to my Halloween collection.


I used a board I cut from those dastardly pallets, text I printed out, a ballpoint pen and white gelly roll pen. Just trace over the paper onto the wood using the ballpoint pen as hard as you can to leave an impression on the wood. Then remove the paper and follow that impression you just made with the white pen. Done!


The spelling of boofet vs. booffet is up for debate but I'm cool with it. Now if I could just finish the rest of my to-do list before that first trick or treater arrives on Friday, Ill be all set.

Trash to Treasure: Graphic Bulletin Board

Wrapping up this trash to treasure series is Chelsea from Two Twenty One. Aside from just being a fun, well designed blog to follow, she shares some great easy projects anyone can put to use without the use of power tools or much expertise. And she has a card catalog! Today she is sharing a goodie featuring coral print fabric (yea, a woman after my own heart!)


********


Hey, Brooklyn Limestone readers! I'm Chelsea from Two Twenty One, where I share my latest home improvement projects, furniture makeovers, crafts, recipes, home decor and season decor ideas. I'm stopping by to share my fabric covered faux nail head trimmed cork board with you. Get. Excited.

I made this from a cork board I already had, some fabric from JoAnn Fabric, and thumbtacks from Walmart. The total cost was around $12.


This is what I started with-- a perfectly good, 12+ year old cork board.

I started by ironing the fabric because no one likes creases on their fabric-covered cork board. Then I sprayed the cork board with adhesive before laying the fabric on top. I smoothed out the fabric with my hands so there weren't any bubbles.


Then I started to push in the thumbtacks. (Push it real good.)

After all 200+ thumbtacks were in place and my fingers felt like they were going to fall off even though I did this over the span of a couple days, I hot glued the excess fabric onto the back of the cork board.


The original cork board hung horizontally but after deciding to put it on a small wall, I moved the little hangers so it could hang vertically.


Note: If you plan on taking on the self-torturous task of pushing 200+ thumbtacks into a cork board I suggest spreading it out over a few days. Your fingers will thank you.


Trash to Treasure: Workbench to Entertainment Center

Today's Trash to Treasure is a particular favorite. Not only because it was so simple but because the styling here totally makes something ordinary to extraordinary. Meet Jilly, one part of dynamic duo Me and Jilly. (Have I mentioned I have a weird fantasy about sharing this blog with a friend because I think it would be a lot more fun to have a partner in blogging crime? Ok, enough about me...lets get to the project!)

********
Hi! I'm Jilly and I blog at Me and Jilly. My best friend Mia started our blog two years ago while she was all hopped up on pain medication after recovering from knee surgery. The next day, after she realized what she had done, she called me up to tell me we had started a blog! And the fun has been ongoing since that fateful August day in 2010.

I'm so excited to be guest posting here at Brooklyn Limestone. I think in my next life, I might want to live in Brooklyn, in Stefanie's Limestone! Isn't it gorgeous?

The project I'm sharing today is actually one of the easiest I have ever done! I basically lucked into it by stalking Craigslist for a good long while, but my persistence paid off. I was on the hunt for a big and sturdy, but slightly beat up garage workbench. Just before me and my husband had to build our own. (which likely would have cost me my marriage) I happened upon the very object of my affection. For $50.


"I'll take it!!" was my quick email to Bambi. "Only if you can get here before the others who want it as well" was what I got back from her.

Since Mia lived only 10 minutes away from the garage where my treasure was being housed, I sent her into the eye of the worst haboob Arizona has ever experienced. Yes, that's a real word that only we who live in the desert are privy to. And yes, this is a real picture from that very day.


After she picked it up, she did have to pull off the road for 30 minutes due to zero visibility, but she made it out alive and delivered it to me the next day. And that's just ONE of the reasons why I love that girl.

I gave it a good scrubbing, then brushed on a coat of Minwax Gelstain in Chestnut. After it was thoroughly dry (which was 10 minutes in the 117 degree weather), I finished it with a coat of clear wax. I absolutely love the way the wax dried into a soft luster with a hard finish.

Total time spent from picking it up in Bambi's garage, to rolling it into it's final resting place in my basement family room was 3 hours. Why can't all my projects be this easy?


I hope this trash to treasure story will inspire you to search Craigslist, yard sales, and/or your neighbor's garage for something waiting for you to give it a little love! I'd love you to come over and say hi at Me and Jilly. There are so many stories, tutorials, recipes and ideas on our blog, and we love to have visitors. See you soon!

Trash to Treasure: Burlap Sack Headboard

Another installment of the trash to treasure series today from Patricia & David Warrington who are co=owners/designers of Karma Flowers (who also run a fun event design blog), a floral and event company. In other words, they live and breathe the design trends in their work so I was excited to see what they would do with a trash to treasure challenge.


******
It seems these days, burlap is turning up everywhere. From bags to shoes to wedding and event decor, and even interior design. We have embraced the trend because it is natural and neutral, durable and relatively inexpensive. Recently, we have designed burlap table runners and bunting for some very special occasions and have also taken to using it in our own home improvement designs. However, we don't always use burlap in it's most common form, which is simply on a fabric roll. Instead, we have sought out companies that use burlap sacks, or cocoa sacks, in their daily business and have purchased them in an effort to up-cycle. Why? Well, for one, it's environmentally a good choice to reuse and re-purpose, but stylistically it creates options. Burlap sacks typically have bold type or even graphics on them. While most are stamped with black ink, we have found others that infuse greens and reds, and even more vibrant oranges and blues. Against the earth toned sack, the colors really pop.

One of our favorite burlap sack projects was our very own headboard. Our young son often sleeps with us and moves and rolls all over the bed, so we knew we wanted something soft above our heads. Additionally, we wanted to maintain a relatively neutral color palette to fix with the muted and tranquil feel of the rest of the room. Rather that just buying a roll of burlap and creating a rather standard piece we turned, instead, to sacks we had recently purchased at a flea market for around $10.

The first thing you should know about true cocoa sacks is that they stink! Two ways to remedy this is to simply leave them outdoors in covered space for a day or so and let the fresh air to it's magic. The smell may not entirely lift, but it will with time. If you are a bit more adamant about removing the smell, you can soak the sacks in warm water. We suggest leaving them in the water for a couple of hours and then again, letting them air dry, While some burlap is machine washable, this is not recommended for burlap sacks that are not as tightly woven and might significantly fray.

While your burlap sacks are getting a bath, you can begin on the headboard structure. We used a 4' x 8' sheet of 3/4" plywood. A standard size king mattress is 76" wide. We decided to make our headboard 80" wide, in order to allow for a 2" overhang on each side. This accounts for a plush mattress cover or bedspreads. The height is strictly an aesthetic decision. Ours is 40" tall to give you an firm measurement.

You will also need upholstery foam (enough to cover the width and height of the plywood but you can piece several together to achieve this) and spray adhesive. When you are ready to affix the foam, spray a generous amount of spray adhesive onto the plywood. Carefully, place the foam on the plywood with roughly a half inch overhang of foam over the wood.

The next step is to lay batting, at least a foot longer and wider than the foam, out on a flat surface. Flip the plywood and foam over so the foam is lying on the batting. Take one size and fold it up and over onto the plywood, stapling from one end to the other. Repeat the process for the opposite side of the structure than the one you started with. Then repeat for the remaining two sides, being sure to pull extra tight and tuck neatly in the corners.

Once you have selected the sacks you wish to work with and they are clean cut the backs of the sacks off, but do not discard. Keeping in mind type and pattern, lay out the sacks with the graphics in the pattern you desire.

Now you must "sew" them together in order to create a piece of fabric large enough to cover the surface of your wood and foam headboard. Here's a secret. Neither one of us can sew using a sewing machine {learning is on my to-do list} so we elected to hand stitch the bags together using twine.


The twine kept with the natural feel of the burlap and was thick enough to let allow us to do less stitches on each sack. We chose to sew the backs of the sacks together first and use them as the first layer of fabric cover on the wood and foam. This allowed us to stretch the graphic sacks tight around the edges, without worrying that the batting would show through the burlap. Staple the burlap just like you did the batting.

And Voila! You now have a custom upholstered burlap sack headboard. We recommend using french cleats to hang it as they hold weight rather well.


Now sleep tight.


Trash to Treasure: Drop Cloth Bed Skirt

Back again with another great trash to treasure tutorial is the always amazing Besotted Brand (remember her fab DIY sawhorse desk from the last series?). Would you believe she isn't a DIY blogger at all (although she clearly belongs on the dark side with us!) but a talented artist with a fabulous line of goodies for the paper obsessed like me? If you don't already have her blog on your daily visit list you absolutely must add it now!

********


My husband and I recently moved cross country, we arrived safe + sound our bed frame didn't-- it was in dire straits (it cracked in half). Instead of replacing the frame the mattress and box spring have sat on the floor looking like they belonged in a frat house instead of my abode. To remedy this situation on a budget I tried a few traditional bed skirts but they were ill fitting and useless; I even tried a fitted sheet on the box spring which looked equally as unkempt then came my light bulb moment. I initially was going to just upholster the box spring (which I still may do), but I am a decor commitment-phobe so I started with this super easy, no-sew bed skirt project. Let's start with the supplies you will need to get started:


I chose the drop cloth because I wanted a linen fabric, but since I didn't know if this was going to be a d.i.y. gone wrong I figured I would use it as my 'dry run' material. It's great to get the linen look without the linen price. I also chose it because all the ends are finished (they are hemmed) and that would mean I wouldn't have to sew anything. Sharp fabric scissors are your friend, especially when working with thicker cloth. Upholstery pins look a lot like tacks but have twisted bottoms, if you don't know about them, they will change your d.i.y. decor life, you will be 're-upholstering' everything you can get your hands on. The iron you can use or not, I did as I wanted my drop cloth to look crisp.

I wanted this project to be quick + easy, I didn't even bother to measure! I held the drop cloth where I wanted it to hit on the floor (the finished edges on the floor side) and cut it straight across just to where you wouldn't see it when the mattress was on top. I repeated this step on three sides. I had my 'skirt' just touching the floor, because I wanted to give it a really polished look. The upholstery pins twist easily into the wood frame of the box spring and you can remove them just as easily without any visible damage. I just twisted them along the edge of the inner box spring (but far enough back that when the mattress was on top you wouldn't see them). The corners were a little bulkier, but I folded the edge over and added a couple more pins to keep it in place and keep it looking finished.

This is a super easy fix to an ugly box spring and just think of the possibilities! You could do faux pleats, add a sleek ribbon trim border, do stripes or florals or...? You will never buy an ill-fitting bed skirt ever again. You could take this one step further and use furniture staples to wrap the cloth all the way around the front of your box spring for a faux upholstered bed look. I like the idea that I can change this out at my whim. Enjoy!


Trash to Treasure: Tool Chest to Jewelry Armoire

I'm taking a little blog holiday and handing the reigns over to a few talented bloggers for another few installments of my trash to treasure series. Kicking off, welcome Kate of DomestiKatedLife who has a simple and perfect project for all of us flea market hunters. In just a few quick steps she took a garage find to the bedroom beautifully. Pop over to her blog for more great ideas.


********
I'm Kate and I write DomestiKatedLife, I'm so excited to be invited to share my "trash to treasure" makeover today! I bought this beat up old tool chest from the Brimfield Flea Market and it was in pretty horrendous condition, the paint was chipping and the drawers were rusting -- but I saw some potential with the size of the piece and the shallow drawers.


I knew it would be the perfect piece to turn into a jewelry armoire and I scooped it up from the vendor on the spot! After what felt like a million hours of sanding and painting it looked good as new on the outside, and inside I lined the drawers with hot pink felt to keep my necklaces and earrings safe from rolling around on the metal surface.


I use the drawers to organize my very large collection of costume jewelry -- the narrow drawers meant for wrenches are perfect for storing jewelry; it sits in a corner of my bedroom with an old silver tray on top and I keep my everyday accessories hanging above it.


Trash to Treasure: Statement Desk

********************************************************************
Closing out this installment of Trash to Treasure Transformation is the talented Emily of Jones Design Company. She is a master crafter and is kind enough to share some of her tips and tricks with all of us on her blog.


*******************************************************************

Transforming something ordinary {and maybe a little ugly} into something beautiful and useful is one of my favorite things to do. Usually these projects are cost-effective and produce the best results. Take my office desk, for instance.

Here it is in it’s raw state.


image


At that point I was thinking I would add a skirt. But once it was sanded
IMG_3528


primed


IMG_3529


painted {two coats of Sherwin Williams Cashmere paint in Rushing River}


IMG_3537


given a band of white grosgrain ribbon


IMG_3608


and some silver nail head trim


IMG_3611


IMG_3612


I ended up really liking its modern simplicity.


So here she is now living happily in my office.


What was once an pretty ugly desk, is now a one-of-a-kind statement piece {that is very practical, too!}.
Questions about my office? Here are the past posts: office {part one}, office {specifics}, office {rearranged}, painted wallpaper {tutorial}, painted wallpaper {clarified}


enjoy!

Trash to Treasure: What I Love Most Sign

********************************************************************
Today's contributor to this Trash to Treasure Transformation series is none other than Michelle of TenJune. Career woman by day, design blogger by night and baby on the way - she is a woman after my own heart! I might say we live parallel lives if she wasn't so more gorgeous and charming! Her blog features some of the best of the web when it comes to simple yet clever design projects.


*******************************************************************


One of my favorite "trash to treasure" home decor finds all started with some old wooden boards that I found in my basement. With a little bit of creativity and some paint, I turned the boards from trash into a sentimental sign for my living room!
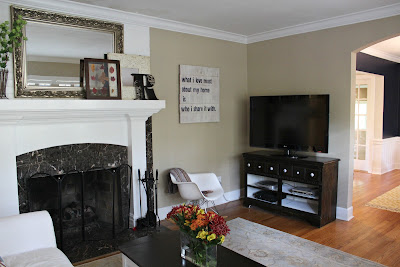

After looking around stores and not seeing a rustic sign that I wanted, I decided to shop my house and make my own sign. What do you know, I found everything I needed to make a rustic wooden wall sign. That means this project was free. I said FREE people! Doesn't get any better than that.


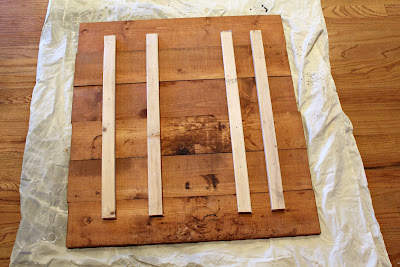
I was thrilled when I found these old wooden boards in my basement- the perfect size, beaten up and rustic looking. Perfect for my project! I simply nailed them together by using support braces on the back. And yes, I do mean me. Prepare to be amazed-- I did this project all by myself.
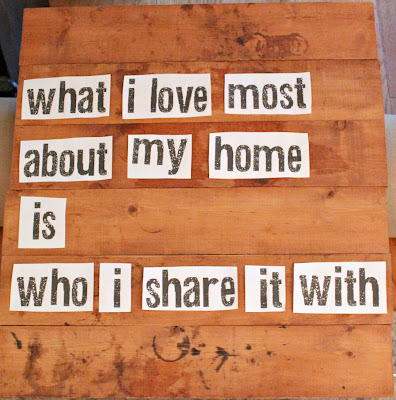
Next up, it was time to paint these bad boys. Before I painted the entire surface of the sign, I played around with the lettering. I simply printed off the quote I wanted to use and moved the words around (ensuring that the font size I choose- 300!) fit the board the way I wanted it to to.
Once I knew the wording would fit, I got to work on painting the entire surface of the sign. I decided to continue my love affair with all things fresh and white in my living room (yes, we've gone through about 97 gallons of white paint! ha), but decided to go with a whitewash effect instead of simply painting the boards. Gotta let that gorgeous rustic character shine through.
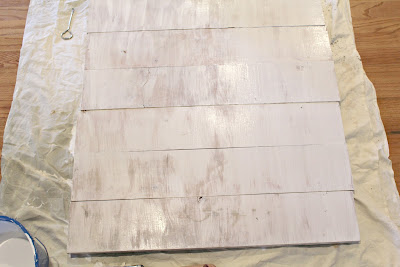
To get the whitewash effect, I simply mixed two parts latex paint with one part water. Then I just slopped it on! The watery paint absorbs easily into the wood, so you might have to do two light coats like I chose to do.
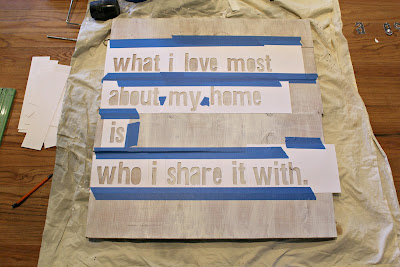
Next it was time to paint the letters. I printed the words onto heavy card stock paper (I thought it would be less resistant to bleeding or tearing once it was covered with wet paint) and then used a craft knife to cut the shape of the words out. The process was a little time consuming, but not too bad... and I promise, I am not a patient person! Then I taped the handmade stencils onto the surface of the boards and used a sponge roller to paint the letters! Easy as pie.


And the final result?


I'm kind of in love. Ok, not kind of.... the piece is maj as Rachel Zoe would say. It's like that wall has been waiting for the sign all along! I chose the navy paint we used in our dining room for the lettering- I thought it would add another element to tie the rooms together.
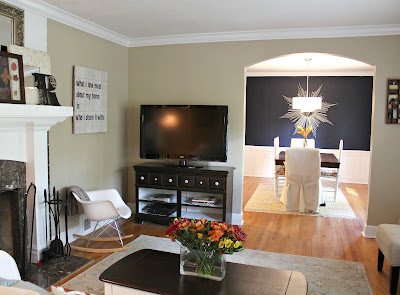


I couldn't be happier with my new sign! And I just can't believe it was FREE! Love.
To learn more about my living room projects and sources, check out this post.

Thanks so much for having me over, S! This blog is a mecca for "from trash to treasure" items, so thanks so much for inspiring us all of the time! : )

Follow @ Instagram

© 2007-2020 Brooklyn Limestone. All Rights Reserved. Privacy Policy
Back to Top